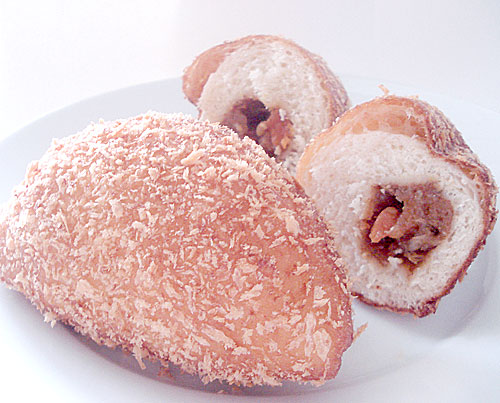
Japanese Curry Bread (Kare-pan)
There's a whole category of breads in Japan called okazu pan. Okazu are the savory dishes that you eat with your bowl of rice at a typical meal, and okazu pan are little breads with savory fillings.
Since curry flavored anything is a hit in Japan, curry bread or kare- pan is one of the most popular okazu pan varieties. It's a bun made of slightly sweet dough, filled with a spoonful of curry, breaded and deep fried. I am not sure how curry bread originated, but I am guessing it was inspired by Russian piroshki (piroshiki is also a popular okazu pan, though in the Japanese version it often contains very non-Russian fillings like harusame, thin bean noodles). Curry bread is sold at bakeries and convenience stores throughout Japan.
Making curry bread is a bit tricky since it's deep-fried. It's easy to make an oily, soggy lump if you fry it too long or at too low a temperature, but if you don't fry it long enough the center part where the dough meets the filling may be raw. My solution for this is to fry it until it's puffed and crisped, then to finish it in the oven. The other trick is to roll out the dough as thinly as you can manage without making it so thin that the curry is going to burst through.
You also have to be careful about the consistency of the curry filling. It's most convenient to start out with some leftover curry, but it has to be reduced down to a very thick, paste-like consistency, otherwise it will run over the dough and make the dough hard to seal. If the dough is not sealed properly, the bun will burst in the oil, which ends up to be quite a mess (oil seeps in, filling seeps out).
All in all, I am not sure I would bother to make curry bread at all if I lived near a Japanese bakery, but I do on occasion get a craving for this very down to earth snack. Try it if you're up for a bit of a challenge. This recipe is adapted from one in an out-of-print Japanese bread book.
Japanese curry bread or kareh pan (karee pan)
Makes 8 to 10 buns
The dough:
- 370g / 13 oz all-purpose white flour (see notes)
- 1 packet, about 7g, regular dry yeast
- 2 Tbs. sugar
- 1 1/2 tsp. salt
- 2 large eggs, beaten, with 1 Tbs. taken out and reserved for the eggwash (see below)
- 160cc / about 5.4 fluid oz.or 5/8th cup milk
- 40g / 1.4 oz (about 2 1/2 Tbs.) butter, at room temperature
The filling:
- About 4 cups of leftover curry or readymade foil-pack curry (though if you're going to all the trouble you might as well start with your own curry)
The coating:
- Bread crumbs - dry panko crumbs preferred
- The reserved 1 Tbs. egg from the dough (see above)
- Milk
To fry:
- Oil (I used peanut oil)
Epuipment and supplies:
- Parchment paper, cut into 10 pieces about 20cm / 8 in cm square (big enough to hold the buns)
- Food processor (useful but not required)
- Pastry brush
- Deep fat fryer or wok or a deep enough pan for frying
- A spatula big enough to put a bun on
- Oven
(Hint: click on each small image to get a larger view.)
Make the dough. If you're using a food processor, put all the dry ingredients into the bowl and whiz to mix. Add the egg (don't forget to reserve 1 tablespoon for the coating/wash), and while the machine is running, slowly add the milk until the dough forms a ball around the blade. Stop and add the butter in pieces, process for about a minute. Take it out and knead it briefly to form a ball.
If you're mixing by hand, mix together the dry ingredients with a whisk (or sift). Make a well in the middle of the mixed dry stuff. Add the egg (don't forget to reserve 1 Tbs. for the coating/wash) and milk into the well, and mix rapidly with your fingertips until you get a rough dough. Continue mixing until you have a ball. Add the butter, cut into small pieces, and knead on a lightly floured surface. The dough will be very sticky at first but resist the temptation to flour your board too much, or the dough will become very stiff. If you keep scraping off the stuck on dough with a scraper and kneading and stretching, eventually the dough will become smooth, coherent and pliable.
Once you have a nice smooth dough ball, put into a clean ball, cover with plastic film and let rise for about 1 to 1/2 hours until doubled in size. Punch down the dough, re-cover and let rise an additional 45 minutes.
While the dough is rising, deal with the curry. Mash down or smoosh/cut up any big bits of carrot, potato, meat etc. Over a low heat, slowly cook down the curry until it's reduce to 2 cups or so, and thick and paste-like. Let cool, then refrigerate until stiff.
Take out the dough, punch down, knead and divide into 8 to 10 pieces. Roll each piece into a ball, and let rest for about 15 minutes under a piece of plastic or a damp kitchen towel.
Put about 1 tablespoon of milk in the reserved egg, and mix well.
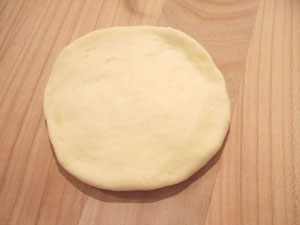 Start forming the buns. With a rolling pin or with your hands, flatten out each piece into a thin round, with the center thicker than the edges. If you're making 10 buns the circle should be about 18cm / 7 inches in diameter.
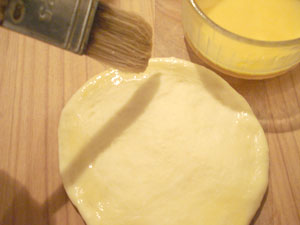 Paint the edges of the circle with the egg wash. Don't make it too wet - the purpose of the eggwash it to act as a glue to form a seal.
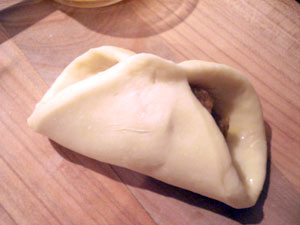 Put a tablespoon or so of curry in the center of the circle. Gather up the opposing edges of the circle above the filling.
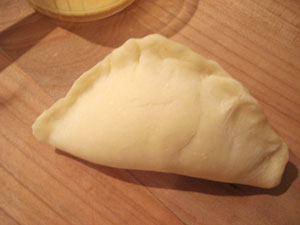 Pinch the dough all around to seal well, like making a dumpling.
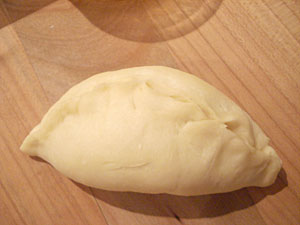 When the edges are all crimped, push the crimped edge down to one side.
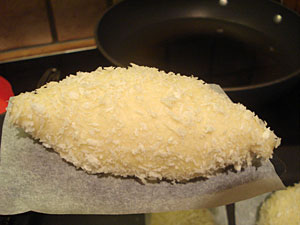
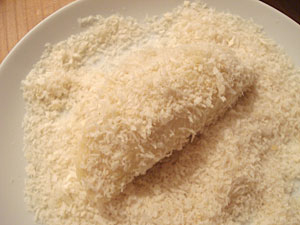 Add a bit more milk to the egg wash and put into a bowl or dish big enough to contain a bun. Dip the bun into the egg wash, coating it on all sides, then roll in bread crumbs.
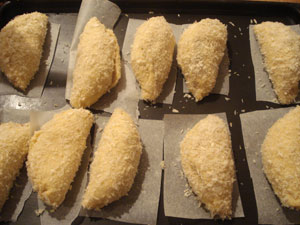 Put each bun on a piece of parchment paper. Leave in a warm place for about 15 minutes - the buns should rise to about 1.5 times their original size.
In the meantime, preheat the oven to 150°C / 300°F. Heat the frying oil to 175°C / 350°F (this is pretty hot, be careful).
If the buns have developed any gaps, pinch them closed.
 Pick up a bun with the paper, with a spatula. Slide the bun, paper and all, into the hot oil. Don't worry the paper won't burn - just scoop it out with the spatula.
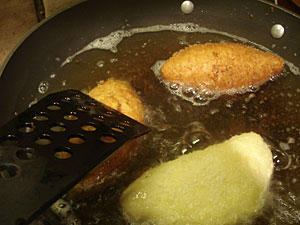 Fry the buns until golden brown - this shouldn't take more than 5 minutes per bun. If they won't stay down just hold them down a bit. Do about 2 or 3 at a time at most - don't overcrowd the pan.
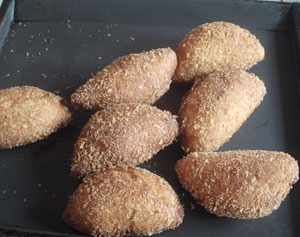 Drain well on a rack or several layers of paper towels, and put the buns on a baking sheet. Bake for about 8-10 minutes.
Serve hot or at room temperature.
Notes
- If you're in Japan use 300g 'strong flour' (kyou-ryokuko) and 70g 'weak flour' (hakuriki-ko)
- You can make curry just for the bread, but making a small amount of curry is a bother, so just plan for a curry meal and reserve some for a later curry bread. (You can freeze the reserved curry as long as you take out the potatoes.)
- Panko or Japanese crunchy breadcrumbs are the best to use for this. They absorb a lot less oil than soft breadcrumbs.
- You can use other fillings, like cooked-down bolognese sauce, leftover stew, or even a stiff custard sauce. As long as the filling is stable enough that it doesn't run over the sides when placed in the center of the dough circle, it should work fine.
- If deep frying doesn't appeal to you, just omit the breadcrumb coating, brush with eggwash, and bake in a 180°C / 360°F oven for 20-25 minutes until golden brown. It won't be the same as the fried version but will still be pretty good.
Submitted by maki on 2007-03-01 15:01.
If you enjoyed this article, please consider becoming my patron via Patreon. ^_^
 Welcome to Just Hungry, where we serve authentic Japanese recipes and more! I'm


Comments
Robert
1 March, 2007 - 18:34
Permalink
Yakitate! Japan
There was an episode of the excellent Yakitate! Japan in which they made Kare-pan. I'm pretty sure it won the competitions, though I could be wrong. I wish they'd release it on DVD with English subtitles so I didn't have to rely on illegal downloads all the time.
Kosetsu
23 January, 2009 - 18:35
Permalink
Re: Yakitate! Japan
You are incorrect, sir... Or at least, Azuma Kazuma, the main protagonist of the show, never made Curry Bread for the competitions. One of his opponents did, however - the CMAP group, during the second battle of the Yakitate!! 9 arc. You might be thinking of the Melon Bread episode, episode 13, during the Newcomer's Battle.
Which brings me to my next point: Maki, have you ever tried replacing the panko that covers each roll with crushed corn flakes? If the Yakitate!! Japan is to be believed, corn flakes would absorb far less oil than any panko, and the texture might even improve. I personally don't know if this is true or not, seeing as how this is my first time even seeing a recipe for Curry Bread, but it's worth trying, right?
yo-ish
25 January, 2009 - 21:58
Permalink
Re: Yakitate! Japan
ya know you can just go on youtube or read the manga!
http://www.onemanga.com/directory (no download no pay website)
anyway I LOVE KARE PAN
oh yeah on the fight with Yukino reverse tarts effect was awesome
fal
2 March, 2007 - 00:46
Permalink
What’s “minutus” ?
What's "minutus" ?
maki
2 March, 2007 - 06:20
Permalink
oops no. x
Hmm...a pretty bad typo I would say. Corrected now!
fal
3 March, 2007 - 01:32
Permalink
Thanks Maki. Great post as
Thanks Maki. Great post as always.
coax
19 August, 2007 - 07:33
Permalink
excellent way to use leftovers
Just stumbled across your site. Thanks for the recipe. Had some leftover Chinese BBQ (char sui) but didn't feel like making steamed buns, mixed it with a bit of onion and some peas. Turned out very good. 美味しい。Can hardly wait to try it with curry.
anon.
7 January, 2008 - 02:21
Permalink
Breadcrumbs
Are there any other kinds that work well?
maki
7 January, 2008 - 21:43
Permalink
panko
panko is really the best for this since they are large, sharp and crisp. You can try other kinds of (plain) breadcrumbs but it won't be the same.
capsai
29 March, 2008 - 21:55
Permalink
Make it Crispier
This is a great and very detailed recipe, thanks a lot for posting it!
As you suggested, this bread tastes absolutely delicious with other fillings as well. I tried making it with Indian Curries and the results were superb.
Erika
27 August, 2008 - 17:56
Permalink
I am so glad I found this
I am so glad I found this recipe! Kare pan was my favourite snack during my years in Japan, and I have been missing it terribly since I have been back in Canada. I will be trying this out as soon as I can ^_^
Silvia
21 January, 2009 - 18:59
Permalink
Re: Japanese Curry Bread (Kare-pan)
Great recipe, thank you for all the useful tips as well!
smile
17 March, 2009 - 03:41
Permalink
Re: Japanese Curry Bread (Kare-pan)
Hi~ thank you for sharing the recipe for kare pan! It tastes very good.
I am wondering, do you know a recipe for baked kare pan rather than fried?
Cheers!
kt
30 May, 2009 - 12:25
Permalink
love it!
i found this site of yours about a year ago, when i was still in japan and anticipating the sadness i'd feel over the lack of my favorite snack once i returned to the USA so i bookmarked it and decided today to try it...and i'm completely satisfied! i'm not sure what i did, i think the dough came out a bit weird so they were more bready than i remember them being in japan but it still hit the spot and satisfied my craving for this wonderful little treat! thanks so much for this! i can't wait to try some of your other recipes too :D this is a great site you've got here!
smilie
8 June, 2009 - 08:58
Permalink
Freeze??
After deep frying can you freeze them and just microwave or put them in the oven afterward?
maki
8 June, 2009 - 15:57
Permalink
Re: Japanese Curry Bread (Kare-pan)
Well you could freeze them and microwave them, but the bread will get a bit tougher, since it's quite light and delicate. You could try wrapping them in foil and warming them in the oven too. But freshly made is the best!
beth
12 June, 2009 - 03:57
Permalink
Re: Japanese Curry Bread (Kare-pan)
Hi, I just wanted to drop a note saying how much I love this recipe. I've been making it for a while now and you should see the look on my husband's face when he knows I'm making it. He is a very happy man, probably his favorite recipe other than pork steamed buns!
Thank you for posting all these yummy recipes, I use them a lot!
kettish
22 March, 2010 - 21:30
Permalink
Re: Japanese Curry Bread (Kare-pan)
Smilie, I'm sure this (like samosas and empanadas, similar concepts from different cultures) would freeze just fine, but the trick is to freeze it BEFORE deep frying. :) I use eggroll wraps for my samosas and puff pastry for my empanadas though, so it might not work as well as I hope it will for you, but it'd be worth experimenting with I think.
J.A.C.
12 April, 2010 - 11:13
Permalink
Taco-pan
I didn't have curry, so I used taco-spiced minced meat instead and didn't deep-fry it since my parents aren't home to help me. And it tasted really great! Can't wait to deep-fry and use curry someday!
Lanthir Calendae
24 April, 2010 - 02:43
Permalink
Re: Japanese Curry Bread (Kare-pan)
I just tried this for the first time, and I must say, I am completely elated! Ephoric! On cloud nine!
I've been missing karepan desperately for the last six years since I left Japan (just ask any of my friends, I often loudly complain about the lack of karepan in the U.S.), and it has made me so happy to finally get to have some again!
The next year or two before I can finally return to Nihon are looking a lot less bleak, now that I can have karepan whenever and wherever I please!
Janet
29 August, 2010 - 04:27
Permalink
Re: Japanese Curry Bread (Kare-pan)
love the site! just wanted to say for all those missing kare pan, i have eaten it quite often here in the states. usually wherever you can find a japanese bakery, they will have it. ive had it in L.A, chicago, and i think it can be gotten in atlanta, to list a few.
maria andriana
9 January, 2011 - 16:11
Permalink
Re: Japanese Curry Bread (Kare-pan)
May I copy your Kare Pan story?
maki
10 January, 2011 - 01:29
Permalink
Re: Japanese Curry Bread (Kare-pan)
Umm... no. Please take a look at the About page for copyright terms.
Baking Beginner
16 January, 2011 - 15:38
Permalink
Dough
I made my dough in a food processor, and it was really really sticky, and didn't rise. I think it didn't rise because the yeast was dead, but is the dough supposed to be sticky? What sort of consistency should it have before I leave it to rise?
maki
16 January, 2011 - 21:30
Permalink
Re: Dough
Dough consistency can depend a lot on how humid your kitchen is when you make it. Try adding the water a little at a time until it reaches the right consistency, instead of just dumping the whole amount in. Or, you can add a little flour afterwards to make it less sticky. If the dough didn't rise, the yeast probably was dead.
sushidushi
8 September, 2011 - 05:51
Permalink
Re: Japanese Curry Bread (Kare-pan)
This looks delicious! I think I might try it with a negimiso filling. I use negimiso, well reduced, as a spread in sandwiches, often with cheese or cold meats. Hardly a traditional use, but delicious!
Also, very much more importantly, welcome back, Maki. I do hope you are now well.
Shari
8 September, 2011 - 20:02
Permalink
Re: Japanese Curry Bread (Kare-pan)
Awesome. As I live an hour's drive away from the nearest place where I can get this, I think that it'll be worth the try. Thanks for the recipe!
Azizah
22 December, 2011 - 07:31
Permalink
Re: Japanese Curry Bread (Kare-pan)
Hi! I was wondering how long you can store the kare pan after making it? I'm house sitting for someone in the next little while and i wanted to make it before hand so that i could have a few snacks when i'm not cooking something. =)
Thank you! And i love your recipes!!!
maki
22 December, 2011 - 16:19
Permalink
Re: Japanese Curry Bread (Kare-pan)
They go stale very quickly, so you should freeze any you want to store for a while, wrapped individually in foil. Just pop them in a toaster oven or oven at 375F/190C or so for about 20 minutes to reheat.
Jamie T
7 January, 2012 - 22:19
Permalink
Re: Japanese Curry Bread (Kare-pan)
Hey,
i was wondering has anyone tried to freeze the dough with the curry in it before you fry them?
and if so can you take them out of the freezer and straight into the frier or should you let them thaw out before you do?
thanks
anon.
26 February, 2012 - 23:13
Permalink
Re: Japanese Curry Bread (Kare-pan)
When I made the dough in the food processor, it turned out too thin???? It never made a dough!!! What did I do wrong????? Because the dough messed up, the rest of it turned out to be a nightmare!!! Please help!!! Please tell me what I did wrong!!!
maki
27 February, 2012 - 10:10
Permalink
Re: Japanese Curry Bread (Kare-pan)
See my reply here.
anon.
3 March, 2012 - 09:00
Permalink
Re: Japanese Curry Bread (Kare-pan)
I tried it for the first time tonight. I didn't expect the dough to take as long as it did (I didn't exactly read through the instructions... until the dough was already made), and I did end up adding extra flour because of the high altitude I'm at, but it turned out well! I really enjoyed it! (I've been craving it since I saw it made in Kuroshitsuji.)
Kevin Michael
5 May, 2012 - 03:55
Permalink
Re: Japanese Curry Bread (Kare-pan)
I had a question,... I was gonna make this with fresh pizza dough I found at the supermarket, you think it'll turn out ok? Also, is there anyway to seal up the curry pan without the egg wash? Would melted butter work? ... Also about dipping it in egg wash...
nanasawayuri
1 February, 2013 - 01:10
Permalink
mmmmmmm
this is my second time using this recipe. i must have measuring cups that are wrong because both times didn't add enough flour. other than that, I LOVE karepan and i am so happy to be able to make it in my own house! thanks so much for this recipe! :)
sneth
30 March, 2013 - 05:01
Permalink
Re: Japanese Curry Bread (Kare-pan)
Just finished making this recipe and the results are amazing!
The dough was rather stick the entire time but just being patient and using the scraper worked a treat.
Definitely will be making them again!
Kriis
15 April, 2013 - 20:05
Permalink
The Egg wash...
I'm vegan and I'm wondering if the egg wash is absolutely necessary. Is there an alternative if it is? I love your websites by the way. Thanks for all your hard work! :D
maki
16 April, 2013 - 00:14
Permalink
Re: The Egg wash...
You do need something for the bread crumbs to cling on to. Maybe you can look on the Veganomicon forum or something for egg wash alternatives when baking.
shannon
20 July, 2013 - 19:12
Permalink
Re: Flour measurement
My food scale is unfortunately not that accurate, so what would the flour measurement be in (US) cups? I tried googling it, but I got a pretty wide range of answers...