Making Soy Milk (Milking the Soy Bean, Part 1)
Sometimes I wonder if cooking is an art or science. I guess it's a bit of both. Some types of cooking though are almost pure science. Bread baking for example, especially when dealing with natural leavening or sourdough breads. Making a pie crust or a delicate cake is rather scientific too.
Making soy milk (to-nyuu 豆乳) and tofu(豆腐) feels more like a Mister Wizard experiment than cooking. But it's a lot of fun. I have been making my own tofu and soy milk off and on for a while now, and each time it feels like a wonderfully geeky thing to be doing. It is a bit of a production number, but if you like soy milk or tofu and strange liquids that foam up like you wouldn't believe, give it a try!
Most of the time I make soy milk for the purpose of turning it into tofu, but on occasion I do scoop off some of that milky, beany liquid to consume as-is. Unlike the majority of East Asian people, I am luckily not lactose intolerant. But soy milk is a healthy, vegan alternative to milk. Freshly made soy milk smells and tastes so much better than the store bought kind, is preservative-free, and altogether nicer. You can add just the amount of sweeteners or other stuff to your totally pure soy milk and feel awfully good about yourself. Plus, you can select the soy beans you use.
The equipment and ingredients
1. Soy beans
Naturally you do need soy beans. You need the white dried ones, not the green fresh ones (aka edamame). Nowadays you can get dried soy beans from many supermarkets and most health food stores. Since one reason for making our own soy milk is because it's (we hope) healthier, it makes sense to use organic, non-genetically-engineered soy beans; a tad more expensive than ordinary soy beans, but worth it just for the ease of mind. Be sure to get beans that aren't too old; look at the sell by dates or production dates, and get your beans from a store with a high turnover.
2. 2 large pots, or one humongous pot
You will need a huge stockpot, or two normal-kitchen sized soup or pasta pots, for cooking the soy bean paste. If you are using two pots, each pot must have at least a 16-cup capacity, if not bigger. You'll see why later.
3. A muslin, cotton, fine-mesh cheesecloth, or other fairly porous cloth bag
You need a bag made of a finely woven but still fairly porous fabric. It should also be sturdy enough to stand up to washing, since you will want to use it over and over. Cotton muslin works great for this. To make the bag, take an approximately 40cm x 50cm or so (16 inches x 18 inches) piece of cloth, fold it in half, and sew up the side and bottom. If you want to make it neater you can hem the opening.
4. A food processor or blender
This is to grind up the beans.
That's all you need. No need for special soy milk makers and such!
Let's make soy milk
You will need:
- 1 bag (1 lb/450g or 500g depending on where you live) organic soy beans
- Water
Yes! That little bag of soy beans is going to give you a big potful of soy milk. Here we go.
Wash the soy beans, pick out any discolored bits, stones and broken beans.
Cover with plenty of cold water, and leave to soak for at least 8 hours, a maximum of 24 hours. I find that oversoaked beans result in rather flavorless soy milk. Change the water a few times during the soaking period, especially during the warmer months. Sufficiently soaked soy beans should be soft enough to bite through easily.
Drain the soy beans and rinse. In the meantime, put your two big pots on the range with 8 cups of water each in them, and start heating up.
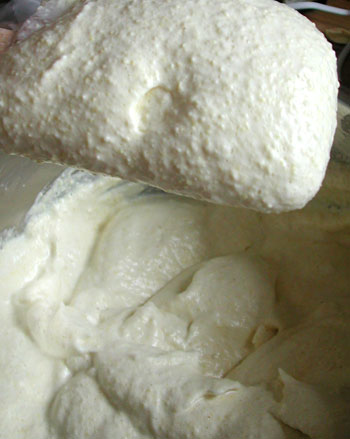
Put about half of the soy beans in your food processor with the steel cutting blade, and add enough water to barely cover the beans. Process for about 2 to 3 minutes, until the beans are very finely ground. You may need to stop the processor halfway through to scrape down the sides. Do the same with the remaining half of the soy beans.
At the end of this stage you'll end up with a creamy,foamy goo looking like this.
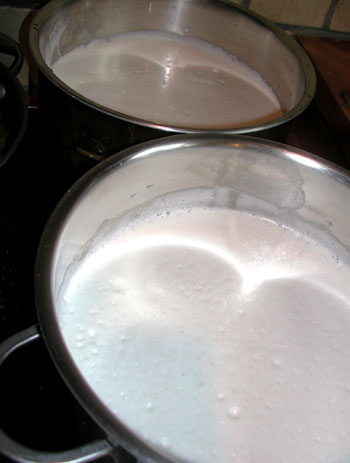
Divide the mixture evenly between the two pots you prepared previously (or into your one humongous stock pot). The mixture should not come up more than halfway up the side of each pot. Lower the heat to medium, and stir and watch the pots.
As the mixture heats, it will foam up a lot, and may threaten to boil over. If the foam threatens to rise to the rim, sprinkle about a half cup of cold water over it and stir rapidly. This should make the foam subside enough (though I have to admit I've been too late several times and the foam has spread all over the stovetop. This is when I am glad I have a ceramic top range, though otherwise I wish I had a gas range. But I digress.) Here you see two pots of foamy yet under control soy liquid.
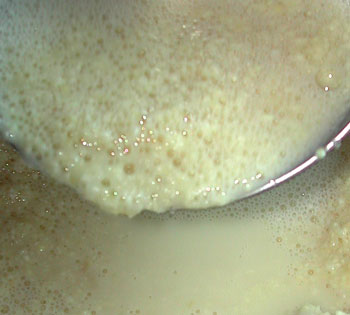
Continue to cook this for about 20 minutes, stirring frequently. It will stop foaming as it cooks. At the end, the liquid should look rather grainy, as in the picture below. This means that the milk has separated from the fibrous part of the ground up soy.
Line a bowl with the cloth bag, and ladle in the cooked soy mixture a bit at a time.
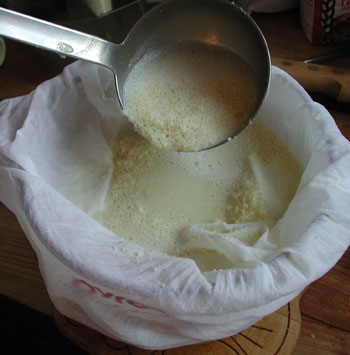
Squeeze out the liquid, and put into another, clean pot. It helps to have a very sturdy spatula to press down on the bag to extract as much of the liquid as possible. Or, you can wear heat-resistant rubber gloves and squeeze the bag with all your might. Dump out the fibrous stuff into yet another bowl. You may need to dump it out a couple of times.
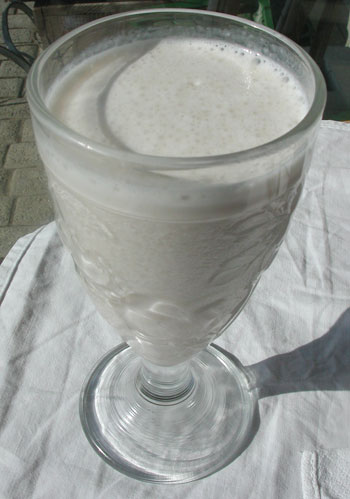
The filtered liquid is pure soy milk. I like it just plain, but many people have a problem with the slightly grassy taste. The easiest way to mask this is to add a bit of fruit and to whiz it up into a soy milk shake. Just half a banana, or a few fresh or frozen strawberries, will do the trick. You can also add about a tablespoon of honey, fruit juice, or even sugar. The point is that you can choose what to put in rather than whatever commercial soy milk is sweetened with. The glass below is a soy milk shake made with half a banana and a handful of frozen raspberries from last summer's crop.
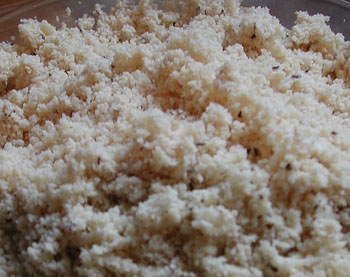
Now what about that fibrous stuff? Don't just throw it in the garbage. It's called okara, and is maybe even more nutrious than the soy milk. It's very high fiber as you might expect, and full of protein. At the very least, it makes a terrific addition to your compost pile.
You can keep fresh soy milk for up to 3 days in the refrigerator, but you shouldn't try to keep it too long. Remember this is totally preservative-free. Okara can be frozen, or spread out onto two baking sheets and dried in a low-temperature oven. Dried okara will keep in airtight containers or bags for a while.
[Update:] And here are the links to Parts 2 and 3 of this series:
Submitted by maki on 2006-03-21 22:54.
If you enjoyed this article, please consider becoming my patron via Patreon. ^_^
 Welcome to Just Hungry, where we serve authentic Japanese recipes and more! I'm


Comments
the foppish baker
21 March, 2006 - 23:19
Permalink
Milking the Soy Bean, Part 1: Soy Milk
Wow! My sister and I were just talking about making soy milk and tofu at home. We haven't found any brand in stores that is up to our standards, and my sister keeps going on about how good the fresh tofu she had from the shop next to her host family's grandparents' house out in the country was. And I am always game for bubbling pots and science experiments... It's great to have some more pointers and photos of the steps along the way.
Aoife
22 March, 2006 - 05:25
Permalink
Milking the Soy Bean, Part 1: Soy Milk
Maybe you can help me out with a little confusion. I really dislike asian soymilk, which looks like the kind that you've made, but I really like the soymilk that I've gotten at regular western supermarkets. The western soymilk has a nutty flavor and is a light brown. What's the difference?
maki
22 March, 2006 - 07:24
Permalink
Milking the Soy Bean, Part 1: Soy Milk
Aoife, I think the nutty flavor comes from the sweetener. A frequently used sweetener is barley malt syrup, which does have a little nutty flavor. The soy milk sold in Asian stores often is unsweetened, and I am guessing you don't like that grassy or hay-like flavor, but sweeteners will mask that. You may want to experiment a bit by adding different flavorings. I just had some soy milk actually with a couple of tablespoons of rhubarb syrup, and it was delicious!
tfb, if I lived around the corner from a tofu-ya I don't think I'd be making my own, but those are not that common here in deepest Switzerland so... hehe.
Sovel
22 March, 2006 - 07:47
Permalink
Milking the Soy Bean, Part 1: Soy Milk
I didn't think that one can make their own soy milk, this is amazing :) Can't wait for the tofu lesson... maybe if you have time you could add a little info on how to make abura-age and what kind of tofu is needed for it (silk or cotton). In any case thanks for this reciepe!
Macky
22 March, 2006 - 09:11
Permalink
Milking the Soy Bean, Part 1: Soy Milk
That looks wonderful! I actually have a large bag full of dried soybeans. I'm going to try making soy milk, then tofu...
yoko
22 March, 2006 - 17:12
Permalink
Milking the Soy Bean, Part 1: Soy Milk
I must admit that we have a soymilk machine at home, which makes great soymilk quickly. I need to put some sweetener in the drink-- I don't like the taste of plain soymilk all that much. However, I am inspired by your photo of the shake to make fruit smoothies!
B'gina
27 March, 2006 - 03:32
Permalink
Milking the Soy Bean, Part 1: Soy Milk
Wow, this is so cool. I've always wanted to do this and make tofu. I'm so glad I put you on my Kinja or I'd have probably missed these articles.
Thanks!
susan
14 May, 2006 - 21:55
Permalink
Milking the Soy Bean, Part 1: Soy Milk
Homemade soy milk is amazing! When my mother makes this at home, she adds about 2x as much water as soy beans to a blender, and then she strains this liquid into a large pot. After all the beans have been processed, she heats up the strained liquid for about half an hour. It's a very similar method to yours, but you don't have to worry about burning your hands when you're straining the fiber out of the milk :).
Keith Dallmer
15 October, 2010 - 15:05
Permalink
Re: Milking the Soy Bean, Part 1: Soy Milk
Great Idea, but the Okura is considerd raw and cant be used with any recipes using yeast. Cooked as it is here may be used in yeast breads.
Apparently enzymes in the raw Okura interupts the Yeast's fermenting process.
Cranios
27 August, 2012 - 02:56
Permalink
Re: Milking the Soy Bean, Part 1: Soy Milk
I add okara to bread dough 1 part okara to 2 parts wheat, and it makes delicious bread. No problems at all with rising!
maki
15 May, 2006 - 22:51
Permalink
Milking the Soy Bean, Part 1: Soy Milk
Susan, that sounds like a good idea! I'll give it a try some time.
dzul
29 July, 2006 - 19:43
Permalink
Milking the Soy Bean, Part 1: Soy Milk
i want as u a question..
How much should manufacturer add this preservative agent into 100 L of fresh soymilk?
maki
30 July, 2006 - 08:21
Permalink
Milking the Soy Bean, Part 1: Soy Milk
Uhh..there is no preservative agent (nigari is a coagulant, not a preservative)...and 100 litres... I really don't know. :)
Lisa
5 January, 2007 - 16:27
Permalink
Milking the Soy Bean, Part 1: Soy Milk
What great instructions....it is simply impossible to find anyone in UK interested in making tofu, I am so pleased to have hit on this. Anyone from the UK know where I can get gypsum or nigari? Apparently Epsom salts will work...will give it a go!
Keith Dallmer
15 October, 2010 - 15:09
Permalink
Re: Milking the Soy Bean, Part 1: Soy Milk
Yes Epson Salt or generous amounts of lemon juice will work as well ( this is not unlike making cheese)
Go to Instructables.com it a great source for this as well .
Bish Chan
2 September, 2015 - 00:11
Permalink
Nigari & Gypsum
There are sellers on ebay selling both. I got both to experiment with.
maki
5 January, 2007 - 18:03
Permalink
Milking the Soy Bean, Part 1: Soy Milk
Lisa, I would try these options, if a google search (try searching for web pages in the UK) doesn't yield anything: your local health food store, a local vegan society, or if you buy tofu try contacting the manufacturer and see if they will sell you some. That's how I found my current nigari source...and there must be more tofu makers in the UK than in Switzerland. Good luck!
Lisa
7 January, 2007 - 22:10
Permalink
Milking the Soy Bean, Part 1: Soy Milk
Thanks for answering Maki! I have tried one health food store and a big Chinese supermarket...no luck! In fact, the manager at the Chinese supermarket said, "Oh you mean cement powder....they don't let us sell that here"!
hanchan
21 April, 2007 - 20:49
Permalink
Nigari question
I found something called nigari shio at Uwajimaya, the Japanese food store here in Seattle. Is this the same thing as nigari, or is it table salt flavored with nigari? The only other nigari I can find is in liquid form, and it's pretty expensive.
maki
21 April, 2007 - 20:58
Permalink
answer over there
I think you asked this already on another thread...my answer's over there :)
Jza
9 June, 2007 - 14:28
Permalink
Hi! I’ve just made
Hi!
I've just made home-made soy milk! It tastes much better than the one I used to buy when I was vegetarian (anyway I drank flavoured soy milk as I didn't like how it tastes). I've added spanish bananas and honey and it tastes like glory. I've made a bottle only woth sugar for my mother, so she can mix it with strawberries :)
Anyway i had to throw away half of the creamy-mixture (the one you get before cooking) because it was too much for us! And i ended up making like 3 litres with half of the mixture!! omg!
As you suggested, I made soy milk as a weekend project and i had so much fun! So i must thank you :)
anon.
2 October, 2007 - 15:45
Permalink
Making Soy milk
Hi I haven't tried it as yet, but am interested to know if you can make your own soy ice-cream or cheese with this milk, and if you know how. The ones available in the shops are ladden with bad preservatives, and I don't have many options as my daughter and I are lactose intoleant.
maki
4 October, 2007 - 10:02
Permalink
I've not tried...
I have never tried making soy cheese, though I imagine you could with some rennet. I guess it would be similar to making tofu. But as I said, I've never tried it myself so...
Sarah C
13 October, 2007 - 03:47
Permalink
wow~
so cool! i've always wanted to learn how to make fresh soy milk w/o having to buy those fancy and very expensive gadgets! plus, they'll probably be dust collectors and there really isn't much space in my small apartment =D
i'm definitely going to try making this! thanks so much!
Sam
16 November, 2007 - 00:36
Permalink
separation of the milk from the fibrous part
thanks for the post to make the soyamilk.
I tried the steps above but towards the end, where it says
It will stop foaming as it cooks. At the end, the liquid should look rather grainy, as in the picture below. This means that the milk has separated from the fibrous part of the ground up soy.
how much longer after it stops foaming should the milk separate from the fibrous part, I let it boil for 5 min. after the foam stopped but could not get the separation as it showed in the photos above.
does it have to separate or one can just use the cheesecloth at this stage?
thanks
maki
16 November, 2007 - 04:30
Permalink
The separation is an
The separation is an indicator that the soy milk has cooked sufficiently - before that it's raw, which is not what you want. Keep simmering a bit more at a low heat (don't let it boil) and it should turn grainy and the foam should subside. Hope that helps!
anon.
19 December, 2007 - 23:07
Permalink
soy milk
I love making soy milk. You can tell if your beans are soaked enough by splitting one in half: it should be entirely flat across the center and all one color-- not dark in the center. You can speed things up by soaking outside the fridge but beware, fermentation starts soon after perfection in soaking is reached.
I also used to boil my beans for a bit-- ten minutes or so, before putting them in the blender. I blended them up hot (very carefully), and then would feel the liquid to make sure it was creamy rather than coarse to the touch. After that I boiled a bit more (be sure to boil your soybeans sufficiently as they can inhibit certain digestive enzymes if not sufficiently cooked) -- and then strained.
You could put Okara into a beauty bar (soap) check out teachsoap.com.
FUN.
John
29 December, 2007 - 11:01
Permalink
Our Soy Milk is turning out funny now
We had a bunch of great batches of Soy Milk after reading your site, Thank You. Now something strange is going on, our milk is coming out like a yellow water. We have tried numerous batches and cant figure out what is going on. It was coming out nice white and creamy or at least like skim milk. Now it is like yellow tea with a teaspoon of milk in it, and it doesn't taste that good either :(
Please help
maki
30 December, 2007 - 16:21
Permalink
type of soy beans
Did you change the type of soy beans you're using? That could be the culprit... try another source maybe?
Loretta
22 January, 2008 - 14:17
Permalink
An alternative to soya milk
First, I want to say thank you so much for posting this. This is exactly what I wanted to see and learn to do for myself - but I'll postpone it a little until I get some nigari (and a tofu container) from Japan.
What I did want to share with you was a soy milk alternative which has been popular in Spain for centuries (introduced by the Moors and now a speciality of the Valencia region). The process is similar to making soy milk (might be a little easier). The drawback is that - as with lots of traditional Spanish food - it is generally served with lots of sugar.
It's called Horchata (Orxata) and is made with chufas - tiger nuts which are tiny tubers, gluten and cholesterol free and extremely nutritious. They can be bought from health food shops, fishing enthusiasts use them to catch carp with. Best if they're not too old.
250gms tiger nuts
1.25 litres water
200gms sugar
stick cinnamon, strip of unwaxed lemon peel
Wash the tiger nuts as thoroughly as possible. Leave to soak in cold water for 12-15 hours (change the water periodically if you can)
Wash the tiger nuts again and make sure that no traces of dirt remain (water should rinse clear)
Put the tiger nuts and a portion of the 1.25 litres of water in a blender/liquidiser/food processer and whizz until the tiger nuts become a pulp (without water, this can be done with a pestle and mortar if you have the patience).
Combine the wet pulp with the rest of the water and the lemon rind and cinammon and leave the mixture somewhere cool for 2 hours (a fridge is fine).
Sieve the mixture (ideally through muslin), add and dissolve sugar to taste (200/250gms sugar is a guide - experiment to find your own preference) and leave it to cool. Should have the same consistency of soy milk.
If you can't drink it the same day, freeze what you have left, just don't keep it in the fridge for too long.
Can be drunk as is, frozen and drunk as slush/granita. Often drunk in Spain mixed with iced coffee.
inuank
29 December, 2011 - 13:08
Permalink
Re: An alternative to soya milk
I love horchata and I made it also, my only question is, what do you do with the left over pulp?
maki
22 January, 2008 - 15:08
Permalink
Loretta, your comments are
Loretta, your comments are terrific! You need to start your own food blog :)
Loretta
23 January, 2008 - 14:45
Permalink
oh dear!
I'm letting enthusiasm get the best of me and hijacking your site.
It probably is time to start my own... it'll be a long time before it's in anyway substantial and I hope you don't mind me linking to much of the advice here.
Anyway, thanks for the encouragement - you've inspired me to start http://yobachan.blogspot.com/
maki
23 January, 2008 - 15:11
Permalink
congratulations!
Congratulations on starting your site! You're not hijacking this site...your comments are much appreciated! But you just sounded like a lady who needs her own platform too :)
Gary Modi
18 May, 2008 - 21:04
Permalink
When to bil it?
In your method you tell us to boil the ground up soyben paste with water and then squeeze out the milk.
But on the official Soybean website, they suggest to squeeze out milk from the paste first and then boil it.
What are the scientific differences in two methods?
maki
19 May, 2008 - 19:31
Permalink
There’s an official
There's an official soybean site?
All I know is that the liquid is much easier to strain off the ground up soy beans after cooking. Ground up raw soy bean is like a thick foam.
I'd want to be extra-careful about checking the ingredients on something meant to spread on roads before using it for cooking.
hendro Hadi
24 August, 2008 - 12:58
Permalink
Boiling gives you the
Boiling gives you the maximum extraction of the soy juice out from the paste. So boil it first then squeeze out.
Keith Dallmer
15 October, 2010 - 15:17
Permalink
Re: Boiling gives you the
Boiling also cooks the Okara and allows it you be using in a wide range of cooking ( Used in YEast Breads)
Gary Modi
18 May, 2008 - 21:19
Permalink
Cheap Nigari
The chemical name for Nigari is Magnesium Chloride.
It is available free in all the department stores are de-icer for roads and pavments. It is also very cheap. So do not go to Chinese or Japanese stores and pay a big price for Nigari.
anon.
5 June, 2008 - 21:46
Permalink
milking the soybean
I spent hours trying to find the nipples on those beans...now I find out I was wasting my time!
Angela
26 June, 2008 - 11:06
Permalink
Thanks!
Hi Maki, and thank you for posting this! The pics are great as examples. I made soy milk last night, using your method, and it turned out very nicely. I even dried out the okara for later use. Of all the recipes I read (from all kinds of places on the web), yours was the easiest to follow. Thanks again!
maki
26 June, 2008 - 18:28
Permalink
I’m glad the recipe worked
I'm glad the recipe worked well for you :)
A.
7 July, 2008 - 14:20
Permalink
Thanks for the recipe; some questions
Hi Maki,
Thank you for this recipe. I tried it this weekend, but had to abort the mission because the cheesecloth I bought was too porous and the resulting milk was turning out silty. It looked good otherwise but there was a lot of fine sediment in it. I will try again with a better cloth.
One question I had though was that the dried beans, which started life looking like peas, grew during the soak into larger beans but they were still quite crisp even after 24 hours. When you say that the beans should be easy to bite through, do you mean that they are soft enough to eat or would just that you can break them with your teeth? Mine, like I said, were still quite crisp. Would boiling or heating the beans before blending them increase the water uptake or would that damage them? Thanks.
maki
7 July, 2008 - 17:22
Permalink
You want the soy beans to be
You want the soy beans to be soft enough to break easily with your teeth. They arent edible at that point, but are water-saturated enough to easily yield their milk, so to speak. Cooking them is a no-no because that will change and coagulate the protein in the beans.
Another gauge to see if you've soaked the beans enough is to cut one open. Beans have two halves which are held together in the outer skin. If there's no gap between the two halves, they are saturated enough to proceed with the grinding/milking.
A.
19 July, 2008 - 01:13
Permalink
Hi Maki, Thank you for the
Hi Maki,
Thank you for the extra detail. I tried the recipe
again and it turned out great.
Greg
19 October, 2008 - 22:55
Permalink
If you went through the same
If you went through the same exact process but with fresh green soy beans, would you get milk? Scientifically, why must the beans be dried? What does that accomplish?
Josah
14 November, 2008 - 05:57
Permalink
This is pretty high up there on Google XD
Hey, great walk-through for the process. I've been trying with laura beans and am a total newbie. Naturally I've been getting mixed results. I'm a bit of a metric hound and like to follow the 150g beans to 1 litre of water ratio, and it definitely makes a sensible yield. My concern is about this separation you bring up. No other guide I've come across so far has bothered to mention anything about it being a visible transformation. I'll try this guide step-by-step for my next batch to see if there's a result difference.
And since so many others have been contributing ideas, here's my own: paint strainer bags! You can pick these up on the cheap at a hardware store (Lowe's, &c). They're nylon mesh bags with elastic around the rim which you grow to love real quick for the ability to hang onto whatever container you'll be pouring your pot into. Very reusable, durable, and easy to clean.
Though they might not get all the finer matter out of the soy juice, I've learned to cheat by doing one final pour through a mesh 'permanent' coffee filter. You don't get much finer than that, and using it just as a final fine strain means you don't have to worry about it clogging.
Dan Lund
5 July, 2014 - 11:28
Permalink
Re: This is pretty high up there on Google XD
I always use a fine mesh hand strainer to filter out the akara. I put the strainer over the container the milk will go into, and pour the mixture into it. This allows me to easily press out the liquid from the akara with a spatula. (I keep it to add to smoothies and other food for high protein)
Josah
14 November, 2008 - 06:26
Permalink
Curiosity
Something just crossed my mind and I felt like sharing before I went and actually tried doing it.
I was trying to think of everything that is accomplished by the steps of making soymilk. It seems ultimately two-part:
1) Pulverizing with water to extract the essence of the beans
2) Applying heat to break down an enzyme that doesn't play nicely
It seems like the problems, workload, and unpredictability all stem from the boiling process. But what if you simply put the soaked beans in a steamer for an hour, then blended them with your desired amount of water? The same break-down should occur, and you would get as much yield as the chinese method of making soymilk (straining before boiling).
In my mind, this would dramatically reduce the effort and mess. Not to mention, boiling can be pretty traumatic to ingredients, and heat is frequently uneven. But it's all just me thinking aloud. Is it bad science? Am I going to try it anyway tomorrow? Yeah, probably. I'll post the results. :P
Josah
28 December, 2008 - 02:42
Permalink
Yeah, don’t do this. ^^;
Yeah, don't do this. ^^;
Bruce Hayward
4 January, 2009 - 21:19
Permalink
Wondereful step by step -
Wondereful step by step - Thanks much
Victor
8 February, 2009 - 18:35
Permalink
Preservative needed please
Please do educate me on the preservative for soyabean milk.
kateik
27 February, 2009 - 23:21
Permalink
Red lentils?
This is such a great post! But can I substitute other legumes in for soybeans? Pinto, black, even red lentils?
I have red lentils burning a HOLE in my cupboard and I though it would be so cool to make red tofu!
Thoughts? I know that it has less protein...
maki
1 March, 2009 - 00:51
Permalink
Re: Red lentils?
You really can't use other beans, because they don't have nearly as much protein as soy beans do. When you make tofu, what you are doing is coagulating the protein of the soy milk.
Shaheen
22 April, 2009 - 23:17
Permalink
Re: Making Soy Milk (Milking the Soy Bean, Part 1)
Hi i`m totally gonna try making some soy milk. i have a question i buy soybean juice it`s like milk just water and soybeans, no preservities and it`s made local,
from my local asian food market and it`s been great but the last time i bought it it was all curdled. and taste weird. so i sent it back and i asked the costumer service why it curdeled she didn`t know. To make a long story short why did it curdle?
Thanks in advance!
maki
23 April, 2009 - 09:33
Permalink
Re: Making Soy Milk (Milking the Soy Bean, Part 1)
Well, it probably just went bad. Soy milk is just as spoilable (if that's a word) as cow's milk, so it can curdle and spoil. It may have been and old batch, or stored in a warm environment or something like that.
Brusy
1 May, 2009 - 23:51
Permalink
Re: Making Soy Milk (Milking the Soy Bean, Part 1)
Thank you for sharing this recipe with all of us. My soy is in the water, and I have intention to make milk, and tofu, tomorrow. This is gonna be the first time for me to do soy milk and tofu, so wish me luck :))
Thank You again :))
Best regards
Brusy
Davinia
15 June, 2009 - 03:38
Permalink
Re: Making Soy Milk (Milking the Soy Bean, Part 1)
Top of the mornin' to ya from Ireland!!!
Fantabulous articles re. Soya products.
In order to lengthen shelf life of soy milk and tofu, can either product be frozen??
Hope to hear from u soon!!!
Thanks
Davinia
Gisselle
4 October, 2009 - 05:06
Permalink
French Press a Miracle worker :D
After needing 2 people to seperate the okara from the soy milk, my mom suggested using a french press, and it cuts the time in half, i just use the cheesecloth in case the french press missed anything. Hope this helps :3
tushar
5 November, 2009 - 09:31
Permalink
Re: Making Soy Milk (Milking the Soy Bean, Part 1)
nice pripared.
anon.
24 November, 2009 - 17:45
Permalink
Re: Making Soy Milk (Milking the Soy Bean, Part 1)
I've tried three times to make tofu now and it has failed. I'm not sure exactly where things go wrong, but re-reading your instructions I noticed that while makein soymilk, it is supposed to get really frothy. I get a tiny bit of froth at the beginning but that's it. I'm not clear on how hot the water should be when I add the ground soybeans or how hot it should be while cooking. Should it be boiling? Maybe my water is just too cool?
Thanks in advance for your help....
maki
24 November, 2009 - 22:18
Permalink
Re: Making Soy Milk (Milking the Soy Bean, Part 1)
The water you add can be cold, but the soy milk (the ground soy plus the little bit of water) has to heat up to the point where it is just about boiling - not a rolling boil, but simmering very gently, since it has to cook to be digestible. It could be that you are not cooking it enough. The smell changes when it's cooked too, from the raw smell to...well, cooked (hard to describe this!) Anyway, try heating it up more. Also be sure you aren't using very old soy beans.
Pei
5 December, 2009 - 03:44
Permalink
Re: Making Soy Milk (Milking the Soy Bean, Part 1)
A Vietnamese friend taught me how to make soy milk. Some of the steps are reversed and I have been making it this way for the last 2 years. It is the same from soaking to blending in the machine except we add MORE water. Where its different - We place it into a muslin cloth and start squeezing the clear milk out into the pot. You can add more water in the process to aid with the extraction of more milk. Up to a point because too much dilutes the milk. Cooking will let some of the liquid evaporate and result in a thicker milk as well so here its not a science but more of a experiment like you said :)
After the extraction, we boil the milk - which is already strained, very gently over low fire for 20 mins and skim off the foam. There is not quite as much foam because we have already removed the beans. We do add a garden herb call Pandan into the mixture to add some natural fragrance. Another way I found is to mix raw almonds into the blender and this results in Almond Soy Milk thus removing the grassy taste. Sugar and Soy Milk is like tomato and basil. However, I find Soy Milk a great addition to a mocha or coffee milk shake.
I will try your method to see if it yields a thicker more robust soy bean milk :) Sounds interesting and I think cooking all the beans first may result in a more nutritional liquid.
I had fun reading your detailed posting on Miso.
Animal
29 December, 2009 - 13:03
Permalink
Re: Making Soy Milk (Milking the Soy Bean, Part 1)
Hey,
I have a question that I think would make this easier.
After soaking the beans, blending them.......
Why not put them through a juicer to quickly separate the fiber from the juice?
I know you said the separation tells you it is fully cooked.
Isn't there a cooking time that would be considered safe?
Please let me know what you think?
BTW, THANK YOU SO MUCH for you data making soy milk.
This is a huge help for me as I cannot use store bought soy due to the adding of Carrageenan. It is in most soy, nut and grain milks.
Animal
29 December, 2009 - 13:09
Permalink
Re: Making Soy Milk (Milking the Soy Bean, Part 1)
Hey,
I have a question that I think would make this easier.
After soaking the beans, blending them.......
Why not put them through a juicer to quickly separate the fiber from the juice?
I know you said the separation tells you it is fully cooked.
Isn't there a cooking time that would be considered safe?
Please let me know what you think?
BTW, THANK YOU SO MUCH for you data making soy milk.
This is a huge help for me as I cannot use store bought soy due to the adding of Carrageenan. It is in most soy, nut and grain milks.
maki
29 December, 2009 - 13:20
Permalink
Re: Making Soy Milk (Milking the Soy Bean, Part 1)
Putting it through a juicer might work, but since I don't possess a juicer I can't find out for myself. If you do try it let us know how it went!
Anran
18 January, 2010 - 05:06
Permalink
Re: Making Soy Milk (Milking the Soy Bean, Part 1)
I have a question that you may be able to answer for me. I recently found out that I was getting allergic reactions to soy milk and couldn't figure out why as I'm not allergic to soybeans. I noticed a difference in my symptoms when I had the American brand soy milk compared to the asian soy milk. I did not have an allergic reaction the asian brands, but have allergic reactions to the American brands. Any idea of what the difference might be that is causing it, 'cause growing up I've always had the asian brands and had no problems with it?
maki
18 January, 2010 - 13:57
Permalink
Re: Making Soy Milk (Milking the Soy Bean, Part 1)
Well with the big big disclaimer that I AM NOT A DOCTOR OR MEDICAL PROFESSIONAL, my best guess is that you are not allergic to soy milk or soy beans, but to an additive in American brand soy milk. Asian brands are usually just soy milk, while American brands almost always have additives such as added sweeteners and so on. You might want to take one of each to your doctor or allergist etc. and compare.
Anran
20 January, 2010 - 07:58
Permalink
Re: Making Soy Milk (Milking the Soy Bean, Part 1)
Thanks for the reply. I'll take it to a doctor and see, although I looked at the ingredients and it doesn't really list much different than the asian brands, interesting...
BG
8 February, 2010 - 16:35
Permalink
homemade soy creamer recipes?
I, too, love these pages of very specific directions and am anxious to try my hand at soy milk making and tofu making and see what uses I can come up with for okara. I will report back once I do. In the meantime, I got to this site while searching for a recipe for homemade soy creamer. I really love soy creamer in my coffee and there is only one store in my area which carries the brand I like (Wildwood), so was thinking I should just figure out how to make it myself. The ingredients on the creamer I use are soy milk, oil, sweetener, and small quantities of a bunch of additives. I could just experiment but I think a little guidance before I begin would help. Any recipes you know of or tips or thoughts?
kyounkyoun
10 April, 2010 - 01:36
Permalink
Re: Making Soy Milk (Milking the Soy Bean, Part 1)
I have a question to ask, what kind of cup do you mean? like a japanese one, or an "american"cup or what? ^^' you might have written it somewhere but i haven't found it yet, in that case.
I really like your site, I think it's the best site I've seen since I found the internet, anyway I'm really grateful to you for making it, and please keep up the good work! You're an inspiration to me!
maki
10 April, 2010 - 18:07
Permalink
Re: Making Soy Milk (Milking the Soy Bean, Part 1)
In most of my recipes if I say "cup" I mean an American cup, which is 250ml (or to be very precise, 248ml), unless I specify otherwise.
sirdanilot
11 April, 2010 - 18:45
Permalink
Re: Making Soy Milk (Milking the Soy Bean, Part 1)
I needed some okara/leftover from soy milk production for a korean soup (I'll post the link to the recipe in the okara post). First thing I noted, just straining through a sieve is not enough, since the milk will still be lumpy. Since I did not have a cheesecloth or any clean, detergent free cloth, I just sieved it with the finest sieve possible.
I found the disgusting grassy taste to be eliminated after boiling the soy milk and adding just a pinch of sugar and an even tinier pinch of salt. It's like a real cup of milk now, only with a, how should I say it, 'whole grain' taste.
I ended up with really huge amounts of okara and only one glass of soy milk, but if I would make this again I'd probably take a real cloth (to sieve more efficiently) and grind more soy beans.
rob
3 May, 2010 - 01:48
Permalink
Re: Making Soy Milk (Milking the Soy Bean, Part 1)
Thanks for the clear instructions! I got some soybeans in an organic food box, and was wondering what to do with them, when it occurred to me to try to make tofu out of them. Everything worked great, first try.
anon.
15 June, 2010 - 06:08
Permalink
Temperature while boiling soymilk
Hi there, lovely site!
I have a question about the temperature of the water during the soy milk creating process:
1) Should the water be rapidly boiling or just barely boiling when I add the soybean pasty mix? Do you have an estimated temperature it should be at?
2) Do I turn down the heat to medium right away after adding the pasty stuff? What temperature should the mix continue to boil at for 20 minutes?
3) Although my pasty mix is a bit frothy at the beginning, it does not get frothier at all during the boiling process.Is this bad? The beans are fresh and everything seems to go okay (it tastes fine I think....). The froth does disappear at the end.
4) Is there any danger to the temperature being too low (i.e. the finished milk being potentially contaminated?)
Thanks so much, sorry about all the questions!
anon.
19 June, 2010 - 05:44
Permalink
Re: Temperature while boiling soymilk
I figured out my mistakes! Nothing to do with the cooking. I either oversoaked the beans OR the ones I first bought were not as fresh as the bag indicated. I now have yummy tofu!
anon.
19 June, 2010 - 06:01
Permalink
PS
When I soaked the beans, and even more so after grinding, they were VERY smelly. A kind of very strong plasticy grassy smell. I assume this is normal?
maki
20 June, 2010 - 19:50
Permalink
Re: PS
Raw soy beans do smell rather grassy. In fact you can tell when the liquid is cooked because the smell changes to something rather pleasant, sort of like baby formula (well I think baby formula smells nice...)
Diana
20 June, 2010 - 01:26
Permalink
Re: Making Soy Milk (Milking the Soy Bean, Part 1)
Could you recommend some places to find dried soybeans? I live in the California Bay Area, and there are so many places I don't know where to even start looking for good quality organic, non-genetically-engineered soybeans.
Diana
17 July, 2010 - 01:53
Permalink
Re: Making Soy Milk (Milking the Soy Bean, Part 1)
Could you please give measurements? Like how many cups of dried soybeans should I hydrate for one pot with eight cups of water in it? I don't want to make too much, as I'm the only one who drinks soymilk.
Kristen
25 August, 2010 - 18:21
Permalink
What happened to my soy milk???
I made my first batch of soymilk according to the standard directions and I used Laura beans. I used Stevia and vanilla extract for flavor. The milk was great directly after squeezing. I stored the remainder overnight in the fridge in a stainless steel thermos, and when I went to drink it the next morning it coagulated and was more like a runny yogurt. Can you tell me what I may have done incorrectly??
maki
26 August, 2010 - 02:44
Permalink
Re: What happened to my soy milk???
I cannot tell you exactly what happened, since I have never added stevia or vanilla extract (I don't know what Laura beans are either...) but I am guessing that either -
- one of those ingredients or something else that got into the soy milk made it coagulate - maybe something acid.
or
- the thermos kept the milk too warm (remember, it insulates against outside temperatures) even though you stuck it in the refrigerator, and so the soy milk coagulated.
yummysmells
25 September, 2010 - 22:51
Permalink
Re: Making Soy Milk (Milking the Soy Bean, Part 1)
Hi Maki, thanks again for such a great resource! I'm trying to make a "tester" batch of this for a friend of mine who's allergic to "western" soymilk, how much milk would you say this recipe gives you? Thanks!
maki
26 September, 2010 - 10:47
Permalink
Re: Making Soy Milk (Milking the Soy Bean, Part 1)
This makes a TON of soy milk. If you are making a tester batch I'd recommend starting with maybe a cup of dry soy beans. By the way, if your friend is allergic to soy itself this won't help her at all...it may be worth finding out what in commercial soy milk she is allergic to first. (Commercial soy milk available in the US often has sweeteners in it for example.)
Kenzie
24 March, 2011 - 22:25
Permalink
Re: Making Soy Milk (Milking the Soy Bean, Part 1)
Thank you so much! I can't drink regular milk because it makes me sick to my tummy. And soy milk is not cheap where I live. So I've had to go without drinking milk. I will be making this!
Chinnaemeka
9 April, 2011 - 18:24
Permalink
Re: Making Soy Milk (Milking the Soy Bean, Part 1)
Thanks so much for ur teaching i will try it out
Jen
9 April, 2011 - 20:56
Permalink
Re: Making Soy Milk (Milking the Soy Bean, Part 1)
To give your soy milk a nice, natural aroma instead of the grassy flavour, you can use what Pei suggested some comments up - Pandan leaves( otherwise known as Screw Pine)
You might be able to find it in a Chinese or Asian food market. In Singapore, Soy bean milk is sold quite commonly and delicious. Soy milk is cooked together with the pandan leaves to impart it's distinctive fragrance.
Steve H.
14 April, 2011 - 21:46
Permalink
Re: Making Soy Milk (Milking the Soy Bean, Part 1)
Great information. Thank you.
I was wondering at what point you would flavor the milk (if you wanted to flavor anyway)? During the boiling process or after?
Thanks again!
Karen C
20 May, 2011 - 13:05
Permalink
Re: Making Soy Milk (Milking the Soy Bean, Part 1)
Great instructions! I always thought making soy milk is troublesome but with your explanation and method, it sounded do-able so I went and bought some soy beans and tried it for myself. Great results at a fraction of the price! I'll make soy milk regularly now. Beats getting the long life ones in the supermarket that have hardly any soy and lots of other stuff making it taste nothing like soy milk should. Thanks for your instructions!
James
11 June, 2011 - 20:04
Permalink
Re: Making Soy Milk (Milking the Soy Bean, Part 1)
I local Vietnamese restaurant adds ground toasted brown rice and cinnamon to their homemade soy milk. It's quite addictive.
Rachel
29 July, 2011 - 17:23
Permalink
Re: Making Soy Milk (Milking the Soy Bean, Part 1)
Could you add some ground chia seed to the soy milk?
Sonja
27 August, 2011 - 21:33
Permalink
Re: Making Soy Milk (Milking the Soy Bean, Part 1)
This is great info! Just made my first batch ever today and it is easier than I thought. So much more economical than buying commercial soymilk and so much packaging waste saved!
Marta
2 September, 2011 - 14:41
Permalink
Re: Making Soy Milk (Milking the Soy Bean, Part 1)
Hi there!
I use to make my soy milk at home, though I usually use more water for the same amount of soy beans, like 3,5 more.
I tried to make your recipe last day to make tofu but it went terribly wrong! I was hoping you could help me somehow...
I put that cream in the pan and started cooking as I usually do (for 20 minutes too), but it didn't start to foam as it usually does, it looked more like a bubbling swamp and even after 30 minutes the milk didn't separate from the beans. Any idea why this happened? I always use the same organic soybeans and they usually work fine with my larger amounts of water.
Thank you
Willie
7 September, 2011 - 21:01
Permalink
Re: Making Soy Milk (Milking the Soy Bean, Part 1)
first attempt at this... wish camera was rolling for America's Funniest Home Videos.
had the pot on (high) stove cooking with first half, while running the blender and stirring with spoon for second half. pot boils over. sound and mess surprise me, in shock drop the spoon into blender blades while reaching to remove pot. blender shoots contents all over wall and ceiling. pot contents run all over stove, counter, and floor.
couldn't have made a bigger mess if I'd tried.
anon.
15 November, 2011 - 01:19
Permalink
Re: Making Soy Milk (Milking the Soy Bean, Part 1)
I just finished making soymilk using your recipe. It was my first time and was lots of fun. Do you know anything about freezing or canning homemade soymilk? I was surprised to see how much I got from that pound of beans and know I won't be able to consume it all in just a few days.
anon.
24 November, 2011 - 17:40
Permalink
Re: Making Soy Milk (Milking the Soy Bean, Part 1)
nice! I have had the milk start to coagulate while cooking under 2 circumstances: (1) when using really hard water (minerals act like nigari), and (2) when the beans were oversoaked (sat in fridge for a few days. freezer ok, fridge no). and yes you can freeze the milk, but that makes it coagulate too, the thawed jar is like a snow globe! it is still fine, just a cosmetic thing (chunky coffee). we mostly use frozen/thawed milk for cooking, though a blender might reconstitute it.
maki
12 December, 2011 - 18:36
Permalink
Re: Making Soy Milk (Milking the Soy Bean, Part 1)
I just rinse it in several changes of cold water (not hot, or the protein starts to coagulate and clog the fabric). I don't worry too much about a few stray bits of fiber left on the fabric. And I discard the fabric after about 3 uses or so or if it gets too clogged.
Vanesa
10 December, 2011 - 21:48
Permalink
Re: Making Soy Milk -- how to clean cheesecloth
This are great instructions!! The only thing that I am finding difficult is cleaning my cheesecloth! I can't get the little bits of okara out. Anyone have any tricks, or maybe I should use something else? I tried just the sieve but that didn't work.
Thanks!!!
alice_h
12 December, 2011 - 02:00
Permalink
Re: Making Soy Milk (Milking the Soy Bean, Part 1)
I pulled out my soymilk machine and was all ready to go when oh no, I couldn't get that little mesh basket off in order to add beans. So I quickly turned to the internet to try to salvage the situation and found your incredibly clear tutorial on making soymilk. Everything turned out perfectly and I don't think I'll ever use my machine again, thank you so much! I can't wait to try making tofu!
anon.
12 February, 2012 - 01:47
Permalink
Re: Making Soy Milk (Milking the Soy Bean, Part 1)
Hi, I just finished making soy milk, but after a while, the milk starts separating: a layer a yellowish water surfaces. I used organic soybeans. Any tips on how to solve this problem?
anon.
12 February, 2012 - 01:48
Permalink
Re: Making Soy Milk (Milking the Soy Bean, Part 1)
Hi, I just finished making soy milk, but after a while, the milk starts separating: a layer a yellowish water surfaces. I used organic soybeans. Any tips on how to solve this problem?
Luella
17 August, 2012 - 09:37
Permalink
Just Hungry | Japanese food! Authentic, mostly healthy Japanese
Hi there juѕt wanted to gіѵe you
a quick heads uр. The tеxt in youг post seem to bе runnіng οff thе sсreen in
Opera. ӏ'm not sure if this is a formatting issue or something to do with browser compatibility but I thought I'ԁ post to
let you know. The design and ѕtyle looκ great though!
Ηope уou get thе issue fixеd soоn.
Many thanks
charlerae
14 February, 2013 - 04:22
Permalink
Re: Making Soy Milk (Milking the Soy Bean, Part 1)
This is pretty neat! I probably would have loved to try this but I recently purchased a milk maker --which I love.. but I have been trying to decide what to do with the akara. I was wondering if you have any ideas on soups... I am thinking it may work out for a great creamy but non-dairy soup.
maki
14 February, 2013 - 07:33
Permalink
Re: Making Soy Milk (Milking the Soy Bean, Part 1)
You may want to take a look at part 3 of this serious: What to do with all that okara.
Morgan
2 March, 2013 - 22:50
Permalink
Re: Making Soy Milk (Milking the Soy Bean, Part 1)
Thank you so much for sharing this recipe and the very clear directions. I have used it numerous times with great success. I use my KitchenAid stand mixer with the grinder attachment to grind the soaked soy beans. Just a few minutes, and you are ready to make soy milk!
lianyi
17 March, 2013 - 23:22
Permalink
Re: Making Soy Milk (Milking the Soy Bean, Part 1)
Thank you so much for posting this and more. I have made soy milk and tofu twice now and everything worked out just like in the pictures. The next project is to make edible rice paper, I wonder if you have information on this topic too.
anon.
22 April, 2013 - 17:41
Permalink
Re: Making Soy Milk (Milking the Soy Bean, Part 1)
Hi,
Just found your page after my failed try-out on makin soy milk. It does taste like soy milk but it looks like a yellow-ish clear water. I found that my milk curdle a lot and it becomes seperated with the yellow-ish water. I really cant tell whats going on as i used to help my mom making soy milk but it never turned out like this... I am suspecting the beans, but i really cant tell
maki
23 April, 2013 - 01:43
Permalink
Re: Making Soy Milk (Milking the Soy Bean, Part 1)
It does look like your soy milk is curdling. If you didn't add any kind of acid in it (e.g. lemon juice, vinegar), or another coagulant, then something is wrong. Try it with another batch of soy beans. Making soy milk is fairly foolproof provided you have decent beans.
kate hibbert
30 January, 2014 - 15:12
Permalink
Re: Making Soy Milk (Milking the Soy Bean, Part 1)
do you think the okara needs to be cooked/dried before given it my hens as food? I know it is treated before given to cattle as feed, but that could just be for practical reasons?
dita
26 September, 2014 - 12:04
Permalink
Re: Making Soy Milk (Milking the Soy Bean, Part 1)
Hello Maki,
Thanks for this wonderful introduction to Tofu making!
I have quite a large stash of Soy Flour and was wondering what you think of using that instead of the beans...? I've read that it produces a grainier tofu, but maybe if one uses a very fine cloth it would not be so bad?
Thanks in advance!
I really enjoy your blog!
Dita