Japanese Cooking 101, Lesson 2: Prep and Cook A Great Bowl of Japanese Rice

This is Lesson 2 of Japanese Cooking 101. Today I'll show you how to cook the star of Japanese cooking - plain, steamed rice. Rice is so central to the Japanese table that the word for cooked rice, gohan (ご飯)to use the polite term, or meshi (飯)to use the more informal term, is also the word for the entire meal. In other words, in Japan when you have rice, you have a meal.
Another point to keep in mind is that most savory foods eaten in Japan, with the exception of noodle dishes, are designed to go well with plain rice. Once you understand that a lot of things about Japanese cooking will make sense. Japanese dishes tend to be a little bit too salty or a little bit too well high in flavor, especially umami, to eat on their own. They are made that way on purpose so that they will pair well with the blandness of that bowl of plain rice.
Preliminaries: What is Japanese rice supposed to be like?
The handiest way to see how Japanese rice is supposed to be like is to get one of these - a pack of microwaveable rice.
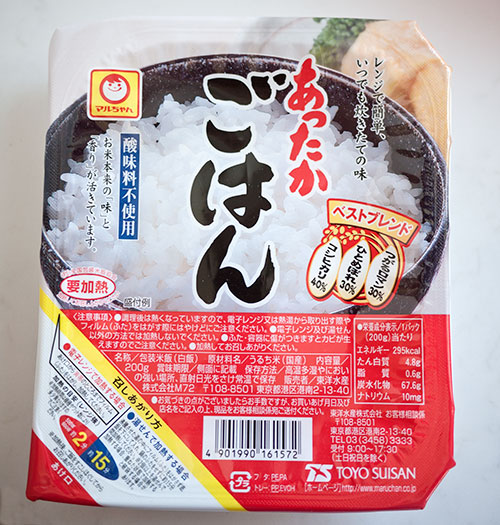
I wish I could say you can go to your nearest Japanese restaurant to get a bowl of good rice, but I've seen such difference in quality at various so-called Japanese restaurants that I'm hesitant to do that. But I do know that these microwave packs are pretty uniformly good.
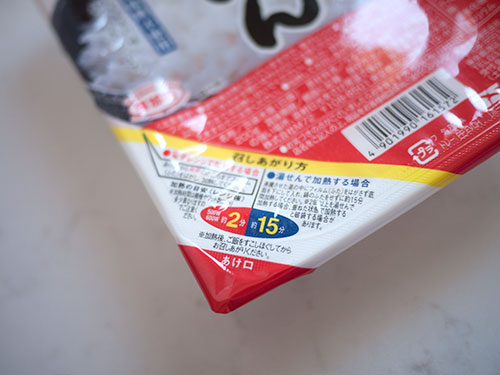
So how do you heat these things? If you look at the corner of the rice packet - and this is something all the different brands of these rice packets share - you see the numbers 2 and 15. That means that to cook it in the microwave you need to peel back the top wrapper to the line, then microwave on the High setting for 2 minutes. If you don't have a microwave you cat heat it up over a pan of boiling water: Put the pack in a pan of boiling water lowered to a simmer, with the top wrapper on, and heat for 15 minutes.
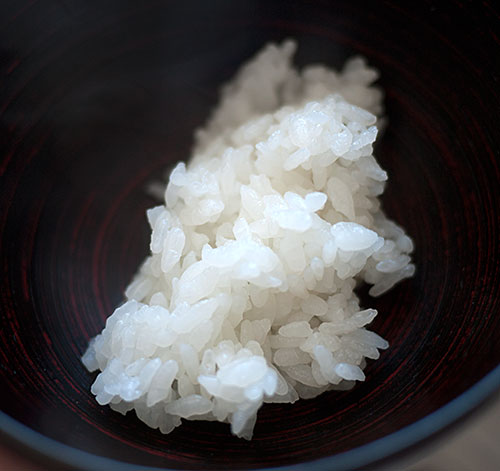
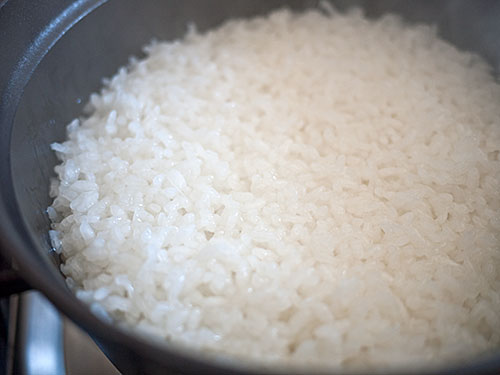
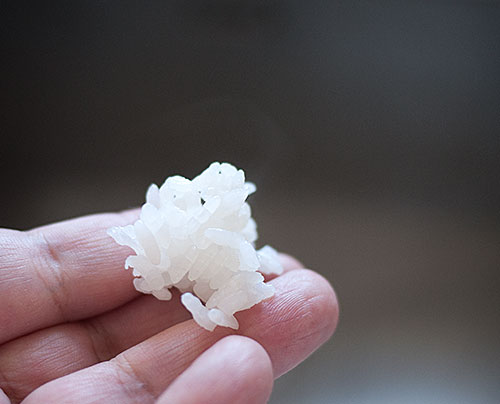
So go ahead and heat up the rice. Take some out - careful, it's very hot - and put a little into a bowl. Taste it without anything on it. The rice should taste quite clean, with a slightly sticky texture so that the grains adhere to each other if you press them together lightly. However, each grain is still intact and not at all mushy.
One more thing:
Properly prepared Japanese rice is never, ever ever "fluffy".
One of the things that flummoxed me most when I got interested in cooking as an adult (I cooked a bit as a teenager, but mainly things like everyday Japanese food and cookies) was this insistence in many American cookbooks that the ideal texture of rice should be "fluffy". I didn't get it at all, since fluffy to me is duck feathers, the fur on my favorite teddy bear, a soufflé maybe, or angel food cake...in other words, not something applicable to well cooked rice, at last not Japanese style rice. I do understand that some types of rice, such as basmati (my second favorite kind of rice) and jasmine, need to have fairly firm and separate grains. I also understood why risotto needed to be creamy. I have since tried rice that is said to be 'fluffy', such as the type that cooks up in a minute...but if that's supposed to be 'perfect' rice then I don't know what.
But regardless of how other types of rice are supposed to be like, the bottom line is: Japanese rice is never, ever "fluffy".
Now you know how Japanese rice should be like, you should also understand why you cannot substitute the types of long-grain rices that should have separate, non-sticky firm grains like jasmine, not to mention Carolina type rice. (You can use the medium-grain rice types that are used in risotto and the like in a pinch; see Looking at Rice, my rice-type primer.)
So let's cook some Japanese rice!
Rinse, dry, soak: The most important steps to cooking Japanese rice
Many rices don't need any rinsing at all, and with some, such as the risotto rices, it's even prohibited, since the powdery substance is critical to the creamy texture. Things are very different when it comes to Japanese rice: the rinsing, drying and soaking steps are the most critical parts of cooking properly textured, properly tasting rice.
In this lesson we will be cooking 320g / 360cc (360ml), or 1 1/2 U.S. cups ((11.3 oz) of rice. If you have a rice cooker, this is equivalent to 2 rice cooker measuring cups.. To that we'll be adding 410ml (1 3/4 U.S. cups) of water at the end.
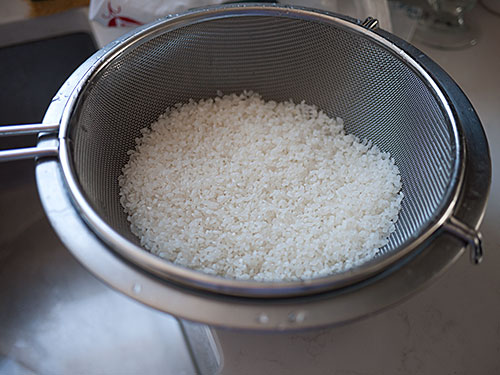
Equipment: We will be using a fine-mesh sieve and a bowl that the sieve can fit over, as described in the list of required ingredients and equipment for the course. This will yield about 660 grams, or a bit more than 4 U.S. cups of cooked rice, which will serve 3-4 people as part of a Japanese meal. To cook the rice we will be using a heavy-bottomed cast iron pot with a heavy lid as the base.
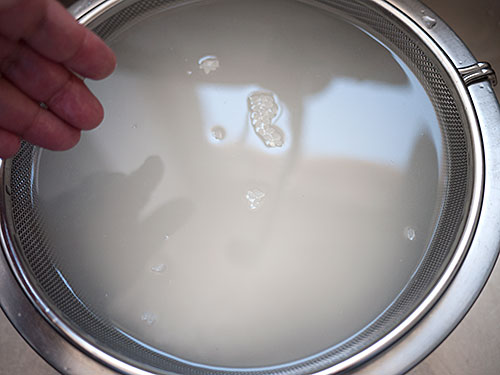
Measure the rice into the sieve, and put the sieve into the bowl. We'll be working in the sink.
Run cold water from the tap at a fairly slow stream into the sieve/bowl. Rub the rice grains gently between your fingers. The water will turn very milky and opaque.
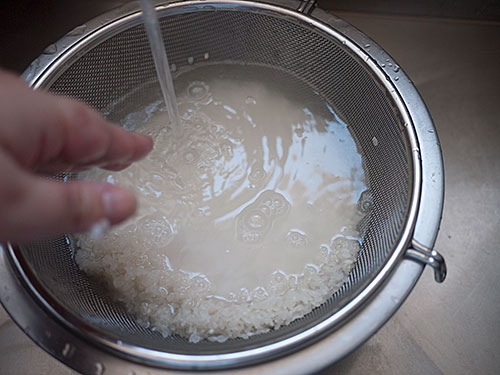
Lift the sieve out of the bowl. It's important to not let the rice sit in that milky water, otherwise it will be re-absorbed into the grains and the cooked rice will not taste as clean as we want it to be. Discard the water in the bowl.
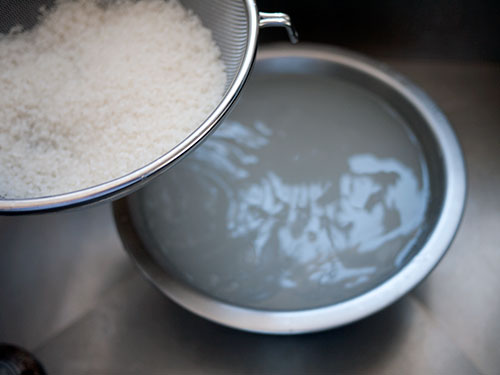
Repeat the fill with clean water -> rub grains gently -> drain away the cloudy water steps, until the water in the bowl is pretty clear. (Don't rub the grains together too hard or you may break them up, which is not the idea.)
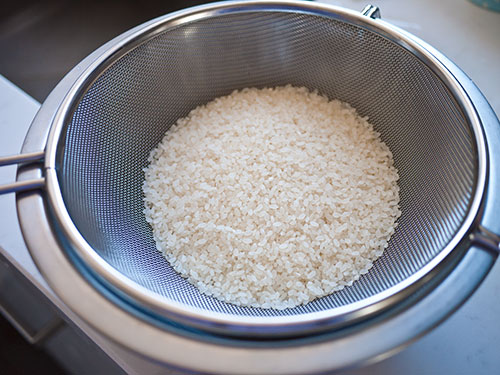
This about as clear as it should be. With most Japanese rice these days you only need to do the above 3 steps about 4-5 times, but if you're using another rice such as vialone, you may need a couple more rinse cycles as it were.
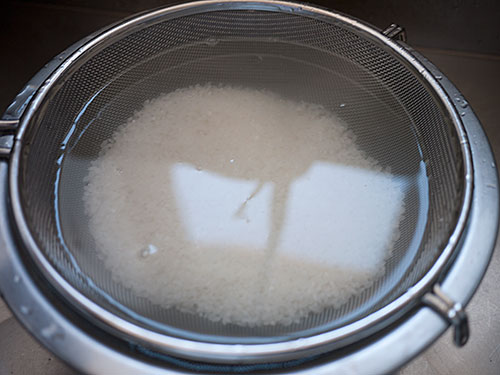
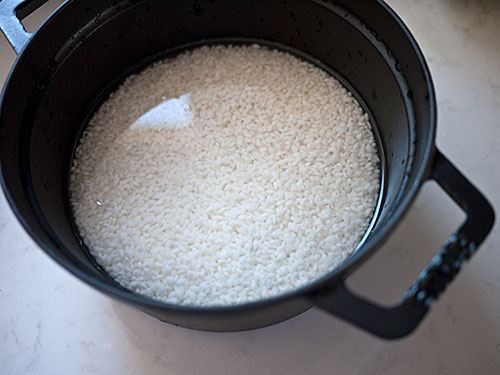
Drain the water away from the rice once again. Suspend the sieve over the bowl to let the rest of the water drain away from the rice, for at least 15 minutes. 30 minutes is ideal. (You use the bowl under the sieve to catch any dripping water, but if you have a sieve with legs you can just leave it in the sink.)
After draining for 30 minutes, the rice grains should look very white and a bit opaque.

Put the rice and 410ml (1 3/4 U.S. cups) of water in the pot. This about 1.1 times the rice in volume. Note: If you have rice that's been around for more than a year, add a bit more water (around 420ml) to compensate for the rice drying out. Leave the rice to soak for at least 30 minutes, 1 hour is ideal. Soaking the rice ensures that the moisture penetrates each grain, so that they cook evenly and thoroughly in a relatively short time without getting mushy or leaving a hard uncooked center.
Some notes for the soaking step
- You can soak the rice for longer, up to a half-day or so. If you're cooking rice for dinner, you can rinse the rice in the morning and cook it when you get home (or set the timer on your cooker accordingly). If you are cooking rice for a bento you're going to be packing in the morning, rinse the rice and set it to soak at night. When the weather is very hot, it's safest to soak the rice in the refrigerator, but otherwise room temperature is fine.
- If you are in a big hurry you can skip or shorten the soaking time, but it will affect the texture of the rice. If you just don't have time to soak the rice, add a tiny bit more water.
- If you have a rice cooker, put the drained rice in the bowl and add water up to the 2-cup level. If you have a high-end rice cooker you just need to switch it on, since the cook cycles on these have the soaking time already built in. If you have a less expensive cooker that starts cooking the rice as soon as you switch it on, add some soaking time by setting a timer for 1 hour or more.)
- If you're lucky enough to have new-harvest rice, you can shorten the soaking time to 15 minutes.
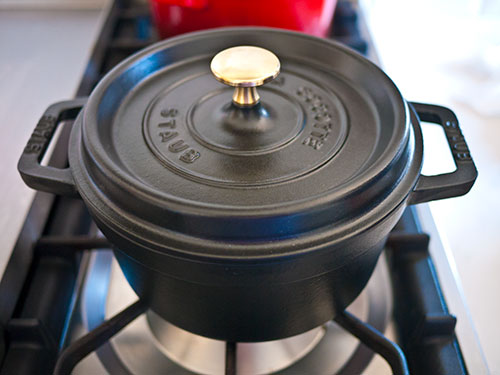
So we've soaked our rice. For this lesson we'll be using a small yet hefty cast-iron pot. You can use these instructions as-is if you are using a donabe (a pottery pot for cooking rice) or a tetsugama (an iron rice cooking pot). If you want to use a frying pan to cook the rice, please follow the instructions on this page. The most important thing that all methods share is a lid that sits quite securely on the cooking container. And of course, if you're using a rice cooker you can just set it and let it do its thing.
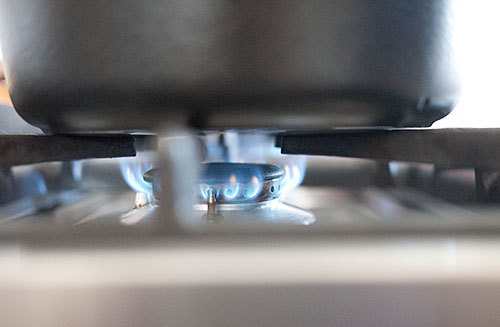
So we've now soaked our rice. Put the pot on the hob over medium heat on the low side. If you're using gas, the flame should be about this big in relation to the size of the pot. (For electric or IH, set the heat to a tick below medium.)
Now at this point, you can do as my mother advises: Set a kitchen timer for 12 minutes and forget about it until the timer goes off. This actually works pretty well. But if you want to fuss a bit over the pot and see how it progresses....
Let the pot heat. Do not open the lid. You should hear the pot start to boil. Eventually you should see steam coming out of the edges of the lid. (The photo doesn't show this too well to be honest, but in person you'll see it.)
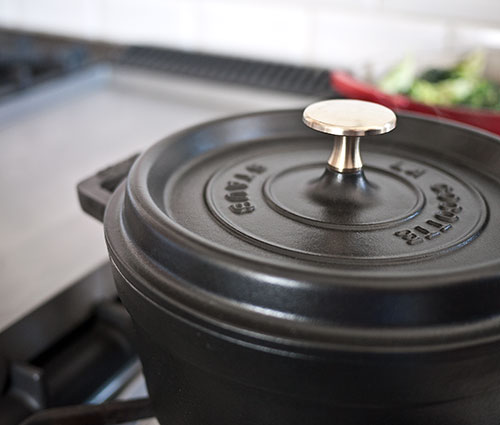
Lower the heat a little bit more so it's a bit stronger than a bare simmer, and set the timer for 7 minutes. (Actually if you just let it be, the boil time + simmer time does add up to around 12-13 minutes. Mother knows best!)
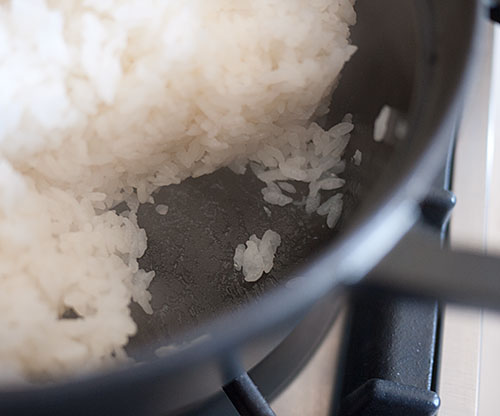
At this point you really shouldn't open the lid but if you must, take a peak. You should see that the water is gone, the rice looks shiny, and there are little steam holes all over the surface. You may see a few bubbles.
Put the lid back on as quick as you can! Turn the heat off, and let it rest for 10 to 20 minutes.
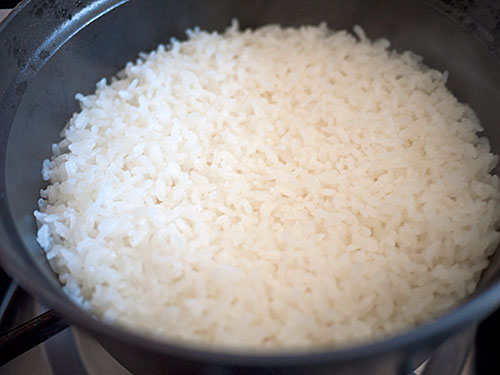
Open the lid - your rice should look like this: perfectly cooked, the surface dotted with little steam holes. There should be no excess moisture left in the pan, but if there is, put the lid back on and put the heat up to high for 20 seconds. Note that this may brown the bottom of the rice a bit.
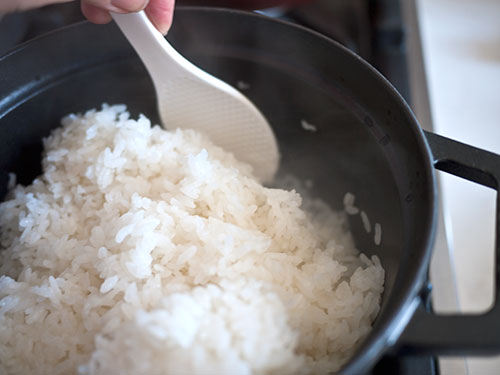
Stir up your rice with a rice paddle. Use the paddle to turn up the rice away from the sides and the bottom. The stirring-up process helps any remaining excess moisture to evaporate, so the rice grains don't have a chance to get mushy. (Tip: this stirring-up is especially important if you are using a rice cooker and using the keep-warm function. If you don't stir up the rice the bottom parts get rather water logged.)
There shouldn't be any grains glued to the bottom or burned!
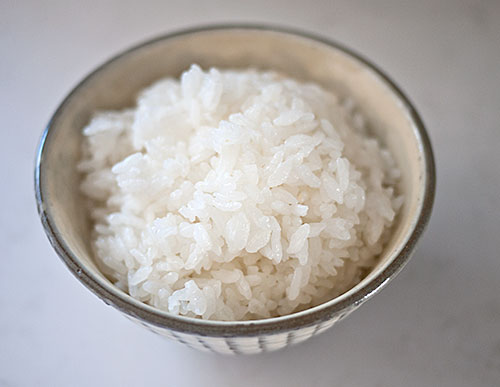
Take a small bit of the rice. Note the texture, the color, the flavor...it should be very much like that microwave-packet rice. Grains separate, sticking slightly together; sticking well together when pressed lightly; and a very clean flavor.
And there you have it - a perfectly cooked bowl of Japanese rice...
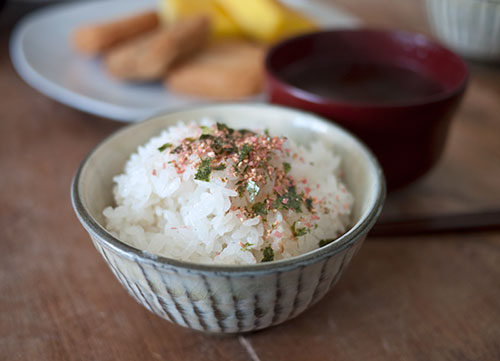
...the star of a Japanese meal (I put a little furikake on top.)
Phew, that was a lot of steps! But it's pretty easy once you have them down.
Summary: How to cook perfect Japanese rice
- Rinse the uncooked rice in several changes of clean water, while constantly draining the cloudy water away.
- Let the rice dry out a bit in a sieve.
- Put the rice and 1.1 times the rice in volume of clean water (c.g. 1 cup of rice = 1.1 cups water) in your cooking implement for at least 30 minutes, ideally 1 hour or more up to half a day.
- (Or follow the instructions for your rice cooker.
- If using a pot with lid: Lid on, heat pot over medium-low heat for 12 minutes (use a timer!) OR...heat over medium-low heat until steam is coming out from the edges of the lid; lower the heat a bit, and cook for 7 minutes (use a timer!)
- Turn off the heat, lid still on. Let rest for 10-20 minutes.
- Turn the rice up with a paddle.
- Enjoy!
I hope you can digest all that. I know it's a lot of instructions, but by following along you will have rice success.
Remember: whatever cooking method you use, including ones I haven't covered here such as using the microwave or the oven, the important parts of the process to ensure proper texture and taste are the rinsing an soaking steps.
Coming up, we'll have a bonus for Lesson 2: how to prepare sushi rice, or shari, plus how to take care of your rice cooker. Stay tuned!
And of course as usual, please post your comments, questions and results in the comment section right here or on the Facebook page.
Addendum: If you have very hard water
If you have very hard water in your area, you may find a kind of grey scum on the top of your cooked rice. You can just remove the scum and the rice should be ok, but if it bothers you try using filtered water for the soaking and cooking. When we lived in the Zürich area we used to filter our rice-cooking water with a Brita filter. In our new house, we invested in a water softener - one of our best decisions ever. The rice no longer looks grey, our towels aren't hard and spiky, and our shower drain doesn't need cleaning out nearly as much.
Submitted by maki on 2013-03-14 21:57.

 Welcome to Just Hungry, where we serve authentic Japanese recipes and more! I'm


Comments
anon.
15 March, 2013 - 01:06
Permalink
Re: Japanese Cooking 101, Lesson 2: Prep and Cook A Great ...
I miss rice so much-any advice for T2 diabetics? how do you cope?
maki
15 March, 2013 - 01:37
Permalink
Re: Japanese Cooking 101, Lesson 2: Prep and Cook A Great ...
You may want to kick me for not being helpful, but my solution, and what the diabetes organizations in Japan recommend, is to just eat less rice. So in my case I just have one not-overloaded bowl of rice, once a day. I watch my overall carb intake, not eating bread on days I eat rice, etc. That seems to work well for me at least, although I'm still on medication too (metformin). I do feel your pain though! ^_^;
anon.
17 March, 2013 - 20:38
Permalink
Re: Japanese Cooking 101, Lesson 2: Prep and Cook A Great ...
As a T2 diabetic, I still eat rice almost every day, but I do eat less of it. I also sub in brown rice (brown Jasmine, brown basmati, black rice) for white rice most of the time.
Anna
30 March, 2013 - 16:34
Permalink
Re: Japanese Cooking 101, Lesson 2: Prep and Cook A Great ...
Great question. I'm not yet on any meds, can't seem to handle any amount of rice at all. I feel our pain!
Masae Takashima
2 May, 2013 - 21:58
Permalink
Re: Japanese Cooking 101, Lesson 2: Prep and Cook A Great ...
Nishiki makes a type of rice called Haiga, which is a medium grain Japanese-style rice that has the rice germ intact, and the hull removed. It is the best of both worlds: All the health benefits of brown rice WITHOUT the taste and texture of brown rice! Cooks and tastes just like white rice, too. I buy it from my local Asian grocery store. It's US$14.99 for a 15 pound bag. Amazon.com also sells it, at a much higher price.
I've tried medium grain brown rice and it made me miserable. Couldn't stand the texture and taste. Long grain brown rice is definitely better, and it would be my go-to rice if it weren't for this Nishiki Haiga Rice.
Katie
17 May, 2013 - 19:18
Permalink
Re: Japanese Cooking 101, Lesson 2: Prep and Cook A Great ...
Have you tried sprouted brown rice? I know it's still not anything like white rice, but I find it's a bit less... hard? Than normal brown rice (even the properly cooked kind).
I've never cared for how toothsome and dry brown rice seems, but sprouted rice turns normal brown rice chewy. It's not as taste-neutral as white rice, but it's something at least. :)
G
15 March, 2013 - 05:30
Permalink
Re: Japanese Cooking 101, Lesson 2: Prep and Cook A Great ...
Great article! I have question though, unfortunately for many of us outside of Japan the only access to good quality rice is what you have mentioned above, a pack of microwavable rice from Japan. Can you explain whether or not any of the Californian Short Grain Rice lets say Nishiki Brand come close to anything grown in Japan?
maki
15 March, 2013 - 09:31
Permalink
Re: Japanese Cooking 101, Lesson 2: Prep and Cook A Great ...
Nishiki rice is fine, as are other California- (or general U.S.) grown Japanese type rices. Take a look at my rice notes on the course ingredient list.
anon.
15 March, 2013 - 05:44
Permalink
Re: Japanese Cooking 101, Lesson 2: Prep and Cook A Great ...
Hi Maki,
Is there a reason to soak your rice other than to ensure each grain is cooked all the way? I've never soaked my rice and it has always come out evenly cooked. I usually cook jasmine rice in a mid-priced Tiger brand rice cooker for reference. My mother taught me not to open the rice cooker until steam has stopped seaping out also to ensure that the rice is coked evenly, but in my experience, I'v never noticed a difference.
Also, thank you so much for this series!
maki
15 March, 2013 - 09:29
Permalink
Re: Japanese Cooking 101, Lesson 2: Prep and Cook A Great ...
The ideal state of Japanese style rice is for each grain to be plump and juicy. This differs from the ideal state of jasmine rice and other long grain rices. That's one reason why I have the part about seeing how the rice should be with the microwave rice packet. You'll see that the 'ideal state' for Japanese style rice is quite different. In a way, Japanese style rice is very persnickety.
That being said, your mom is probably right in that jasmine rice will turn out a better also if you follow her instructions, especially when cooking the rice in a pot or a cheap basic rice cooker. Tiger makes very good rice cookers, and modern rice cookers are very forgiving and 'fix' any shortcuts and so on that we take.
Hope that helps!
Lin
15 March, 2013 - 05:51
Permalink
Re: Japanese Cooking 101, Lesson 2: Prep and Cook A Great ...
I am not following the course yet, but saving all the information for when I can do it. The bento course as well.
Meanwhile, PLEASE tell me where to get the fabulous cast iron pan you used to cook rice. We have a (name not given) rice cooker and I at least am very dissatisfied with it. There are enamelled cast iron pots and perhaps they would do. But your pot looks perfect. I can't quite read the brand on the lid!
maki
15 March, 2013 - 09:50
Permalink
Re: Japanese Cooking 101, Lesson 2: Prep and Cook A Great ...
It's a Staub 20 cm diameter (2.3l capacity) cocotte...which I got on sale here (and it's cheaper in France anyway since they make it here!) I am not sure they sell that size in the U.S. but this one is the smallest I could see on Amazon. Mine is I think one size smaller than that, and it's great to cook 2-3 cups of rice. Besides Amazon I believe Sur la Table carries Staub in the U.S. It is rather pricey there though. Le Creuset would be ok too - the point is to have a heavy bottom, stable pot with a securely fitting or heavy lid.
Sylvia S. B. S.
15 March, 2013 - 22:25
Permalink
Re: Japanese Cooking 101, Lesson 2: Prep and Cook A Great ...
Staub is really pricey on Amazon, too. I mean it costs a fortune!!!!
maki
15 March, 2013 - 23:03
Permalink
Re: Japanese Cooking 101, Lesson 2: Prep and Cook A Great ...
They sure are expensive. But so gorgeous too. My little 20 pot is adorable. (Staub is very "in" at the moment in Japan, and there are several really good Staub cookbooks there.)
Nadja
15 March, 2013 - 08:18
Permalink
Re: Japanese Cooking 101, Lesson 2: Prep and Cook A Great ...
Thank you for the detailed instructions, Maki! Hopefully I'll be able to produce a bowl of perfect rice some day - I loved the rice in Japan and was so surprised that it tasted good without anything else to eat with!
I got myself a Hitachi Rice Cooker international model with timer function when I was in Japan last summer, hoping to get perfectly cooked rice at home too, but I have problems with adjusting the water level. Most times my rice comes out a bit mushy (and with a bit of rice bran >_>) although I try to follow the steps in the instructions and on your site... Maybe it's the rice, maybe it's the hard water (although I cook the rice in Brita-filtered water) or maybe it's the frikkin' cooker. (It does not have a specific Japanese Rice function, but advises me to use the same water level as for Yasmine rice. I tried to reduce the water amount and now it's better, but still far from perfect) Brown rice and all the other grains I cook with it are always perfect. Argh!
Greetings from Austria,
Nadja
maki
15 March, 2013 - 09:54
Permalink
Re: Japanese Cooking 101, Lesson 2: Prep and Cook A Great ...
Try the pre-soaking + 1.1 times the volume of rice as described in the lesson and see how that works out.
Nadja
21 March, 2013 - 09:10
Permalink
Re: Japanese Cooking 101, Lesson 2: Prep and Cook A Great ...
Dear Maki,
I proudly present my first bowl of good rice :) The method worked and finally I was able to impress my guests - thanks a lot. I'm looking forward to all the other dishes you are going to show us!
Nadja
Katarzyna
15 March, 2013 - 08:39
Permalink
Re: Japanese Cooking 101, Lesson 2: Prep and Cook A Great ...
Maki, I need some advice. My rice cooker is a very basic one (there are only two options: cook/warm up). Rice cooked in this tool always sticks to the bottom, sometimes it's even slightly brownish (burnt) and tight/firm. This is not how it's supposed to be, right? So every time I open the lid of the rice cooker and stip up the rice in order to avoid it getting burnt.
Your rice is so beautifully white, like little pearls, so maybe I'm doing something wrong? Or the rice cooker does not function properly?
maki
15 March, 2013 - 09:52
Permalink
Re: Japanese Cooking 101, Lesson 2: Prep and Cook A Great ...
It looks like there might be something wrong with the heating element of the cooker. Has it been like that since it was brand new? If so...I'm afraid you might have gotten a defective model. If it worked properly before, did you have an accident with it (rice boiling over) and is there a burned on residue on the heating element? If so that should be carefully cleaned off. I'll have some tips about taking care of a rice cooker in the next post.
Elena
15 March, 2013 - 14:18
Permalink
Re: Japanese Cooking 101, Lesson 2: Prep and Cook A Great ...
Katarzyna, I have the same problem! Did you try the pre-soaking + 1.1 times the volume of rice?
Maki, when the cooking cycle ends can I open immediately the rice cooker's lid or is it better to let it rest for 10 to 20 minutes?
Thanks
maki
15 March, 2013 - 20:19
Permalink
Re: Japanese Cooking 101, Lesson 2: Prep and Cook A Great ...
With less expensive rice cookers the resting time is not calculated in, so it's best to let it rest 10 minutes plus.
Jinann
17 March, 2013 - 12:36
Permalink
Re: Japanese Cooking 101, Lesson 2: Prep and Cook A Great ...
I have the same exact problem as well.. I also have a super cheap, basic rice cooker (only has one switch-- cook) meant for one person, so I guess it makes sense, but it still bothers me because I'm pretty sure I'm doing everything correctly. I've made rice in the same way using better rice cookers and never had a problem, so I guess you do get what you pay for...
Ingrid
15 March, 2013 - 12:00
Permalink
Re: Japanese Cooking 101, Lesson 2: Prep and Cook A Great ...
I have the same problem as Katazyna but my ricecooker has behaved that way from the very beginning. As it was a cheap model, I shouldn't be surprised I guess. I thought my top rice (above the slightly burnt layer) was OK, but I never knew about the drying and soaking steps after rinsing. After getting clear water while rinsing, the rice always went immediately into the cooker. Could that maybe be a reason for the burnt rice also?
PeteNotMeat
15 March, 2013 - 17:50
Permalink
Re: Japanese Cooking 101, Lesson 2: Prep and Cook A Great ...
I also have a cheapo rice cooker and found that experimenting with the soaking time/amount of cooking water helped with the bottom layer issue, although it never went away completely.
Jillian
15 March, 2013 - 13:46
Permalink
Re: Japanese Cooking 101, Lesson 2: Prep and Cook A Great ...
I'll be taking a look at this the next time I make rice! My process is basically the same, but I always felt like I was doing something wrong since no one ver really taught me...
And I've wondered this for a long time, but does the temperature of the water for the rinse step matter? Maybe I'm just being silly but I always think about it when I'm rinsing my rice. What do you usually do?
maki
15 March, 2013 - 20:17
Permalink
Re: Japanese Cooking 101, Lesson 2: Prep and Cook A Great ...
Good question. I usually use the coldest water my hands can stand. In the summer it's no problem just to use cold tap water, but in the winter it's really cold, so I warm it up a little bit by turning it towards hot...but not actually hot, just not bone-chillingly cold. I think when you use hot water the rice start to smell kind of bran-y, if that makes any sense.
kingyo
15 March, 2013 - 15:59
Permalink
Re: Japanese Cooking 101, Lesson 2: Prep and Cook A Great ...
Are these microwave rice packages that good? When I first saw them at the asian markets I thought they must be terrible, but now I see people buying them by the case...
maki
15 March, 2013 - 20:15
Permalink
Re: Japanese Cooking 101, Lesson 2: Prep and Cook A Great ...
They really are pretty good, which is why I use one as a 'baseline' for rice here. Try one!
Joe
16 March, 2013 - 09:13
Permalink
Re: Japanese Cooking 101, Lesson 2: Prep and Cook A Great ...
THANK YOU!!! This is an amazing post that gave me a huge 'ohisashiburi' feeling when I put it into practice last night (maguro-don).
Loving this Japanese cooking 101 course. Keep up the amazing work.
daniel- comedera.com
16 March, 2013 - 15:30
Permalink
Re: Japanese Cooking 101, Lesson 2: Prep and Cook A Great ...
Thank you for the post, i have tried to do the japanese rice, but never sucedded hahaha, now i think i will make it better!
I also have a food blog, and i love asiatic food!
thanks for the recipe!
anon.
17 March, 2013 - 04:18
Permalink
Re: Japanese Cooking 101, Lesson 2: Prep and Cook A Great ...
Boy does this seem counter intuitive. Found this post randomly while searching for how to use the rice cooker I bought at a second hand shop. All I could find were stupid posts about how to make the rice fluffy and not sticky. I cannot stand fluffy rice that doesn't stick together. All the other posts I found were for long grain and I always use medium grain rice. I had not considered washing my rice. I was always told that rinsing rice caused all the nutrition to be washed away. Though you are likely not using enriched rice. I have never seen japanese rice that was enriched. I also have never seen american rice that was not enriched. I swear I had a point when I started this post. It doesn't look like my point is coming back to me. Anyway next time I use the rice cooker I will try soaking the rice first. It is just a little tiger brand cooker so it is not exactly top of the line. It just starts cooking right away.
Oh I remembered my point. What exactly is the difference between american medium grain rice and japanese medium grain rice? I mean other than american rice being coated with extra vitamins and stuff.
maki
18 March, 2013 - 04:22
Permalink
Re: Japanese Cooking 101, Lesson 2: Prep and Cook A Great ...
I have to plead ignorance on this since I have never tried enriched medium grain American rice. If it can't be rinsed because the rinsing is going to wash off that enrichment that you have paid good money for, I guess you should not be rinsing it. But that probably means it will not taste anything like how Japanese style rice should.
Generally when something is 'enriched', e.g. bread, cereals and so forth, it just means the manufacturer has sprayed on or mixed in some artificial vitamins and other nutrients. So...you might as well take a vitamin supplement (or get your nutrients from other food sources) and use un-enriched rice. Just my opinion of course...
Heda
17 March, 2013 - 10:13
Permalink
Re: Japanese Cooking 101, Lesson 2: Prep and Cook A Great ...
Was skeptical about need to wash rice 4 or 5 times but have to admit the end result was superb rice! I have a tiger japanese rice cooker and thought washing would make no difference and might even stop the grains from sticking nicely together to eat with chop sticks. But have to admit it did taste cleaner and the rice grains were perfect and stuck together in nice little chop stick size bites. Am totally converted to the benefits of washing rice.
Yukiko
17 March, 2013 - 12:13
Permalink
Re: Japanese Cooking 101, Lesson 2: Prep and Cook A Great ...
Is your rice really that light? I think all rice I've ever tried weighing is about 85 g / 100 ml (uncooked rice). So 150 g would definitely be under 200 ml?
maki
18 March, 2013 - 18:55
Permalink
Re: Japanese Cooking 101, Lesson 2: Prep and Cook A Great ...
I just re-measured and 1 rice-cooker cup (1 gou - 一合), which is 180cc, of uncooked rice, actually around 160g. So a Japanese 1-cup measure of 200cc would be about 177g, and a U.S. cup (243cc) would be 216g. Different rices may weight a bit differently though. The most important thing is probably the volume ratio of rice to water - 1:1.1 or 1:1.15.
Yukiko
20 March, 2013 - 05:33
Permalink
Re: Japanese Cooking 101, Lesson 2: Prep and Cook A Great ...
Thanks! Btw, I love your sites :)
Milady
17 March, 2013 - 12:38
Permalink
Re: Japanese Cooking 101, Lesson 2: Prep and Cook A Great ...
Thank you so much for this course! I have been making Japanese rice for a few years, but I love this step by step method. I just wanted to raise a small issue: 360 ml or 1 1/2 cups of uncooked rice made for 300 grams here, not 150 g :)
Can't wait for the next lesson, thanks again!
maki
18 March, 2013 - 19:03
Permalink
Re: Japanese Cooking 101, Lesson 2: Prep and Cook A Great ...
You are right - and, it's actually approximately 160g per rice-cooker cup - __180cc__. I've amended the text above. Thanks for pointing it out! I hope most people were using the volume measurements ^_^;
Carla B.
17 March, 2013 - 16:03
Permalink
Re: Japanese Cooking 101, Lesson 2: Prep and Cook A Great ...
I've always cooked my sushi rice like any other rice (rinse, cover with water to 1/2" depth above the rice surface, bring to a boil uncovered, then turn to low and cover, cooking for an additional 25 min. (40 for brown rices)) It always turned out well. But I thought I'd try your method, and it really refines the result, bringing out the glutinous aspect of the rice. The grains are individual but sticky in a dry way, and moist and slightly bouncy when chewed. The stickiness dissolves into a silky coating in the mouth. Turned out so perfectly, I'll never cook Japanese rice any other way. I ate the leftovers at room temperature for breakfast with a shake of furikake (this one was crunchy bits of wakame and extremely crunchy little balls of rice and cornstarch) on top. Thanks!
EnaKate
17 March, 2013 - 17:51
Permalink
Re: Japanese Cooking 101, Lesson 2: Prep and Cook A Great ...
Thank you for this post, and the whole cooking series so far, really enjoying it :-)
I've been having the same problem of sticking rice (although not burning) with my cheapo rice cooker, so I guess I'll experiment more with soaking times. I tried putting a little oil in the bottom of the cooker once (with basmati rice) because it was recommended online, but it didn't help, just added more calories!
Maki-sensei, I was wondering if you could explain why you drain and then soak the rice again? I'm sure there is a reason but I don't understand. (May be it is the magic step that will solve the sticking rice - that'd be nice!).
Also to Lin - Lodge in the USA makes a little cast iron pot. I haven't used it myself but I have one of their cast iron/ enamel ones and I've been really happy with it. The advantage is its much cheaper than the European brands, at least in the US anyway. Might be helpful depending on where you live.
EnaKate
22 March, 2013 - 18:47
Permalink
Re: Japanese Cooking 101, Lesson 2: Prep and Cook A Great ...
Tried cooking rice again, making sure to rinse, drain and then soak (for several hours this time) as per instructions. Unfortunately the rice is still sticking. I guess you get what you pay for with rice cookers... But at least my rice tasted great!
maki
23 March, 2013 - 20:50
Permalink
Re: Japanese Cooking 101, Lesson 2: Prep and Cook A Great ...
You want to rinse the rice several times but you don't want to let it sit in the cloudy water that has all the stuff you want to wash away from the rice. So that's the reason you drain the cloudy water away, and then rinse again with fresh water.
EnaKate
24 March, 2013 - 16:07
Permalink
Re: Japanese Cooking 101, Lesson 2: Prep and Cook A Great ...
Oh sorry, I meant after the last rinse when you let the rice drain and sit for 15 - 30 minutes. It seems like it would dry out, and I wondered what the purpose of that drying step was. I guess it's just to make sure all the starch has drained out?
Thank you so much for your help :-)
kate
18 March, 2013 - 04:12
Permalink
Re: Japanese Cooking 101, Lesson 2: Prep and Cook A Great ...
Thank you, thank you! These instructions were so helpful. I have never been a fan of rice, but it turns out i love Japanese rice when it is properly prepared. I managed to find short grain Japanese style "sushi" rice at my local super market and now i will never go back to basmati. Thank you again for all you amazing recipes!
Carla B.
18 March, 2013 - 13:07
Permalink
Re: Japanese Cooking 101, Lesson 2: Prep and Cook A Great ...
Meant to ask you: do you use the soaking method for other kinds of rice too, or just the short-grain Japanese rice?
maki
18 March, 2013 - 17:56
Permalink
Re: Japanese Cooking 101, Lesson 2: Prep and Cook A Great ...
I do actually soak other types of rice too, except for risotto where the grains are sautéed. I give basmati for instance about a 10-15 minute soak and it turns out pretty nicely.
Joseph Chaiwhan Kim
18 March, 2013 - 19:00
Permalink
Re: Japanese Cooking 101, Lesson 2: Prep and Cook A Great ...
Great tips. Of course, you could also buy a rice cooker if you plan to eat a lot of rice. Some are quite simple and have no options. Others are expensive and sophisticated. We have both at our home.
anon.
19 March, 2013 - 15:35
Permalink
Re: Japanese Cooking 101, Lesson 2: Prep and Cook A Great ...
Um are there any special things we want to do for brown Japanese rice, like increase soaking time?
maki
20 March, 2013 - 04:01
Permalink
Re: Japanese Cooking 101, Lesson 2: Prep and Cook A Great ...
For brown rice, the instructions here work great. Brown rice does need extra soaking time, but only needs a couple of rinses. The main point in cooking brown rice is to 'break through' the coating.
LizW
20 March, 2013 - 18:35
Permalink
Shortgrain rice
So here I am, all set to follow along and my rice is currently washed and draining... and I'm thinking that it doesn't really look like your pictures. I cook Japanese rice a lot, and it's usually "ok" but not great...
Anyway, it turns out that my friendly local Japanese store sells me short grain rice, not medium grain rice. It's Yume Nishiki and it claims to be suitable for sushi and "all Japanese dishes".
I realise this isn't what your instructions say (and I'll fix it next time I buy rice) but I'm just wondering what the difference is. It just a preference thing, or a regional thing? And if my rice comes out great, can I still have a tick for the lesson :)
maki
20 March, 2013 - 19:17
Permalink
Re: Shortgrain rice
I really can't say why the rice you are using doesn't look right unless I take a look at it, but I can tell you about Yumenishiki rice. Yumenishiki is a Japanese variety of rice that is grown in Italy, under the supervision of Japanese food distributors. It's a great choice for Japanese food fans in Europe since you're not paying for the shipping charges for Japanese rice grown in Japan, the U.S. or China. I have a bag of it myself!
LizW
20 March, 2013 - 19:55
Permalink
Re: Shortgrain rice
OK, thanks!
(I think it doesn't look "right" only in that it looks different - the grains look shorter than those pictured. Presumably because they are :)
If I go ahead and cook it as per your medium grain instructions, do you think it'll come out well?
LizW
20 March, 2013 - 22:18
Permalink
Re: Shortgrain rice
Yay! I went ahead anyway in the interests of getting tea on the table, and it's certainly the best rice I've ever managed to cook at home :)
I've followed instructions really carefully before, but they often rely on you seeing what the rice looks like - and my only glass-lidded pan isn't great. But "put in pan, cook for 12 minutes" even I can manage :)
Yay, rice! Thank you!
http://www.flickr.com/photos/9043927@N05/8574972161/in/photostream
Vicky
21 March, 2013 - 05:25
Permalink
Re: Japanese Cooking 101, Lesson 2: Prep and Cook A Great ...
1) What if you have an electric rice cooker?
2) What do you do with left over rice? I want to include more rice in my diet but I can't imagine going through this process multiple times a day. Aside from putting leftovers in the fridge?
Louisa
23 March, 2013 - 18:35
Permalink
Re: Japanese Cooking 101, Lesson 2: Prep and Cook A Great ...
"We will be using a fine-mesh sieve and a bowl that the sieve can fit over, as described in the list of required ingredients and equipment for the course. This will yield about 660 grams, or a bit more than 4 U.S. cups of cooked rice, which will serve 3-4 people as part of a Japanese meal."
I've read the whole recipe over and over, why can't I find how much uncooked rice to use? I can only find the yield, but I don't see others with this question. What am I missing?
maki
23 March, 2013 - 20:48
Permalink
Re: Japanese Cooking 101, Lesson 2: Prep and Cook A Great ...
I screwed up something there and made the amounts disappear, but they're back now!
Louisa
23 March, 2013 - 21:24
Permalink
Re: Japanese Cooking 101, Lesson 2: Prep and Cook A Great ...
Thank you!
ladybee56
23 March, 2013 - 18:58
Permalink
Re: Japanese Cooking 101, Lesson 2: Prep and Cook A Great ...
Thank you for the time you put into doing these lessons; much appreciated.
The first time I cooked the rice it turned out very mushy. So I've just cooked again and it turned out good this time, Yea!
I also did a batch in my electric pressure cooker following your rinsing and soaking directions, then I followed the cooking procedure for my cooker. The rice turned out pretty good, it is a bit more sticky (not mushy but more sticky than the batch I cooked on the stove top).
I noticed in your notes for a high end rice cooker you said not to soak the rice, so I'm wondering if maybe I should not soak the rice if cooking in pressure cooker? Anyway, I'm going to try again but this time not soaking the the rice over night and see how it turns out. I cook basmati in my electric pressure cooker and it turns out perfect every time.
Oh, unless I'm blind I could not find the amount of rice to use for this lesson listed in this post. I went back to the email letter and found the amount there but I don't seem to find it in this posting.
ありがとう
maki
23 March, 2013 - 20:45
Permalink
Re: Japanese Cooking 101, Lesson 2: Prep and Cook A Great ...
Some high end cookers include the soaking time in the cooking cycle, so it's not totally necessary to soak for an additional time on top of that, but it doesn't hurt either. If you're using a pressure cooker the soaking is not totally necessary since the pressure does help penetrate the grains with moisture, but again, soaking doesn't hurt. (Actually the most recent high end rice cookers use pressure for all or part of the cooking process.)
I must have somehow put in some odd code in the text to make the amounts disappear, but they are back now! Sorry about that.
Yaronit
22 April, 2013 - 03:36
Permalink
Re: Japanese Cooking 101, Lesson 2: Prep and Cook A Great ...
Thank you so much for your rice instructions and recipe for sushi rice seasoning. The last time I tried to make sushi (I am not Japanese but I may be a Japanophile if that's the word for it), it was a nightmare! This time, it was a much more controlled and rewarding experience.
Mawb
13 May, 2013 - 03:20
Permalink
Re: Japanese Cooking 101, Lesson 2: Prep and Cook A Great ...
OK. *Cracks knuckles*. I will be trying my hand at the frying pan method of cooking rice next week, now that I have picked up a bag of sushi rice from Sainsury's!
I really miss the rice I enjoyed during a couple of trips to Japan, and wanted to try and cook some here. But until I read your site, I was being baffled by the term "sushi rice" in shops, thinking the dry stuff must be unsuitable for anything but sushi, which I didn't want to make. Thank you very much for the reassurance on that point - it's saved me more mail order costs)!
Just one question really, and it's about volume ratios. I might be being either stupid or fussy here, but I'd just like a little clarification on the weights and measures, as I'm a bit unsure.
If I wanted to prepare around 200g of uncooked rice (which I guess would work for 2-3 people), what amount of water in millilitres would I use? I do usually cook in metric but find I have no idea how to work out a 1:1.1 ratio when one ingredient is measured by weight and the other by liquid volume.
Sorry again if this is a stupid question but I don't want to fall at the first hurdle. Thanks!
Katie
17 May, 2013 - 19:38
Permalink
Re: Japanese Cooking 101, Lesson 2: Prep and Cook A Great ...
Based on the 1:1 to 1:1.15 ratio, you'd want 220-230mL of water for 200g rice.
1mL water= 1cm^3 =1g.
Hope this helps!
Mawb
12 June, 2013 - 23:27
Permalink
Re: Japanese Cooking 101, Lesson 2: Prep and Cook A Great ...
Thank you it does! I was overcomplicating things :)
Mawb
14 May, 2013 - 21:40
Permalink
Re: Japanese Cooking 101, Lesson 2: Prep and Cook A Great ...
Since I am still waiting for my frying pan lid to arrive in the post, I dug out the best pot I could muster - a big Circulon saucepan with a well-fitting lid, and decided to give this a try. At the same time I made your dashi and converted it into a tofu and veg miso soup.
I'm totally behind with this course as ironically I was in Japan when it started, but I am trying to catch up!
I just wanted to say that my rice turned out just as I remember it should be! Amazing! I have always wondered what rice to buy and how to cook it - now I know :) Thank you so much :)
amy
17 May, 2013 - 03:18
Permalink
Re: Japanese Cooking 101, Lesson 2: Prep and Cook A Great ...
What do you think of cooking rice in salted water?
maki
17 May, 2013 - 04:40
Permalink
Re: Japanese Cooking 101, Lesson 2: Prep and Cook A Great ...
It depends on what you're going to use the rice for. When you're cooking rice as part of a Japanese meal, the other items have enough salt so there's no need to add salt to the cooking water. It lets you really taste the rice itself too.
Aria
26 May, 2013 - 06:01
Permalink
Re: Japanese Cooking 101, Lesson 2: Prep and Cook A Great ...
Just wondering, do you have to use a rice paddle when stirring the rice or would it be okay to use something like a spatula instead?
Mawb
12 June, 2013 - 23:23
Permalink
Re: Japanese Cooking 101, Lesson 2: Prep and Cook A Great ...
Personally I use an all-wooden cooking spatula, since I manages to lose the wooden/bamboo rice paddle I used to own. It works fine!
Aghork
11 June, 2013 - 11:11
Permalink
Re: Japanese Cooking 101, Lesson 2: Prep and Cook A Great ...
Do you think it would be possible to pre-wash a bigger amount of rice when I have to cook a small amount every day?
I am not a fan of freezing rice, but washing consumes huge amounts of water, even if it's not that much rice.
Would it make a difference if I pre-washed 1kg of rice for the whole week and let it dry again, so I just need to put it in the rice cooker and set the timer, instead of washing 200ml of rice every day?
Samm
18 June, 2013 - 04:09
Permalink
Re: Japanese Cooking 101, Lesson 2: Prep and Cook A Great ...
Hi! Can i know what is the purpose of draining rice for 15-30mins? I live in a country where the staple diet is rice, and we eat japanese rice fairly often. The rinsing part, my mom does that, but we hardly do the draining part? Does it have to do with japanese rice, or all rice in general?
Clive
31 August, 2013 - 17:42
Permalink
Re: Japanese Cooking 101, Lesson 2: Prep and Cook A Great ...
I have just started cooking Japanese food after finding your site a couple of weeks ago. This course is extremely helpful and have completed most of it. Originally, I had only a regular non-stick saucepan so I tried it. The rice was okay flavor-wise but it came out the pan almost as one piece. So I looked around online for a heavy bottom pan. As mentioned by others here very expensive, and then I saw a 21 cm cast-iron pan at Argos (UK), only £25!!!
So I got it yesterday and cooked up a batch of rice. It was sufficient for four portions, so I ate one portion and froze the rest. Had another portion today from the freezer today and it tasted just as good.
So thank you Maki-san for this course as it has been a great intro to Japanese cooking.
Guillaume Drolet
23 October, 2013 - 11:15
Permalink
Re: Japanese Cooking 101, Lesson 2: Prep and Cook A Great ...
I noticed that your most recent rice cooking guide (this one basically) is quite different from your older one (http://justhungry.com/2003/11/japanese_basics_1.html) ... Why is that? Actually, it's mostly the cooking part that differs.
I've tried to simply cooking on 1 notch below medium heat for 14 minutes and leave it there as you said here and ... at the end the pan was still full with water :p Maybe I did something wrong and I didn't notice .. I'll give it another shot.
I think the other method you described is a bit more complicated but gave more reliable results for me. I'm trying to see what I can do to tweak your cooking directions in this lesson to fit my stove top's power but I'm not too sure yet.
Otherwise thank you very much for your rice cooking guides. Previously I had used someone else's rice cooker so .. I had no idea how to actually cook it in a pan.
Now I'm wondering about chinese rice.... who would think rice is such a complicated thing?
maki
24 October, 2013 - 07:03
Permalink
Re: Japanese Cooking 101, Lesson 2: Prep and Cook A Great ...
It could be that you need to raise the heat a tad. Were the rice grains cooked through despite the excess water? You can also try turning the heat up to high at the end, to evaporate any remaining water (the rice will making a crackling sound in the pot). I don't do this part, which is the main difference between my old method, because it usually resulted in a brown bottom for me...which is still tasty, but I prefer my rice to just be plain steamed. ^_^
Be sure to do the resting part at the end too, where the rice absorbs more moisture.
ran
6 December, 2013 - 16:33
Permalink
Re: Japanese Cooking 101, Lesson 2: Prep and Cook A Great ...
Hi Maki, I'm a regular reader of your website and a great fan of Japanese culture. I'm just wondering how often you should clean the inner lid of the rice cooker.
anon.
20 January, 2014 - 01:09
Permalink
Re: Japanese Cooking 101, Lesson 2: Prep and Cook A Great ...
Any advice on how to cook Japanese rice in a stainless steel pot? I followed this instructions but it came out very mushy.
Thanks
maki
20 January, 2014 - 02:05
Permalink
Re: Japanese Cooking 101, Lesson 2: Prep and Cook A Great ...
Try to describe the procedure you used, otherwise I have no way of knowing what went wrong.
- Did you use the right kind of rice?
- Did you use a pot with heavy sides, especially a thick bottom? Stainless steel pots don't conduct heat as well as cast iron, copper or aluminum pots, so need one that has a good, thick heavy bottom if possible.
- Did you use the right amount of water?
This recipe has worked for many, many MANY people. So if you troubleshoot what went wrong, it should work for you too.
Jasper
11 August, 2014 - 14:40
Permalink
Re: Japanese Cooking 101, Lesson 2: Prep and Cook A Great ...
Just followed this recipe to the letter, and got some pretty excellent rice! My first attempt loosely following another recipe was a disaster, but I stuck to this (including the 'ignore it for 12 minutes' part) and my rice came out beautiful, and a great texture for my first try with making onigiri.
Tokyo Lab
19 October, 2014 - 10:42
Permalink
Re: Japanese Cooking 101, Lesson 2: Prep and Cook A Great ...
Great tips!! We would also recommend to use a pan with a clear lid so you don't have to open it to see if the water is boiling. And don't forget the rice paddle! We found a great one in Tokyo: http://www.tokyolab.co.uk/japanese-food-kitchen-tableware/43-spatule-sha...
Magda
7 November, 2014 - 11:26
Permalink
Re: Japanese Cooking 101, Lesson 2: Prep and Cook A Great ...
After i turned off the heat, am i supposed to let the rice sit on the still-warm cooking hob (electric)? Or remove pot from heat completely and let it rest.
Thank you :)
maki
26 November, 2014 - 02:10
Permalink
Re: Japanese Cooking 101, Lesson 2: Prep and Cook A Great ...
If you have an electric hob that stays warm, take the pot off it and let it rest/steam without heat.
Cleo
21 July, 2015 - 22:36
Permalink
size increase
Hi Maki,
I have been making my rice this was for about 6 months now and it always comes out great! My turn off the heat results are not the same as yours since it looks like ALL of the water is in the pan left but by doing the resting phase, the water disappears and I have perfect rice!
I did have a question for you, I tend to bring rice in my bento boxes every day and this causes me to make rice at least once a week, normally twice a week (I use your freezer method of storing my cooked rice so it's ready to go during the week), is there a way I can cook more than 1.5 cups of rice at a time? I don't have a rice cooker I have an electric stove but I would LOVE to be able to double the recipe size or something to that effect. Do you have any insight, I am hesitant to straight double anything because I don't know what to do with the cooking time or heat level and I don't want to have an epic fail and ruin the rice and have to throw it away.
maki
23 July, 2015 - 04:09
Permalink
Sure, you can cook 3 cups of
Sure, you can cook 3 cups of rice at a time. Just double the amounts and have a big enough pot (because the water tends to bubble up a lot when you're cooking rice).