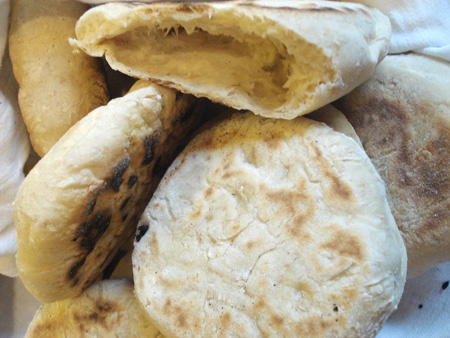
Homemade whole wheat pita bread, no oven needed
Even with more than 900 (and counting) posts and almost 200 recipes posted on Just Hungry, there are still lots of things that I make all the time, but haven't got around to writing about yet. A lot of those things take more time to write up than cook, almost. This whole wheat pita bread recipe is one of them. You do have to account for the obligatory rising time for the dough, but otherwise it's dead easy, and your kitchen working time in total is maybe 20 minutes, 30 tops. For fresh baked bread!
The key is that the pitas are not baked in the oven. No need for preheating baking stones or quarry tiles or all that stuff. They are baked, so to speak, in a plain old frying pan. You can make them any size you want as long as it fits in the bottom of the frying pan. I like to make small, palm-sized ones for easy snacking or bringing along for lunch.
This recipe also only requires 3 cups of flour in total. I sometimes get a bit frustrated by bread recipes that call for like 6 cups of flour, since we are a small household watching our collective waistlines and there's no way we can eat that much bread in a reasonable amount of time. Sure you can freeze the excess, but then you can quickly accumulate massive amounts of frozen bread if you bake often. So anyway, this makes 12 smallish pitas, which are gone quite quickly, especially with a resident Bread Fiend in house.
I referred to many other pita bread recipes, especially this excellent one on About.com, before arriving at this version. The cooking in the frying pan concept came from watching naan bread and Chinese flat breads puff when cooked on griddles. A griddle is not necessary though - and I think most people have at least one frying pan.
The recipe is so simple, and I make it so often, that I've committed it to memory.
Whole wheat pita bread without an oven
- 1 packet (7g) instant dried yeast
- 250ml warm water (A U.S. cup plus a bit)
- pinch of sugar
- 2 cups whole wheat flour
- 1 cup white bread flour (or strong flour; in Switzerland use Zopfmehl (farine de tresse)) (Using bread flour ensures there's sufficient gluten in the dough.)
- 1 tsp salt
- 1 tsp olive oil
Equipment needed:
- a non-stick frying pan or two
- lids to fit the pans
- mixing bowl
- clean washed pillow case
Mix together the warm water (from the tap is fine), yeast, and pinch of sugar. Leave in a warm place until frothy.
Mix together the flours and salt in a large mixing bowl. Add the liquid gradually, stirring vigorously with a wooden spoon. Add the oil, and as soon as it's formed a ball start to knead. (If it's a bit dry, add water drops at a time until it's kneadable). Knead until smooth and pliable.
Put the dough ball in a plastic bag or in a clean bowl covered with plastic wrap and leave in a warm place until more than doubled in bulk. In the winter, I find the ideal warm place is on top of a Big Ass PC case with gimpy motherboard which gives out excessive heat despite two cooling fans. This is one instance where I consider a PC to be superior for a task than a Mac.
After the dough has risen, punch it down and knead again. Cut into 8 to 12 equal pieces. Round off each piece into a smooth ball, and leave, covered with a damp cloth or plastic, to rest for about 10 minutes, on a floured surface. (This resting time I find is critical for the successful formation of the pocket inside the pita.)
Flatten the balls with your hand or a rolling pin to your desired diameter (for 12 pieces, about 5-6 inches / 12-15 cm is good). Let rest again for a few minutes so that the dough balls 'relax'. [Edit: this was omitted before. It's not critical, but if you're having trouble getting a 'pocket' to form inside the pita, give this step a try.]
Heat up one or more non-stick frying pans, over medium-high heat.
Take a flattened ball and put in a hot frying pan. Cover with lid. Leave for about 2-3 minutes, until it puffs up. Flip over and cook for another 2-3 minutes on the other side. Some will puff more than others - don't worry if the puffing is minimal, you can still use it.
Take out of the pan and immediately put into the pillow case. Close up the pillow case. This allows the pita to cool in a somewhat closed environment, so the surface is sort of pliable rather than crispy and brittle. (You can, of course, use a large kitchen towel instead, but I thought you might have fun pointing out to your friends that there's a crazy woman who wants you to use a pillow case for baking bread. And it works!)
Repeat for the rest of the dough. Once you get used to it, you can heat up 2, 3 or more frying pans at once and cook several at a time. I find that juggling two pans is my limit though, or the pitas get too black. A little charring is fine - it just adds to the flavor.
Now let's see if there's a pocket inside by cutting one open.
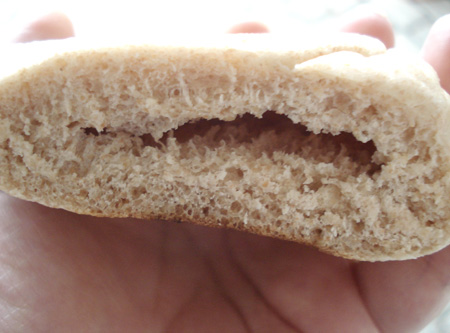
There sure is!
(Sometimes there isn't a pocket - the ones that didn't puff much may be solid inside - but you can easily make one with a knife, or just by wiggling around two fingers inside the bread.)
These come out a bit puffier than commercial pita bread, but are delicious - better! - nevertheless. Use as you would any pita.
Submitted by maki on 2007-11-14 16:56.
If you enjoyed this article, please consider becoming my patron via Patreon. ^_^
 Welcome to Just Hungry, where we serve authentic Japanese recipes and more! I'm


Comments
Karen
16 November, 2007 - 08:28
Permalink
Hi Makiko, What a great
Hi Makiko,
What a great idea, home-made pita on the stovetop--I'll bet they taste fifteen times better than the terrible processed kind grocery stores carry here in the U.S. I'm going to try your nikujaga recipe for a nabe night with friends soon! This recipe was featured in this week's Science Fair on my blog: http://periodicstyle.blogspot.com/
hillary
16 November, 2007 - 23:59
Permalink
Mmm...
Maki! Sorry it's been soooo long since I've stopped in at Just Hungry. I wanted to say hi and that I'm back! Pita bread looks fantastic. Dip that in a little hummus and we're set...
VegeYum @ A Lif...
18 November, 2007 - 00:09
Permalink
Oh I love the look of these
Oh I love the look of these breads. I am going to make them today!
paul
18 November, 2007 - 07:04
Permalink
These look good but I still use my oven ;-)
I may have to try this, though. I usually make naan on a baking stone (2 cups/11 oz flour, 3/4 cup yogurt, tsp yeast, tbsp butter, water as needed, tsp salt) in the oven at 500 degrees (about 6 minutes). But the griddle method bears trying.
This is fun stuff. I found you via the bento site, as I am interested in raising the quality of the meals around here. I'll have to keep an eye on things here, as I can learn a lot.
anon.
20 November, 2007 - 15:06
Permalink
hi, can i use just white
hi, can i use just white flour ?
i don't really want to use whole wheat flour... will white flour and flour for stress do?
i'm in geneva btw.
maki
20 November, 2007 - 16:46
Permalink
white flour
white flour should work fine!
zyna
22 November, 2007 - 19:45
Permalink
Mmhhh!
I made these today with only white flour and they were delicious!
I got 10 pitas out of it and my boyfriend and I ate 3 each for dinner.
Thank you very much for the recipe, this was the first time I tried to make something with yeast dough, that didn't come in a package (I'm 20 years old and just recently started developing some cooking 'skills' :D). Okay, so I had some problems with the dough - first too dry then way too sticky etc. - but in the end it worked out. But although all the pitas puffed up really nicely, none of the 6 we ate so far had a pocket inside :/ I'm wondering if this may have been caused by the flattening? Could it be that I simply pressed too hard while flattening?
zyna (from Germany)
maki
23 November, 2007 - 12:28
Permalink
the pocket
zyna, the pocket development is influenced by how well the gluten in the bread has developed I think, so you may want to try kneading the dough a bit longer so that the dough ball becomes really smooth and 'bouncy'. The resting time after flattening is also important.
Also, since you used all-white flour the water amount may differ a bit from the original recipe, so what you want to do is add the water gradually, stopping when it reaches the right consistency. I am guessing (I haven't tried it!) that with all white flour you'd only need about 230ml of water. Start with 200ml, then only add water in dribbles until you have the right dough consistency.
Finally, if you can get a hold of it, try to use at least 1/3rd 'bread' or 'strong' flour... in Germany you'd look for higher number flours I believe (550, 650 etc) - this has a higher gluten content than lower-number flours.
(though one of our Swiss acquaintances living in München says there is no equivalent to Zopfmehl there so he has to smuggle it in...)
zyna
23 November, 2007 - 13:20
Permalink
Ohh, so you say, the
Ohh, so you say, the flattened balls have to rest again? That makes sense :)
I let them sit end rest only after I formed the little dough balls, but not after flattening them out.
But I think your recipe says nothing about resting time after flattening. Or maybe I just misunderstood it.
Thank you for the very helpful reply, next time I will try it with whole wheat flour and bread flour - this time I just used what I had on hand - and keep your advice in mind.
maki
23 November, 2007 - 14:47
Permalink
you are right
I did omit the resting after flattening part...sorry! I have edited it in now. It's not critical, and you may get a pocket regardless, but it seems to help. Though not all of them will have pockets necessarily (but it's easy to cut one in and it'll still taste fantastic!)
emi
24 November, 2007 - 03:30
Permalink
calories
hi maki!
i've been searching for a whole-wheat pita bread recipe for a while so I was glad that you shared this recipe. I will try them this sunday! Out of curiosity, I was wondering if you knew how many calories were approx. in each pita.
maki
25 November, 2007 - 15:58
Permalink
calories
It's a bit difficult to come up with an exact number, but if you divided the dough into 12 pieces they'd be about 108 calories per pita.
Here's how I come up with that -
2 cups whole wheat flour - 815
1 cup white flour - 450
1 tsp. oil - 40
total - 1305
divided by 12 = 108 calories
emi
25 November, 2007 - 21:27
Permalink
thanks so much, maki! :) I
thanks so much, maki! :) I love the festive holiday layout btw.
ramon
24 November, 2007 - 07:16
Permalink
yoghurt in the dough
a little yoghurt in the dough adds a nice tang to the final bread product, reduce the water by a bit if using yoghurt as part of the moistener for the dough.
sugarlaws
6 December, 2007 - 17:59
Permalink
YUM!
i'm always on the lookout for easy bread recipes -- this looks perfect! pitas are the best.
Audrey
31 January, 2008 - 19:54
Permalink
Japanese Bread
Hi Just Hungry! This looks great and I will give a try soon.
Any chance you will bake a loaf of soft, light, Japanse (or Chinese version) of bread? I'd like to see what technique to use in order to bake a nicely puffed up bread for my three year old. I've tried a couple times baking that Hong Kong style sweet bread with egg yolks, but twice the bread turned out densed, too densed and feels like I am early a hunk of dough, LOL. Thanks much!
maki
1 February, 2008 - 08:01
Permalink
puffy soft bread
Audrey I don't really have a baking recipe scheduled at the moment, but the key to making any yeast bread soft and puffy is to use the right yeast (a 'strong' or bread flour is usually called for), the right amount of hydration (water or other liquid), and to knead it enough. When you have finished mixing and kneading the dough it should not be a hard lump, but soft and bouncy, like a baby's bottom. Hope that gets you going!
Ranja
19 May, 2008 - 20:36
Permalink
whole wheat pita breads-no oven
Hi!
I just made the pitas using only whole wheat and corn flour (i can't consume white flour at the time but I have to take something to at work!). They turned out just fine! Only there was not just one puff on each pita but several, they look kind like "blisters" but it's ok!
Thanx for the recipe
Rania
Athens, Greece
Thrifty Domestica
27 May, 2008 - 22:46
Permalink
quick and scrumptuous!
My hot hubby is always begging for pitas, but I needed a healthier, quicker recipe. This one does the trick fabulously!
Oasis Man
18 February, 2009 - 18:58
Permalink
Re: Homemade whole wheat pita bread, no oven needed
Thanks for sharing the experience:
for developing the puff it is complicated and depends on
1-the flour
2-the kneeding time (or quality)
3-resting time
4-resting time (after flatining ) I think it is the most important
5-the heat the most important factor (think of it: if you open the oven the pastry, the bread, goes down , or the puff died gradualy if oven is opend a lot)
that is my educated guess .. I had pokets almost always (but what I do not know which factor is the most important but if I had to guess it would be the heat in baking, and the resting before baking) by the way you can make the same receipe but coating the bread with sesame and egg
kisses
from the Prairi...
18 May, 2009 - 23:56
Permalink
Another tip for a perfect pocket...
I've used this recipe exactly as given twice, and have never had a problem with a lovely pocket forming in each pita.
I do not cover the pita for the first side that it's on the pan. After about 5 seconds on the pan, I begin pressing down on it lightly and repeatedly with a flat spatula/flipper. This makes multiple bubbles amalgamate into only one, and pushes that bubble to the outer edges - creating the perfect pocket. After the underside is golden, I flip it and cover for the 2nd side.
(I got the spatula idea from making Indian roti/chapati - like on this video around the 4:30 mark http://www.youtube.com/watch?v=jD4o_Lmy6bU)
I've also dumped all the ingredients into my bread machine on the dough cycle - turned out fabulous! Thanks for this delicious recipe!!
Nick.
23 July, 2009 - 06:15
Permalink
Re: Homemade whole wheat pita bread, no oven needed
Maki san, your site is inpiring . ...I live in a mansion in Fukuoka for the last 15 years and miss having an oven to bake breads. I recently spent a reasonable sum of cash on a 10 inch cast iron skillet and a matching lid and have been making Jalopeno tinted cornbread on the gas burner...it works ok actually. Can't wait to try the pita bread...off to Mr Max to hunt down some yeast....honto ni arigata gozaimasu!
P.S Will have a crack at making Umeshu this summer too...having the access to the recipes in English really helps
maki
23 July, 2009 - 08:38
Permalink
Re: Homemade whole wheat pita bread, no oven needed
That is an awesome comment. Thank you! Ganbatte kudasai ne! :)
anon.
11 March, 2010 - 00:19
Permalink
Re: Homemade whole wheat pita bread, no oven needed
is olive oil absolutely necessary, or can i use vegetable oil? the reason i ask is that i have no olive oil at present. thanks. this recipe looks attainable. i'm planning to respond again, after i've tried this recipe. In my country, we have something called sada roti, but the thing with that is i need a 'tava', a flat iron griddle, which i don't have access to as yet either. so a frying pan sounds ideal to me right baout now to make pita bread, which i suppose can replace sada roti until then.
maki
11 March, 2010 - 16:00
Permalink
Re: Homemade whole wheat pita bread, no oven needed
Any vegetable oil will work fine.
Robynne
16 March, 2010 - 15:07
Permalink
Re: Homemade whole wheat pita bread, no oven needed
I made this bread last night, and although most of it was a big flop, I got a handful of really nice ones!
After some practice I also managed to shape some, and managed to get a rather cool dinosaur shaped one. They were a big hit with my mum and brother!
anon.
30 March, 2010 - 02:59
Permalink
Re: Homemade whole wheat pita bread, no oven needed
I'm terrible at this stuff, but these came out great. Really authentic tasting. Reminds us of the pita we eat in Egypt.
Nathan
26 May, 2010 - 04:45
Permalink
Re: Homemade whole wheat pita bread, no oven needed
Yum this looks great! I make my own flour and get my wheat from Organic Food. Mill the wheat and you have your homemade flour!
anon.
25 July, 2010 - 22:16
Permalink
Re: Homemade whole wheat pita bread, no oven needed
has anybody tried this with spelt or kamut flour?
Dina
15 February, 2011 - 03:45
Permalink
Re: Homemade whole wheat pita bread, no oven needed
I am going to try to make these this weekend. For the ones that don't form a pocket you could use them to make pizza. that is what I have been doing with the store bought kind. i am trying to lose weight and a book called the belly fat cure gives a really good recipe for the pizza but store bough pita bread is expensive. thank you for the recipe. oh you could also take the ones that don't have pockets and cut them into bite size pieces and bake them in the oven for about 10 to 15 min and they will get crispy then eat plain like chips or dip them in salsa, hummus, guacamole.... etc.
Ashley
4 April, 2011 - 21:25
Permalink
Re: Homemade whole wheat pita bread, no oven needed
I'm very excited to try your recipe, but I have a question first, can I omitt the white flour and use all whole wheat flour instead?
anon.
14 April, 2011 - 07:51
Permalink
Re: Homemade whole wheat pita bread, no oven needed
Wow, never knew making bread was that easy
Alia
5 August, 2011 - 22:11
Permalink
Re: Homemade whole wheat pita bread, no oven needed
You don't mention how thick to roll them out... And so there is no second rising (after they have been rolled out)?
anon.Leanne
5 March, 2013 - 20:25
Permalink
Re: Homemade whole wheat pita bread, no oven needed
I am inspired to make this bread....my question is ..do I need to heat them right away after the dough has risen and they are cut or can I wait to 'bake' them later in my frying pan? thank you! Leanne
maki
6 March, 2013 - 00:04
Permalink
Re: Homemade whole wheat pita bread, no oven needed
You need to cook the dough as soon as it's cut, formed and rested for the specified time, or they won't rise or form a pocket when cooked.
Nati
31 May, 2013 - 08:58
Permalink
Re: Homemade whole wheat pita bread, no oven needed
Hi! I wanted to make some of those lovely pitas for picnic on Sunday but because of work I`m really limited in time and so need to plan well ! How long approx. is the sitting time for each step? Thanks so much! I love the website and have to try more recipes!
maki
31 May, 2013 - 09:38
Permalink
Re: Homemade whole wheat pita bread, no oven needed
Allow for about 10-15 minutes for the yeast proofing stage, and an hour or so for the dough rising stage at room temperature. If you're busy one thing you can so is to put the dough in the refrigerator and let it rise slowly overnight or so; just take it out and let it come to room temp before proceeding with the forming and 'baking'. Each one takes about 15 minutes or so to cook, so again if you're in a big hurry just use multiple frying pans.
Nati
31 May, 2013 - 09:42
Permalink
Re: Homemade whole wheat pita bread, no oven needed
Thanks! That helps a lot!
pico
15 June, 2014 - 23:16
Permalink
Re: Homemade whole wheat pita bread, no oven needed
I this this is amazing! I live in a very hot climate in a small apartment and i love making pita but heating the oven as hot as it goes an opening it up so many times can get my space sooo hot. This is genius - I can't believe how easy and simple. You are my favorite, maki.