Cooking courses on JustHungry.com
A listing of free cooking courses held on Just Hungry.
Courses for 2013
A list of JustHungry courses for 2013.
Japanese Cooking 101: The Fundamentals of Washoku
The response to Bento 101, my introductory course to the basics of bento lunch making, has been overwhelmingly positive. So I've decided to follow it up with another structured online course titled Japanese Cooking 101: The Fundamentals of Washoku. We'll be conducting it here on Just Hungry since it's about general cooking methodology rather than specific to bentos.
Description
As you may already know, the cooking that goes on in Japan is roughly divided into 4 cuisine types: Washoku, yohshoku (or yoshoku), chuuka, and everything else. The first three, washoku (which means "Japanese food"), yohshoku (meaning "western food" see a description of yohshoku) and chuuka (Chinese food) comprise most of what Japanese people cook for themselves every day. And of these washoku, which comprises what's considered traditional Japanese food, is the most important to learn if you want to master Japanese cooking, since it forms the foundation for everything else that goes on in the Japanese kitchen.
In this course you'll about the fundamental building blocks of washoku and Japanese cooking. After completion you should be able to tackle Japanese recipes with a lot more understanding and ease. It may even help you to recognize the difference between good and not-so-good Japanese food when you eat out.
Format
During this 5 part course, we'll be making 5 dishes: rice, soup, and three okazu - the foods that go with rice. (There may be some variations to each item too.) Each dish will teach you specific skills and flavor combinations that are used all the time in Japanese cooking. And as a bonus, at the end you'll have a "full course" Japanese meal that you can serve proudly to anyone, even your Japanese friends, with the knowledge that it's pretty authentic.
Will it cost me anything?
Nope. Just like Bento 101, it will be free.
Requirements (or, is this course for you?)
- Because I want to teach you what "real, authentic" Japanese food should taste like, you will be required to purchase some ingredients that are fundamental to the cuisine. While I usually offer ideas for substitutions and so on in my recipes, for this course we won't be doing that. This does require you to make an initial investment in some foods that may be rather expensive or hard to get, depending on where you live. If that is an issue for budgetary or other reasons, then this course may not be for you.
- Unlike Bento 101, the focus of Japanese Cooking 101 will be entirely on cooking and cooking techniques. You should take this course only if you're seriously interested in Japanese food, and in cooking in general.
- You should know your way around the kitchen. You don't have to be an expert, but you should know how to wield a kitchen knife, cook something simple on the stove, and so on.
- However, I am going to assume that participants have no prior knowledge of how to cook Japanese food. I'll be explaining what each ingredient is, and how it's used, in detail. So it may be a bit too basic and tedious for people who have been making Japanese food for a while.
- You'll need access to a computer or some way of getting online of course. If you want to share your results visually, you should have a camera or camera phone etc.
- The meal we'll be creating will contain meat and fish products, so it may not suit you if you're a vegetarian, although you may find some techniques useful.
- Since two alcoholic products, sake and mirin, are fundamental to washoku, if you have any reasons for avoiding alcohol in cooking this course may not be for you.
- Last but not least, you'll get the very most out of this course if you follow every lesson in sequence and do each assignment. I estimate that it will require about 2 hours of your time per week.
Start date and duration
- We'll start the week of March 4th (right after Bento 101 wraps up)
- The course will go on for 4 to 5 weeks, and consist of 6 lessons with at least 5 cooking assignments.
Where do I sign up?
There's no formal sign up process. Just follow along when we start in March!
So there you have it. Interested? Questions? Let me know! I'll post the required materials and so on later this week.
(ETA: I inadvertently deleted the original announcement post - and more than 150 or so of your comments under it! :( If you asked a question or something and don't see it, please try re-posting your comment.)
Filed under: japanese washoku cooking courses japanesecooking101Japanese Cooking 101: List of required ingredients and equipment
The response to the Japanese Cooking 101 announcement has been very encouraging! I'm glad that so many of you want to learn about making Japanese food from scratch.
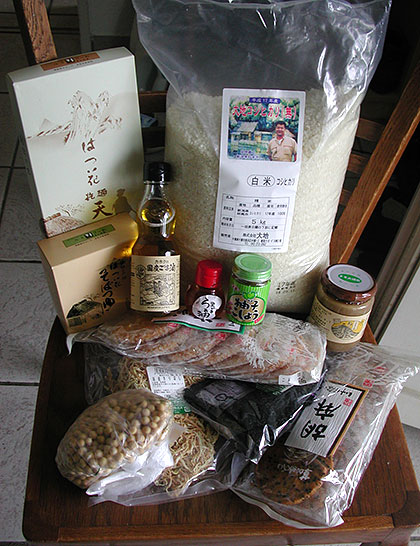
As promised, here is the list of required ingredients that I would like you to have ready for the course. Unfortunately most Japanese ingredients are rather expensive, but on the plus side this will form the nucleus of an authentic Japanese pantry after the course is finished, since we'll only be using a small amount of each.
The fresh ingredients needed will be announced before each lesson, but for this course I will be sticking to things that should be easily obtainable in most of the world, at any tme of the year, so you shouldn't have any problems there.
I've put together a section on my Amazon.com aStore that lists these ingredients. You don't have to buy them from Amazon of course, but you may find it useful to take a look anyway for a visual of the ingredients.
Basic pantry ingredients
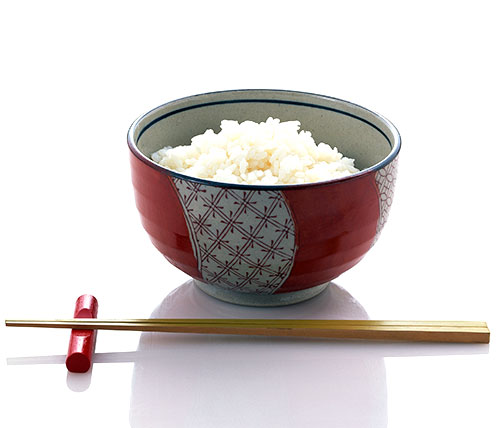
1. A bag of Japanese style medium grain rice
This is available at Japanese grocery stores. Make sure you get "japonica" rice, not "sweet" rice or "mochi" rice. Rice listed as "sushi rice" is ok. For this course, please don't substitute other kinds of rice or it will defeat the purpose. (And we'll be using white rice rather than brown rice since that's the baseline.) These days Japanese style rice is grown in the U.S. (mainly in California, but also in places like Arkansas) as well as in Europe (Italy and Spain), and various parts of Asia. I've not bought any Asian-grown Japanese rice myself, but all the U.S. or Europe grown Japanese rice brands I've tried have been fine. Japanese-grown rice is quite expensive although it's really top quality.
In the U.S. two well known and well priced brands are Nishiki and Kokuho Rose. Of these to I personally prefer Nishiki. If you can afford it, Tamanishiki and Tamaki rices are better quality. I've listed different pack sizes of all three rices on the aStore page. The most frugal option is to get a 2.2 lb / 1 kg bag of Nishiki rice.
In the U.K. and Europe, rice types like Yumenishiki and Yutaka are grown in Spain and Italy. I've tried both, and slightly prefer Yumenishiki, which is now our everyday white rice. Japan Centre (who ship all over Europe) carries both, as well as several Japan-grown rices and Nishiki and Tamanishiki from the U.S.
2. A pack of microwaveable Japanese rice, such as Katokichi
Most Japanese grocery stores stock this in the rice section. They are small packs of rice that can just be heated up in the microwave for 2 minutes. One brand is Katokichi, but there are others. Again please refer to the aStore page for a visual. (By the way, I could only find a big pack of these on Amazon, but you don't need all of that for the course. They usually sell for around $1.50 or so each in stores. If you end up with extras though, they are really handy when you are too busy or lazy to cook your own rice.)
The reason why I'm requiring this is that I want to make sure that you know what Japanese rice should look and taste like when it's properly cooked. I don't really trust the quality of rice at every "Japanese" restaurant around - I've had some pretty awful rice at some - and believe it or not these microwaveable rice packs are pretty good quality.
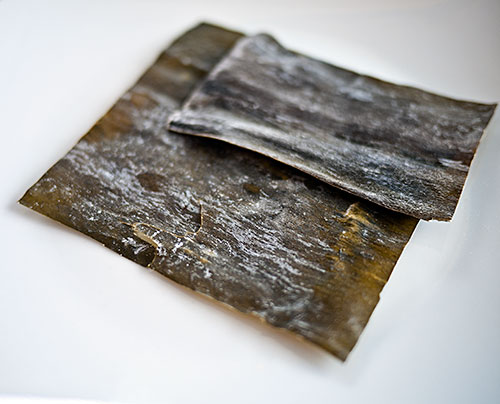
3. Dried konbu seaweed (also known as dashi kelp)
Essentials for making dashi, which is the foundation for most savory Japanese dishes.
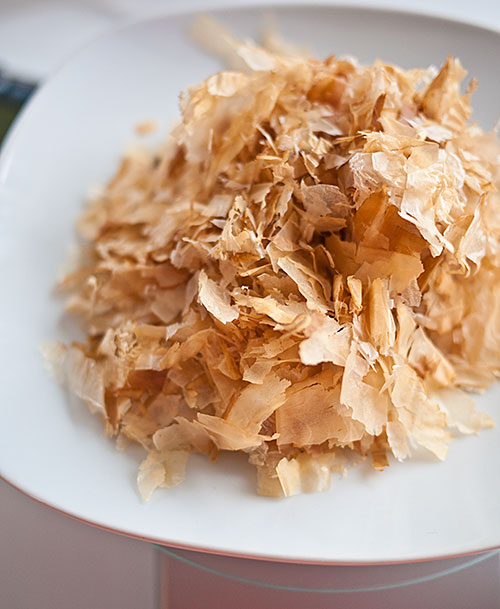
4. Katsuobushi (bonito flakes)
Another essential for making proper dashi stock. Don't bother with the tiny little 6-packs - that's meant to be used as a sprinkle on top of food. Get a bag filled with large, puffy flakes if at all possible. Again I refer you to the aStore page for a visual.
Alternative to 3 and 4: Dashi granules
If you cannot get either katsuobushi or konbu seaweed, dashi granules like Hon-dashi (an Ajinomoto brand) is better than nothing. Keep in mind that dashi granules have added salt, MSG and other things, so you will have to adjust your recipe accordingly.
5. Wakame seaweed
Used in soups and salads. You can usually just get the dried version, but if you're lucky enough to get the fresh, salted kind, let me know and I can tell you how to handle it.
6. Japanese brand soy sauce
The reason why I specify a Japanese brand is that soy sauce formulas differ a little from country to country. Two well known Japanese brands of soy sauce are Kikkoman and Yamasa. I prefer Yamasa but either is fine. A non-Japanese company that makes Japanese-style soy sauce is ok too.
7. Regular sake (preferred) or cooking sake
Sake is used in many Japanese dishes. I much prefer to use a regular sake, but if you can't get it using ryouri-shu or cooking sake is acceptable. Keep in mind that cooking sake has salt (and sometimes other things) added to it so you must adjust the salt in your dish accordingly.
Note: The question of substitutions for sake in cooking is addressed here.
8. Hon-mirin (aka real mirin, preferred) or Aji-mirin or mirin flavored seasoning
Hon-mirin is an alcoholic beverage that is used exclusively in cooking. Aji-mirin or mirin flavored seasoning is what it says - not real mirin, but fairly close, and containing less than 1% alcohol. Get hon-mirin if you can, but aji-mirin is acceptable.
Note: The question of substitutions for mirin in cooking is addressed here.
9. Rice vinegar
The standard vinegar used in Japanese cooking. Mild and slightly sweet.
10. White miso (shiro miso) or awase-miso (blended red and white miso)
Used for miso soup and a lot more. White miso is milder and less salty usually than red miso; blended miso is a great all-purpose miso. See Japanese Miso Primer for more about miso.
By the way, if you're in the UK or Europe Japan Centre carries a Japanese Cooking Essentials kit that contains everything you need for the course except for wakame seaweed, which you can just get separately. It has some other ingredients too which are handy for Japanese cooking. (Note: Japan Centre is an advertiser on Just Hungry, but I'm also a happy longtime customer.)
Equipment
Besides these ingredients, there are a few pieces of equipment that I'd like you to have on hand:
1. A fine-mesh sieve or colander
By fine-mesh, I mean a steel wire mesh rather than the kind of colander that is made of a sheet of metal with holes punched through it. This is used for rinsing rice efficiently. Again, I've listed an example on the aStore page for reference.
2. A bowl large enough to fit the sieve over
Used for washing rice.
3. A large (10 inch / 25 cm or larger) frying pan with a tight fitting lid or a heavy-bottomed pan with a tight fitting lid, or a rice cooker
Any of these can be used for cooking rice. Please have at least one of them ready.
4. Another large frying pan
For frying something!
5. A couple of saucepans or pots
For boiling, making soup, and so on.
6. A soup ladle
The big kind you use for cooking, not a fancy little soup-tureen one.
7. A sharp kitchen knife
A regular chef's knife or santoku knife is fine; no need for a special Japanese one. You should also have a cutting board.
8. A pair of bamboo or wooden cooking chopsticks
This is not mandatory, but it's very handy to have around for all kinds of Asian cooking.
9. A rice paddle
Again, not mandatory, but handy to have.
10. A selection of small bowls and a smallish plate
For presenting your final complete Japanese meal. You certainly do not have to go out and get specialized Japanese dinnerware for this (unless you want to) - just use what you have.
So there you have it. If you have any questions let me know in the comments.
Filed under: japanese ingredients washoku japanesecooking101Japanese Cooking 101: Fresh ingredient shopping list for Week 1
We'll be starting Japanese Cooking 101: The Fundamentals of Washoku next week. If you're cooking along with the course as the lessons are listed, this is your shopping list of fresh ingredients. This is in addition to the staple ingredients on this list.
For Week 1 your fresh ingredient shopping list is pretty short. Basically I want you get something that can go into miso soup (omisoshiru) or clear soup (osuimono or osumashi). Here are some suggestions for some classical ingredients, but you can go with something else if you like too.
For miso soup - choose 1 or 2 of the following (you don't need the whole list):
- Potatoes and wakame seaweed (which you have already in your staple list)
- Soft (silken) tofu, on its own or with wakame
- Cabbage
- Onion
- Daikon radish
- Spinach leaves
- Aburaage (fried tofu skins)
For clear soup - again, choose 1 or 2 of the following; if any of these ingredients are unfamiliar to you, just go with something else:
- Green onions (scallions)
- Wakame seaweed (on your staples list)
- Mitsuba
- Mizuna
- Spinach
- Soft (silken) tofu)
- Fresh shiitake mushrooms or regular mushrooms
- Chicken breast meat
- Kamaboko
If you haven't gotten all the ingredients on the staples list yet, the ones you will be needing are:
- konbu seaweed
- katsuobushi (bonito flakes)
- OR dashi granules
- wakame seaweed (if you'll be using it in your soup)
- miso
You'll also need some salt, which I'm going to assume you have anyway. (Any old edible salt will do here, you don't have to get expensive sea salt or anything unless you want to.)
And that's it! The first lesson will be posted early next week.
Filed under: japanesecooking101Japanese Cooking 101, Lesson 1: How to make dashi stock, the foundation of Japanese cooking
Welcome to the first lesson of Japanese Cooking 101! Throughout this course I hope to teach you about the foundations of traditional Japanese cooking or washoku (和食), as well as how to cook some Japanese dishes. So let's get started!
Lesson 1: Dashi
Dashi or stock (often called dashi stock, which is kind of redundant) is the foundation of all savory washoku. It's not just used in soups; it's used in everything, from sauces, dressings, as a liquid when stewing vegetables, and more. Without dashi, your Japanese dishes simply aren't right. If anything, dashi is more critical to Japanese cooking than meat, vegetable and fish stocks are to French cooking.
So what is dashi? Basically it is a liquid that is packed with umami, or glutamates. Umami is an essential part of any savory cuisine, but particularly so in Japanese cooking. It's not at all surprising that it was a Japanese scientist who invented the purest chemical form of umami, monosodium glutamate (MSG).
While using MSG or a instant dashi powder or granules is very handy, and although the quality of dashi powders have have improved in recent years, dashi made from time-tested, natural ingredients is more rounded and better tasting. The difference between dashi made from instant powder and one made from scratch is like the difference between a bouillon you make with a stock cube and one you make by simmering bones and vegetables for hours.
Luckily for us, the Japanese of yore came up with ways to make whipping up a batch of dashi very easy. Various dried ingredients, mostly from the sea, which can be kept without refrigeration, are used to make dashi quite easily - so much easier than making a meat stock. (I mean, dealing with those icky greasy bones after making chicken or beef stock is not nice.)
Main dashi ingredients
Dashi is made from one or two of these ingredients:
昆布 (kanji); こんぶ (hiragana): Kombu (or konbu) -seaweed
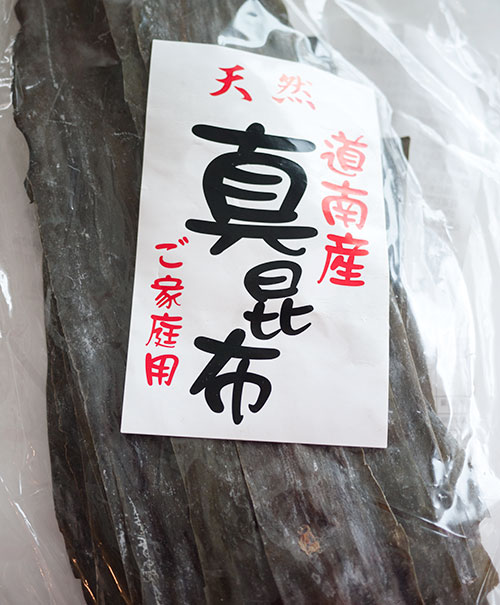
kombu seaweed is a slightly leathery seaweed. It may come in wide sheets, or long ropey strands. kombu is the most widely used dashi ingredient, and has the most neutral flavor of them all. If you are a vegan, a pure kombu dashi is an all-purpose, neutral tasting dashi.
Good kombu is covered on the surface with a fine white powdery substance. Do not wash this off - it's not caked on salt or dust! It's full of that umami we want to extract.

(Note: Many Japanese cookbooks instruct you to wipe the dirt off the surface of kombu with a tightly wrung out kitchen towel. The truth is, this really isn't necessary in most cases these days, since the kombu we get has already been cleaned very well. If you happen to get a batch with some gritty stuff on the surface you'll need to wipe it off, but make sure you're not getting rid of that powdery white stuff in the meantime. If a tiny bit of grit does make it into your dashi you can always strain it off later.)
鰹節 or かつお節 or かつおぶし: Katsuobushi, or bonito flakes
Also called kezuribushi or okaka.
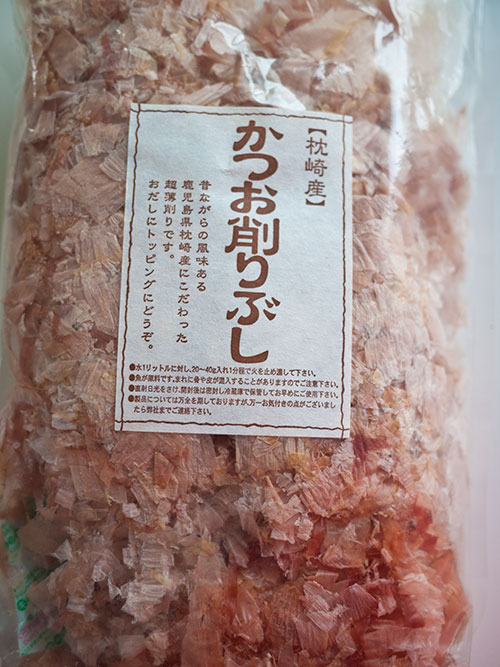
Katsuobushi is a bonito fish (katsuo) that has been dried and fermenented to develop a lot of umami. The fish shrinks down and hardens until it's like a block of wood. This is then grated or shaved into thin flakes, rather like wood shavings. The shavings are used in cooking. Good, fresh pre-shaved katsuobushi is fluffy and yellowish-beige in color with a hint of blush pink. Katsuobushi is the second most common dashi ingredient after kombu. Most of the dashi used around the country in restaurants uses a combination of kombu and katsuobushi.
Katsuobushi is usually available in flaked form, although you can get a whole katsuobushi and a special box grater and grate your own. While freshly shaved or grated katsuobushi is very flavorful, it's a pain in the ass to grate manually, so most people, including professional cooks, use the pre-shaved stuff. (I've seen some electric katsuobushi-shavers sold in Japan, but they're pretty expensive.)
Other dashi ingredients used
We won't be using these ingredients for this lesson, but these items are used in dashi too.
- Small dried fish such as nishin or iwashi (にしん, いわし: herrings and sardines) are often used instead of katsuobushi. Some regions of the country prefer them over katsuobushi, and some people just use them because they are cheaper. The dashi made with these don't taste overly fishy, but are a bit more fishy than katsuobushi.
- Dried shiitake mushrooms (干し椎茸) are used for dashi on occasion. The soaking liquid from reconstituting dried mushrooms makes a very strong tasting dashi, which can be used on its own or with kombu dashi.
Ichiban dashi (first dashi) and niban dashi (second dashi)
Simply put, ichiban dashi or first dashi is the dashi you make from fresh (as in previously unused) ingredients kombu and katsuobushi. Niban dashi or second dashi is dashi made from the kombu, katsuobushi and so on that has previously been used for making ichiban dashi. Ichiban dashi is used for things like soups, or when you want the maximum amount of umami possible. Niban dashi is used for things like stewed dishes, when other ingredients like meat and vegetables will add more umami to the dish so a subtler dashi is adequate. Niban dashi is really a way of being frugal with your dashi ingredients.
Let's make some dashi!
In this lesson we will be making a standard ichiban (first) kombu and katsuobushi dashi, but I'll also show you how kombu-only dashi is made.
Long time readers of the site may know that I've given you a couple of different ways of making dashi in the past. They all work well, but here I'll walk you through the method that I think makes the best tasting dashi.
We will making 1 litre, or about 4 U.S. cups of dashi. For this you will need:
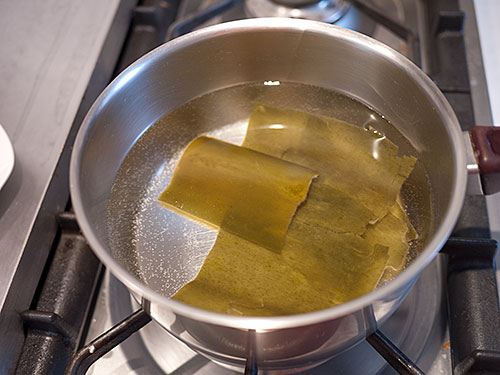
- 10 to 15 grams (1/3 to 1/2 ounce) of kombu
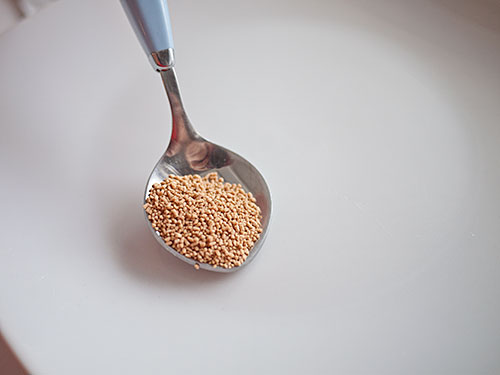
- 10 to 15 grams (1/3 to 1/2 ounce) of katsuobushi
- 1 litre or 1000 ml / 4 U.S. cups of water plus a bit of extra water (about 100ml or 1/3 cup) to allow for evaporation during cooking
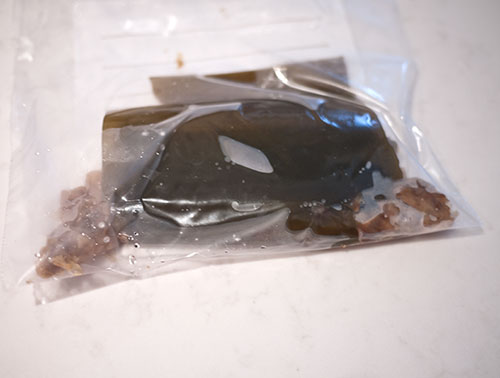
The ratio of water to ingredients: Allow for a minimum of 10 grams of kombu, and 10 to 15 grams of katsuobushi, per 1000 ml(1l) or 4 U.S. sized cups of water. If you're making a kombu-only dashi, you'll want to use at least 15 grams. If you don't have a fairly precise scale, 10 grams of kombu is about a 4 inch square piece - which is the advice I've given you previously, and 19-15 grams of katsuobushi is a good handful. Here I used 15 grams of each. If you don't get the amounts precise don't worry; since these are all-natural ingredients, you can't really use too much of it.
Here's 15 grams of kombu. - about 1 1/2 4-inch / 10 cm squares.
And here's 15 grams of katuobushi - a generous handful:
Set aside the katsuobushi. Put the kombu and water in a pan and leave it to soak for at least 30 minutes. You can leave it in the water for up to a day in the refrigerator, if you want to do the soaking step in advance.
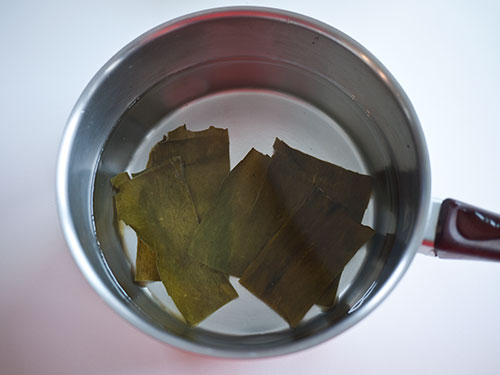
If you want to track how the dashi progresses, take a small sip of the liquid after the kombu has been soaking in it for a while. You should taste just a hint of the sea already. The surface of the kombu will have turned a bit slippery.
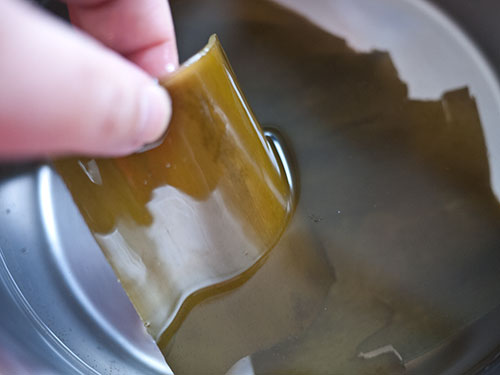
Put the pan on the hob and turn up the heat. Bring it to a boil, then lower the heat.
If you are making a kombu-only dashi, keep the pan on a barely-there low simmer for 30 minutes. Check the water level and add a bit more if it seems to be evaporating too fast.
IF you are making a kombu-katsuobushi combination dashi, simmer the kombu for 10 minutes, then turn off the heat.
Again, if you want to track the progress of the dashi, taste it at the 5, 10 and (if you're going for kombu-only dashi) the 30 minute stages. You'll notice that the dashi is getting gradually stronger in flavor, tasting like the sea. You should notice the umami even at the 5 minute mark. Kombu-only dashi barely has any color.
To make a kombu-katsuobushi combo dashi: After 10 minutes of simmering, add the katsuobushi, and turn the heat off.
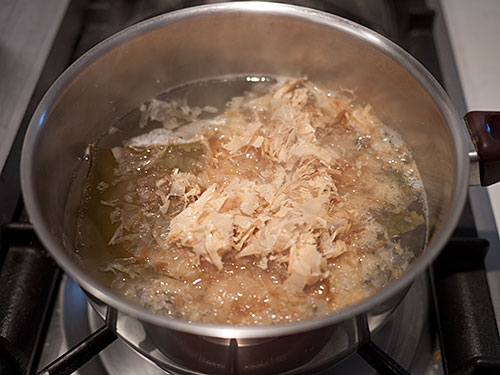
Let the pan sit for a few minutes (about 10 minutes) until the katsuobushi sinks to the bottom of the pan.
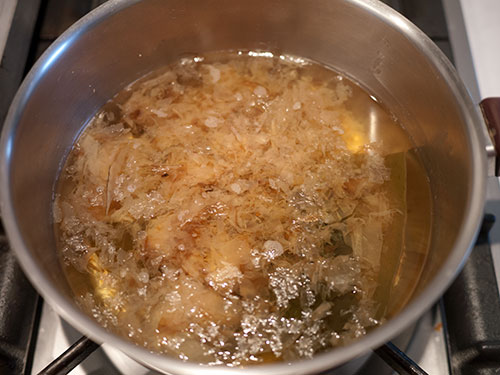
Strain off the liquid, using a fine-mesh sieve.
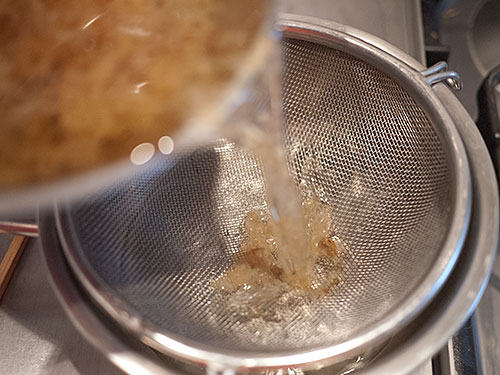
Don't throw away the used kombu and katsuobushi! We'll be using that in a later lesson, so put it in a plastic bag and store it in the freezer.
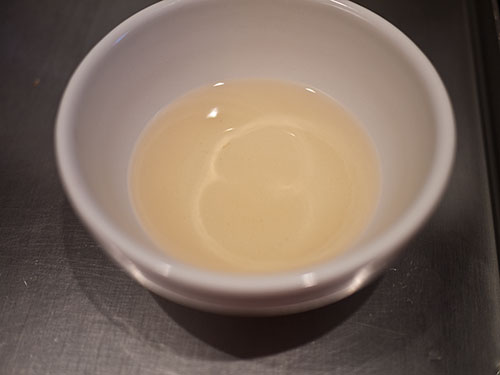
The dashi will have a pale golden color. Give it a taste - you'll notice the katuobushi, but it won't be unpleasantly 'fishy'; it will be like a very light bouillon without the salt.
At this point the dashi can be used right away, or stored well covered for a few day in the refrigerator. You can also freeze it - putting it in ice cube trays is a handy way of doing this.
_This pale golden liquid is the foundation for your savory Japanese dishes. Master the art of dashi making and you're well on your way to becoming a Japanese Iron Chef!
Tomorrow I'll show you how to turn this dashi into two kinds of soup: clear soup called osumashi or osuimono, and misoshiru or miso soup.
Addendum: Using instant dashi stock granules
While dashi made from natural ingredients tastes the best, it may be difficult of not impossible to get the raw ingredients like kombu seaweed and katsuobushi in some parts of the world. In that case using instant dashi stock granules is fine, and certainly better than using straight MSG or nothing at all. And to be brutal, most Japanese restaurants around the world do not make dashi from scratch; they use the granules, (Once you know the taste of 'real' dashi, you'll soon be able to tell when a restaurant isn't using it.)
A complaint I hear sometimes about dashi made from dashi granules is that it is 'fishy'. While they do have some fish flavor (and the granules themselves, especially certain brands, can smell rather fishy) since they are made from katuobushi extract and such, I suspect that one problem is that people are using far too much of it. You only need to use about 1 teaspoon per 4 cups (1 liter) of water, or 1/4 teaspoon per cup.
Dashi, whether made from granules or from scratch, is not meant to be used on its own; it is meant to be a flavor enhancer, not the entire flavor. You add other ingredients like salt, soy sauce, sake and so on to the dashi to "complete" the flavors. So trying to make add enough dashi granules to water or other liquid to make it 'strong' will not turn out well at all.
When you use dashi granules start with a small amount, add the other flavors and then add a bit more if you think it really needs it. Tasting as you go along is the best way to cook something you're unfamiliar with.
Dashi granules that come in pre-portioned packages like these are handy if you can't remember the dosage. These little sealed packages tend to keep better too.

But again, if you can get the real ingredients, please try to make dashi the proper way at least once, so you can know what it's supposed to taste like.
Filed under: basics japanese washoku japanesecooking101Japanese Cooking 101, Lesson 1-Addendum: Making Miso Soup and Clear Soup with Dashi
Now that you know how to make a proper dashi, you're 90% on your way to making delicious miso soup and clear soup. If you have ever wondered why your miso soup doesn't taste quite right, and you were omitting the dashi part...you're in for a treat!
Basic miso soup (味噌汁, misoshiru)
For this lesson I will be using one ingredient, potato, that should be familiar to anyone, and another, wakame seaweed, which may be more unusual but is a standby in Japanese kitchen. It also gives me a chance to show you how to handle miso soup additions that have different cooking times.
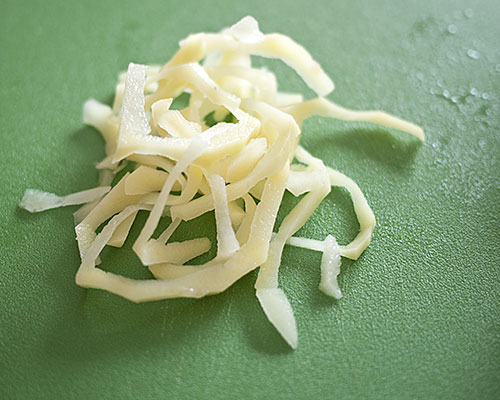
A bit about wakame
Wakame (わかめ) is very different from kombu, but is probably the second most used seaweed in Japanese cooking. Unlike kombu wakame doesn't have a whole lot of umami, although it has a pleasant sea-flavor. It's enjoyed more for its texture, which can be kind of chewy and squeaky when raw, or soft once you cook it even briefly.
Wakame is available in two forms: fresh (raw) and packed in salt; or dried. I usually have the dried kind around because it's more convenient (especially when you live far away from a Japanese grocery store like me) and that is what I used here:

Dried wakame expands to 4-5 times its volume when reconstituted, so use sparingly. Dried wakame usually comes already chopped up, so all you need to do is to take out some and reconstitute in cold water is using in salads or side dishes. For soup you can just put it directly into the soup.
Fresh wakame packed in salt should be stored in the refrigerator. Before using, rinse off the salt under running water, then blanch briefly by pouring boiling water over it. If using in a salad, refresh in cold water. Fresh wakame comes in long whole strands, so you need to chop it up before using. It also expands a bit (about 1.5 times or so) so don't pull out more than you need from that tangle in the packet.
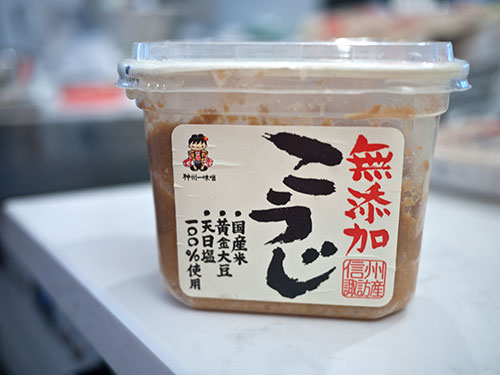
The miso I used, and how much to add to your soup
For this miso soup I used a white Shinshuu miso. Shinshuu is the old name of Nagano Prefecture, and is known for its excellent miso. It's fairly mild on the saltiness scale.
Every miso has a different level of salt, and the worst thing you want to do is to add too much miso to your soup. A general rule of thumb is to use about 1 tablespoon per cup (U.S. measure, 236.5ml) or 1/4 l (250ml) but if you have a very salty red miso for example, you may need less. So when you are trying out a new miso, always add less than you think you need. It's easy to add more. Since we'll be using 1000 ml / around 4 cups for this recipe, we'll start with 3 tablespoons and add more if we think we need it.
(See: Japanese miso primer for more about different types of miso.)
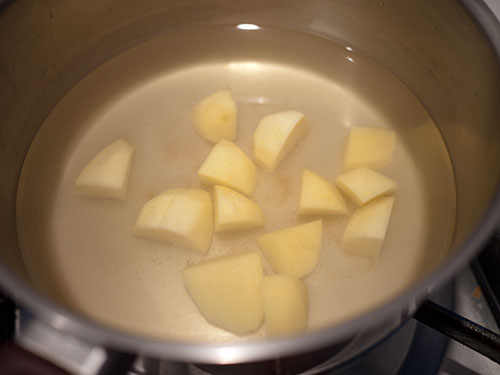
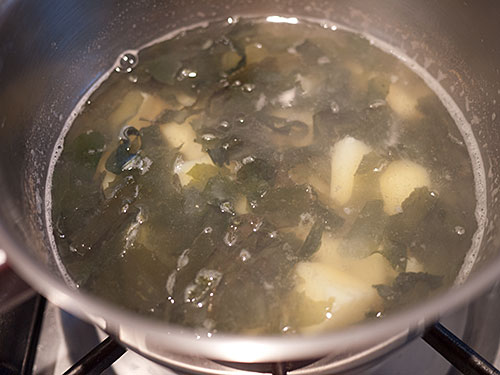
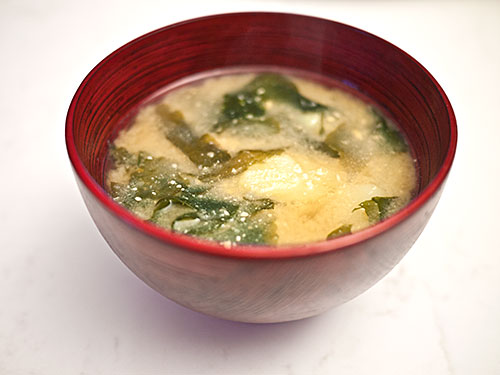
Potato and wakame miso soup (じゃがいもとわかめの味噌汁)
For 3-4 servings
- 1000ml / 4 U.S. cups dashi
- 1 medium potato, peeled and cut into small pieces
- 2-3 tablespoons of dried wakame, or 4-5 tablespoons (about 2 strands) of fresh wakame
- 3-4 tablespoons of miso
- Bring the dashi up to a boil, and add the potato. Lower to a simmer, and cook until the potatoes are soft, around 10 minutes depending on how big the pieces are.
- In the meantime, if you're using fresh wakame, process it as detailed above. Dried wakame can just be thrown in there without reconstituting. When the potato pieces are tender, add the wakame.
- Put the miso paste in a bowl and add some of the liquid from the soup.
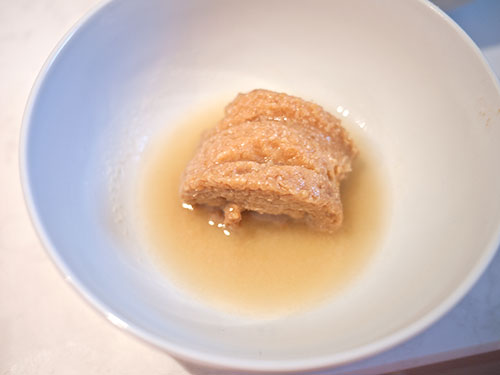
- Mix it around in the liquid until it's dissolved. Never add miso paste directly to soup: always dissolve it first. Otherwise you run the risk of salty clumps or miso in the soup, or of overcooking it. (Incidentally, I always do this dissolving part in the bowl of the ladle I'm using, as do most Japanese home cooks. Once you get more used to making miso soup you can try that too. Less washing up to do!)
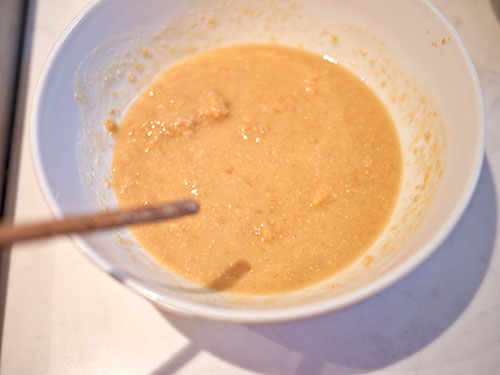
Add the dissolved miso to the soup, then immediately turn off the heat. Miso should not be boiled, or it starts to turn a bit grainy. (Mind you it will still taste fine, so if this happens to you don't throw away your soup or anything). Taste your soup, and if needed add a bit more dissolved miso.
Serve in a bowl. The combination of potato with soft wakame is really homey and delicious. Take your time to inhale the aroma of the soup. If you serve this to a homesick Japanese person they may cry in gratitude.
Tip: If you can't get wakame, you can use some shredded spinach (as I used in the clear soup below) instead.
Miso soup summary
- Cook any hard ingredients until tender in the dashi.
- Add no-cook or almost-no-cook ingredients at the end.
- Always dissolve the miso before adding to the soup, using some of the dashi in the pot.
- Add less miso than you think it needs, then add as needed. 1 tablespoon = 1 U.S. cup or around 250ml of dashi is a fairly good baseline, but all misos are different.
- Never let miso soup boil after adding the miso.
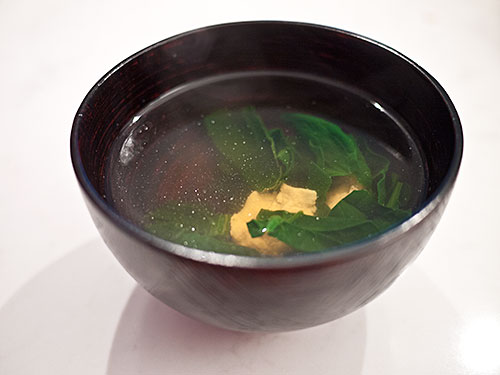
Variation: Clear soup (お吸い物 - osuimono or おすまし - osumashi)
Delicate clear soup or osuimono may seem even easier to make than miso soup on the surface, but getting the flavor balance just right can be a bit tricky. A clear soup really must have a great tasting dashi as a base. Many cooks prefer to use a kombu dashi which is more subtle and refined according to some, but the standard kombu + katsuobushi dashi is fine too.
Here I have used two ingredients that should be easy to get anywhere.
Chicken supreme (tenders) and spinach clear soup (鶏ささみとほうれん草のお吸い物 - tori sasami to hourensou no osuimono)
For 3-4 servings
- 1000ml / 4 U.S. cups dashi
- 1 teaspoon soy sauce (light soy sauce preferred, but dark is ok)
- 2 teaspoons sake
- 1 teaspoon mirin
- Salt to taste
- 1 chicken tender or supreme (the long, thin, tender part that's on the underside of a chicken breast), cut into small slivers
- 3-4 spinach leaves, stalks removed and shredded
I didn't include any step by step photos here since you'll just see a pan of clear liquid mostly! But here are the steps.
- Bring the dashi to a boil, then lower the heat to a simmer.
- Add the soy sauce, sake and mirin. (Note for people who can't use these ingredients - just leave them out; the soup will still taste pretty good.)
- Add the chicken, then add the spinach. Both will cook almost immediately.
- Taste the soup. Add a pinch of salt if you think it needs it, then taste again, until it has the right amount of saltiness.
- Serve in a bowl.
So there you have it! You know how to make great miso soup and clear soup!
If you would like to do so, please link to a picture of your results in the commencts right here, via Twitter to @justbento or @makiwi, or on the Facebook page.
Filed under: soup miso washoku japanesecooking101Japanese Cooking 101: Ingredients and equipment list for Lesson 2
For Lesson 2, we are going to cover the all-important subject of cooking rice. So, from the list of pantry ingredients for the course, you'll need:
- Japanese type rice (uncooked) - this is your one and only critical ingredient for the week. Please read the instructions on the <a href="http://www.justhungry.com/handbook/cooking-courses/>pantry list post carefully for exactly what to get.
- A packet of microwave rice - as a baseline for what Japanese rice should look, feel and taste like
You'll also need the following equipment:
- A fine-mesh sieve, as described on the pantry list post
- A bowl
- A rice paddle is not critical, but handy to have
- A cooking implement for cooking the rice, which can be one of the following:
- A rice cooker
- A heavy bottomed pot, like a cast iron pot, with a tight fitting lid _ A large (at least 10 inches or 25cm diameter) frying pan, with a tight fitting lid
If you'd like to try the bonus how-to, how to prepare proper sushi rice, you will also need:
- rice vinegar
- salt and sugar
- dashi as prepared in Lesson 1, or dashi granules, or kombu
- Equipment: a sushioke or handai (a large, wooden bowl for mixing sushi rice) is ideal, but a large bowl will do too. Plus a rice paddle and a handheld fan or a hairdryer.
- Plus toppings of your choice, such as smoked salmon and cucumber, or some sashimi-grade tuna or other sashimi-grade fish.
And that's it! It should be a very interesting lesson!
Filed under: japanesecooking101Japanese Cooking 101, Lesson 2: Prep and Cook A Great Bowl of Japanese Rice

This is Lesson 2 of Japanese Cooking 101. Today I'll show you how to cook the star of Japanese cooking - plain, steamed rice. Rice is so central to the Japanese table that the word for cooked rice, gohan (ご飯)to use the polite term, or meshi (飯)to use the more informal term, is also the word for the entire meal. In other words, in Japan when you have rice, you have a meal.
Another point to keep in mind is that most savory foods eaten in Japan, with the exception of noodle dishes, are designed to go well with plain rice. Once you understand that a lot of things about Japanese cooking will make sense. Japanese dishes tend to be a little bit too salty or a little bit too well high in flavor, especially umami, to eat on their own. They are made that way on purpose so that they will pair well with the blandness of that bowl of plain rice.
Preliminaries: What is Japanese rice supposed to be like?
The handiest way to see how Japanese rice is supposed to be like is to get one of these - a pack of microwaveable rice.
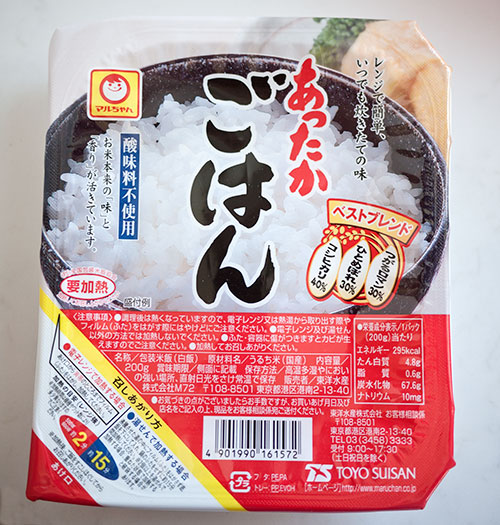
I wish I could say you can go to your nearest Japanese restaurant to get a bowl of good rice, but I've seen such difference in quality at various so-called Japanese restaurants that I'm hesitant to do that. But I do know that these microwave packs are pretty uniformly good.
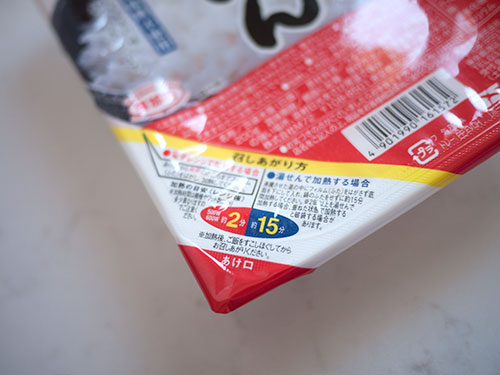
So how do you heat these things? If you look at the corner of the rice packet - and this is something all the different brands of these rice packets share - you see the numbers 2 and 15. That means that to cook it in the microwave you need to peel back the top wrapper to the line, then microwave on the High setting for 2 minutes. If you don't have a microwave you cat heat it up over a pan of boiling water: Put the pack in a pan of boiling water lowered to a simmer, with the top wrapper on, and heat for 15 minutes.
So go ahead and heat up the rice. Take some out - careful, it's very hot - and put a little into a bowl. Taste it without anything on it. The rice should taste quite clean, with a slightly sticky texture so that the grains adhere to each other if you press them together lightly. However, each grain is still intact and not at all mushy.
One more thing:
One of the things that flummoxed me most when I got interested in cooking as an adult (I cooked a bit as a teenager, but mainly things like everyday Japanese food and cookies) was this insistence in many American cookbooks that the ideal texture of rice should be "fluffy". I didn't get it at all, since fluffy to me is duck feathers, the fur on my favorite teddy bear, a soufflé maybe, or angel food cake...in other words, not something applicable to well cooked rice, at last not Japanese style rice. I do understand that some types of rice, such as basmati (my second favorite kind of rice) and jasmine, need to have fairly firm and separate grains. I also understood why risotto needed to be creamy. I have since tried rice that is said to be 'fluffy', such as the type that cooks up in a minute...but if that's supposed to be 'perfect' rice then I don't know what.
But regardless of how other types of rice are supposed to be like, the bottom line is: Japanese rice is never, ever "fluffy".
Now you know how Japanese rice should be like, you should also understand why you cannot substitute the types of long-grain rices that should have separate, non-sticky firm grains like jasmine, not to mention Carolina type rice. (You can use the medium-grain rice types that are used in risotto and the like in a pinch; see Looking at Rice, my rice-type primer.)
So let's cook some Japanese rice!
Rinse, dry, soak: The most important steps to cooking Japanese rice
Many rices don't need any rinsing at all, and with some, such as the risotto rices, it's even prohibited, since the powdery substance is critical to the creamy texture. Things are very different when it comes to Japanese rice: the rinsing, drying and soaking steps are the most critical parts of cooking properly textured, properly tasting rice.
In this lesson we will be cooking 320g / 360cc (360ml), or 1 1/2 U.S. cups ((11.3 oz) of rice. If you have a rice cooker, this is equivalent to 2 rice cooker measuring cups.. To that we'll be adding 410ml (1 3/4 U.S. cups) of water at the end.
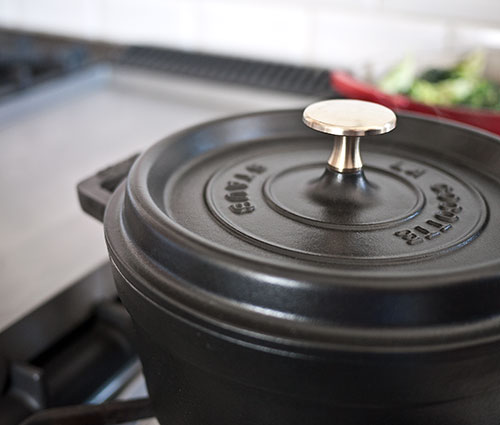
Equipment: We will be using a fine-mesh sieve and a bowl that the sieve can fit over, as described in the list of required ingredients and equipment for the course. This will yield about 660 grams, or a bit more than 4 U.S. cups of cooked rice, which will serve 3-4 people as part of a Japanese meal. To cook the rice we will be using a heavy-bottomed cast iron pot with a heavy lid as the base.
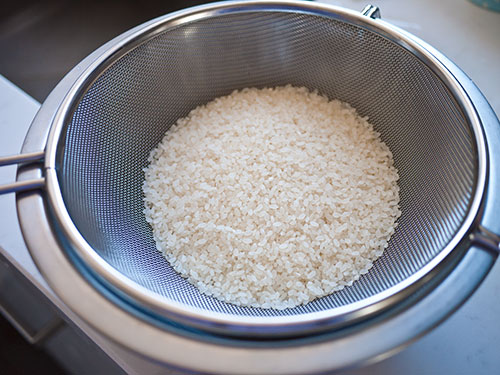
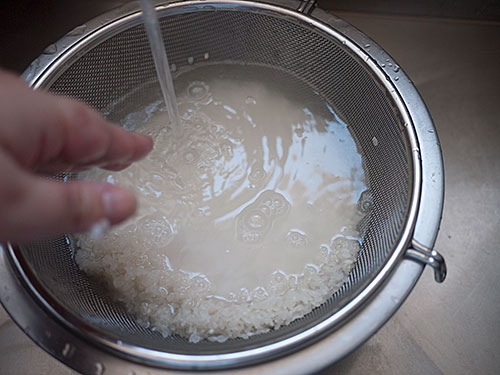
Measure the rice into the sieve, and put the sieve into the bowl. We'll be working in the sink.
Run cold water from the tap at a fairly slow stream into the sieve/bowl. Rub the rice grains gently between your fingers. The water will turn very milky and opaque.
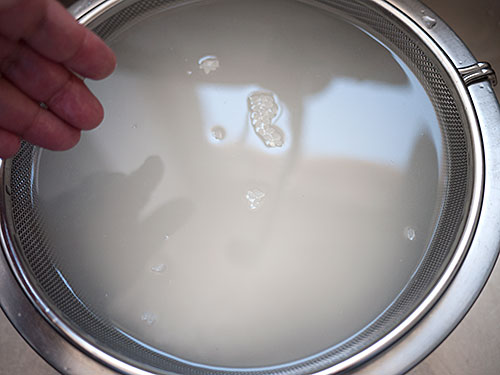
Lift the sieve out of the bowl. It's important to not let the rice sit in that milky water, otherwise it will be re-absorbed into the grains and the cooked rice will not taste as clean as we want it to be. Discard the water in the bowl.
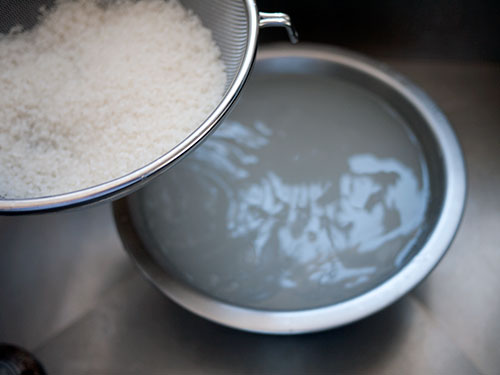
Repeat the fill with clean water -> rub grains gently -> drain away the cloudy water steps, until the water in the bowl is pretty clear. (Don't rub the grains together too hard or you may break them up, which is not the idea.)
This about as clear as it should be. With most Japanese rice these days you only need to do the above 3 steps about 4-5 times, but if you're using another rice such as vialone, you may need a couple more rinse cycles as it were.
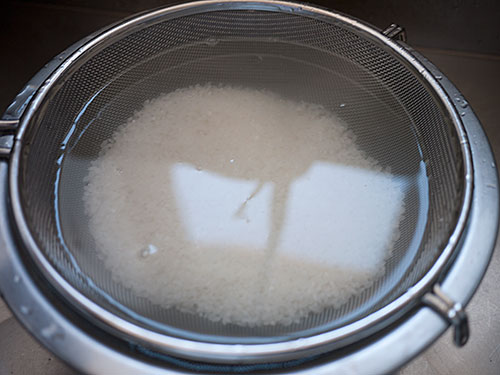
Drain the water away from the rice once again. Suspend the sieve over the bowl to let the rest of the water drain away from the rice, for at least 15 minutes. 30 minutes is ideal. (You use the bowl under the sieve to catch any dripping water, but if you have a sieve with legs you can just leave it in the sink.)
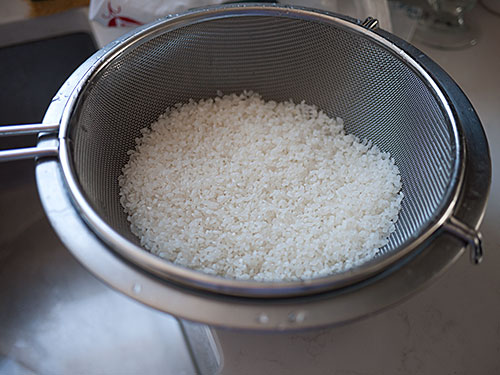
After draining for 30 minutes, the rice grains should look very white and a bit opaque.

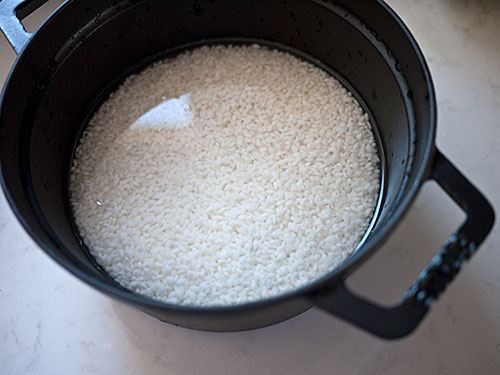
Put the rice and 410ml (1 3/4 U.S. cups) of water in the pot. This about 1.1 times the rice in volume. Note: If you have rice that's been around for more than a year, add a bit more water (around 420ml) to compensate for the rice drying out. Leave the rice to soak for at least 30 minutes, 1 hour is ideal. Soaking the rice ensures that the moisture penetrates each grain, so that they cook evenly and thoroughly in a relatively short time without getting mushy or leaving a hard uncooked center.
Some notes for the soaking step
- You can soak the rice for longer, up to a half-day or so. If you're cooking rice for dinner, you can rinse the rice in the morning and cook it when you get home (or set the timer on your cooker accordingly). If you are cooking rice for a bento you're going to be packing in the morning, rinse the rice and set it to soak at night. When the weather is very hot, it's safest to soak the rice in the refrigerator, but otherwise room temperature is fine.
- If you are in a big hurry you can skip or shorten the soaking time, but it will affect the texture of the rice. If you just don't have time to soak the rice, add a tiny bit more water.
- If you have a rice cooker, put the drained rice in the bowl and add water up to the 2-cup level. If you have a high-end rice cooker you just need to switch it on, since the cook cycles on these have the soaking time already built in. If you have a less expensive cooker that starts cooking the rice as soon as you switch it on, add some soaking time by setting a timer for 1 hour or more.)
- If you're lucky enough to have new-harvest rice, you can shorten the soaking time to 15 minutes.
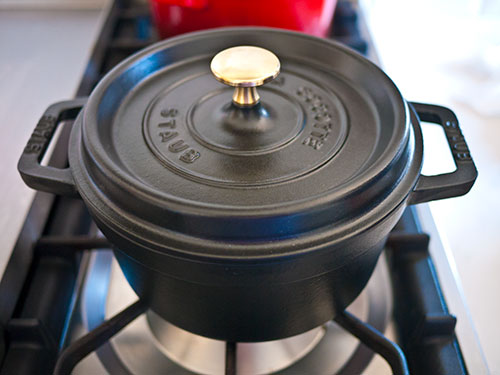
So we've soaked our rice. For this lesson we'll be using a small yet hefty cast-iron pot. You can use these instructions as-is if you are using a donabe (a pottery pot for cooking rice) or a tetsugama (an iron rice cooking pot). If you want to use a frying pan to cook the rice, please follow the instructions on this page. The most important thing that all methods share is a lid that sits quite securely on the cooking container. And of course, if you're using a rice cooker you can just set it and let it do its thing.
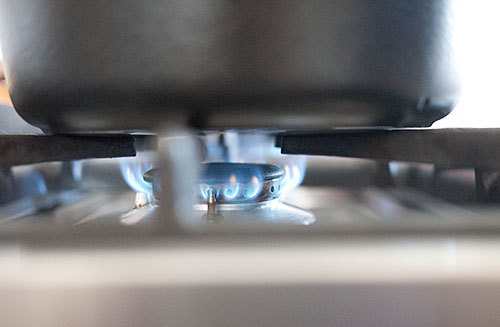
So we've now soaked our rice. Put the pot on the hob over medium heat on the low side. If you're using gas, the flame should be about this big in relation to the size of the pot. (For electric or IH, set the heat to a tick below medium.)
Now at this point, you can do as my mother advises: Set a kitchen timer for 12 minutes and forget about it until the timer goes off. This actually works pretty well. But if you want to fuss a bit over the pot and see how it progresses....
Let the pot heat. Do not open the lid. You should hear the pot start to boil. Eventually you should see steam coming out of the edges of the lid. (The photo doesn't show this too well to be honest, but in person you'll see it.)
Lower the heat a little bit more so it's a bit stronger than a bare simmer, and set the timer for 7 minutes. (Actually if you just let it be, the boil time + simmer time does add up to around 12-13 minutes. Mother knows best!)
At this point you really shouldn't open the lid but if you must, take a peak. You should see that the water is gone, the rice looks shiny, and there are little steam holes all over the surface. You may see a few bubbles.
Put the lid back on as quick as you can! Turn the heat off, and let it rest for 10 to 20 minutes.
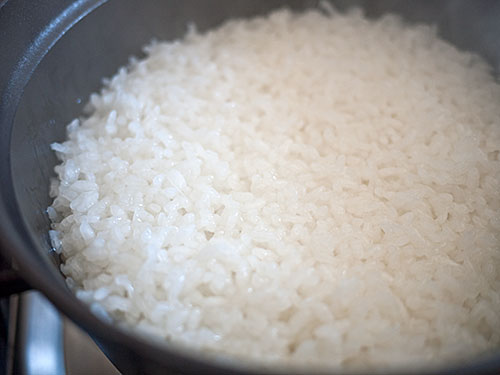
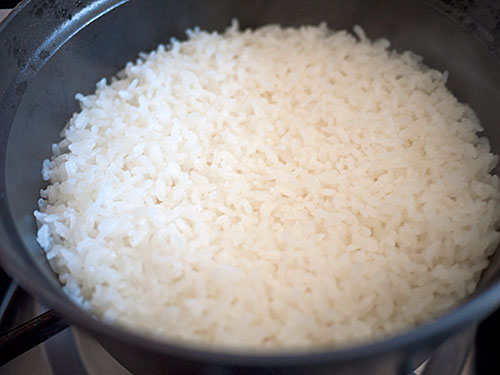
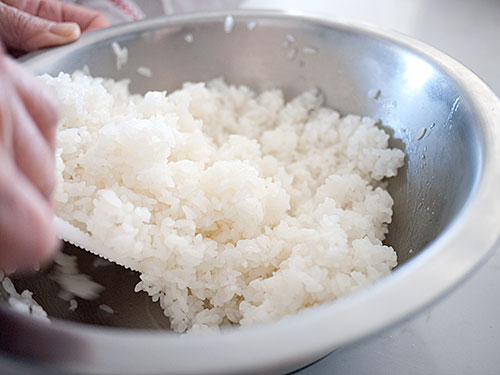
Open the lid - your rice should look like this: perfectly cooked, the surface dotted with little steam holes. There should be no excess moisture left in the pan, but if there is, put the lid back on and put the heat up to high for 20 seconds. Note that this may brown the bottom of the rice a bit.
Stir up your rice with a rice paddle. Use the paddle to turn up the rice away from the sides and the bottom. The stirring-up process helps any remaining excess moisture to evaporate, so the rice grains don't have a chance to get mushy. (Tip: this stirring-up is especially important if you are using a rice cooker and using the keep-warm function. If you don't stir up the rice the bottom parts get rather water logged.)
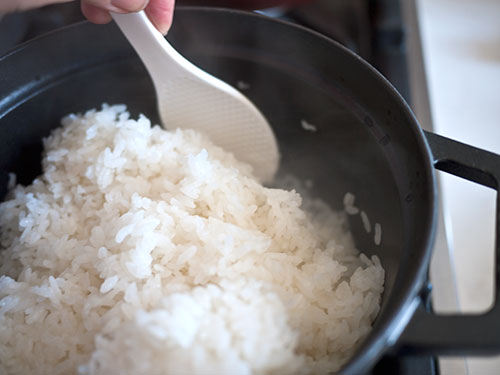
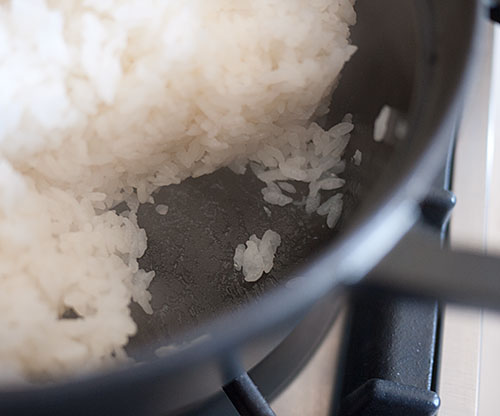
There shouldn't be any grains glued to the bottom or burned!
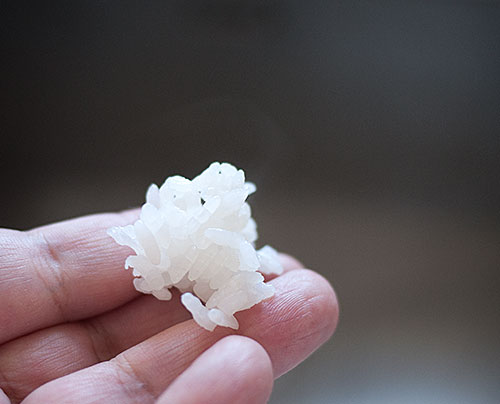
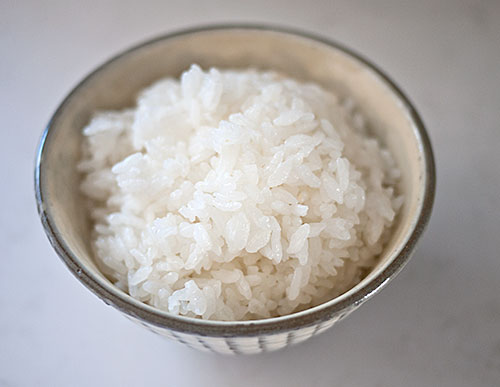
Take a small bit of the rice. Note the texture, the color, the flavor...it should be very much like that microwave-packet rice. Grains separate, sticking slightly together; sticking well together when pressed lightly; and a very clean flavor.
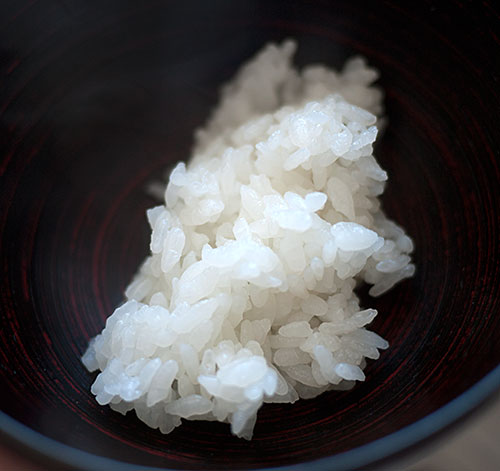
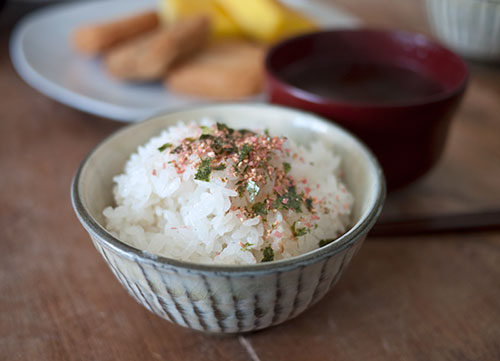
And there you have it - a perfectly cooked bowl of Japanese rice...
...the star of a Japanese meal (I put a little furikake on top.)
Phew, that was a lot of steps! But it's pretty easy once you have them down.
Summary: How to cook perfect Japanese rice
- Rinse the uncooked rice in several changes of clean water, while constantly draining the cloudy water away.
- Let the rice dry out a bit in a sieve.
- Put the rice and 1.1 times the rice in volume of clean water (c.g. 1 cup of rice = 1.1 cups water) in your cooking implement for at least 30 minutes, ideally 1 hour or more up to half a day.
- (Or follow the instructions for your rice cooker.
- If using a pot with lid: Lid on, heat pot over medium-low heat for 12 minutes (use a timer!) OR...heat over medium-low heat until steam is coming out from the edges of the lid; lower the heat a bit, and cook for 7 minutes (use a timer!)
- Turn off the heat, lid still on. Let rest for 10-20 minutes.
- Turn the rice up with a paddle.
- Enjoy!
I hope you can digest all that. I know it's a lot of instructions, but by following along you will have rice success.
Remember: whatever cooking method you use, including ones I haven't covered here such as using the microwave or the oven, the important parts of the process to ensure proper texture and taste are the rinsing an soaking steps.
Coming up, we'll have a bonus for Lesson 2: how to prepare sushi rice, or shari, plus how to take care of your rice cooker. Stay tuned!
And of course as usual, please post your comments, questions and results in the comment section right here or on the Facebook page.
Addendum: If you have very hard water
If you have very hard water in your area, you may find a kind of grey scum on the top of your cooked rice. You can just remove the scum and the rice should be ok, but if it bothers you try using filtered water for the soaking and cooking. When we lived in the Zürich area we used to filter our rice-cooking water with a Brita filter. In our new house, we invested in a water softener - one of our best decisions ever. The rice no longer looks grey, our towels aren't hard and spiky, and our shower drain doesn't need cleaning out nearly as much.
Filed under: basics rice washoku japanesecooking101Japanese Cooking 101, Lesson 2 Bonus: Sushi Rice (Shari) plus Smoked Salmon and Cucumber Chirashizushi
Now that you know how to cook Japanse rice properly, perfect sushi rice, called sushimeshi (すし飯) or shari (しゃり). Sushi rice is what makes sushi sushi - the topppings and things mixed in are almost secondary. So, for good sushi, you must have good sushi rice.
Dashi or no dashi?
Many books recommend cooking the rice with dashi, or something that has a lot of umami such as kombu seaweed. Indeed that's the recommendation I gave when first wrote about making sushi rice on this site almost 10 years ago. While that umami boost does make rice taste yummier, it's not always necessary if the things on top of the rice or mixed in the rice have plenty of umami anyway. Keep in mind that the soy sauce or other sauces have loads of umami too.
One trick of the trade that I learned from my mother, who used to run a very busy sushi restaurant, is: if you want the rice to have that extra bit of shine, add a tiny bit of flavorless vegetable oil such as canola oil to the rice when cooking - about 1/8 teaspoon per rice-cooker cup (180cc/ml). So per U.S. cup it's about 1/7th of of a teaspoon...a couple of drops really. Do not add any more - you don't want your rice to be oily, just shiny. This is a good trick to use if you find that the quality of the rice is a bit subpar.
For this lesson, we'll keep it simple and just cook plain rice, as detailed in the first past of this lesson. The only things we'll be adding are: rice vinegar, sugar, and salt - to the freshly cooked rice. I used some sucanat for this (which is a raw cane sugar that is light brown in color), and sea salt - just for that extra bit of luxury - but plain white granulated sugar and table salt will work just as well.
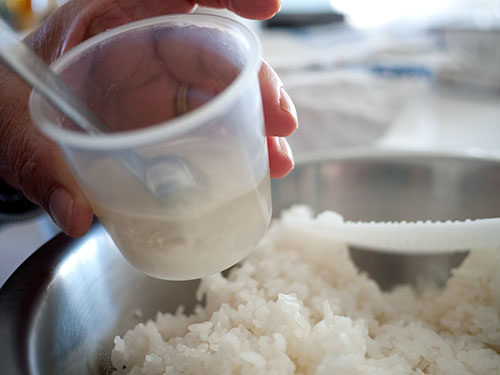
Sushi-zu (sushi vinegar) mix recipe:
For the amount of rice we cooked in the first part (360cc, or 2 rice-cooker cups, or 1 3/4 U.S. cups) we will need:
- 3 tablespoons rice vinegar (45cc) (1 1/2 tablespoons per cup)
- 1 tablespoon fine sugar (1/2 tablespoon per cup) (I used sucanat; white granulated or superfine sugar is fine)
- up to 1 teaspoon finely ground salt (1/2 teaspoon or less per cup) (I used sea salt)
Mix all the above together. That's it!
Note that the amount of salt depends on what you'll be putting on, or in, the rice. If you're making unseasoned raw fish sushi, then add 1 teaspoon; if you're making a sushi with salted ingredients, such as the smoked salmon and cucumber sushi below, you'll need less.
Sushi rice step by step
Here is another tip from my mother: as long as the rice is piping hot, there's no need to heat up the vinegar, sugar and salt so that the latter 2 ingredients dissolve. They will dissolve fine in that hot rice. Here she just quickly mixed them together in a rice cooker cup and dumped it on the rice. We used a stainless steel mixing bowl, because I don't have a nice wooden sushi oke or handai. (The wood helps to absorb excess moisture from the rice, but as long as you work rapidly a plain old bowl works well.) A tip here for rice cooker owners: don't mix the sushi rice in the cooker bowl, since the vinegar may damager the inner markings or coating, especially with less expensive cookers.
Rapidly mix the rice using a cutting motion with your rice paddle. It's rather like folding egg whites into a cake batter: use a cut-turn-fold motion, trying to break up lumps vertically and letting in air so that the rice cools rapidly. Don't squish the rice grains if you can help it.
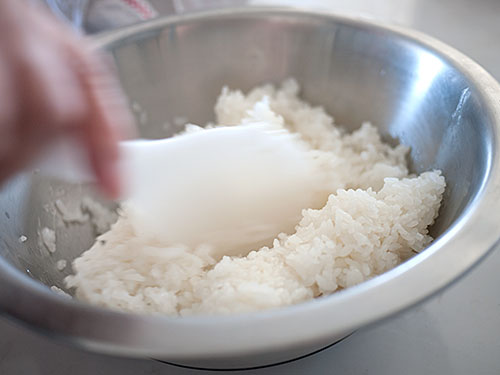
If you have a pair of extra hands, they can help cool the rice more rapidly by fanning it from the side, but if not just mix the rice as quickly as you can. The metal bowl helps to cool the rice a bit faster than wood.
And so there you have it - a bowlful of sushi rice. It should still be slightly warm - the ideal temperature.
Recipe: Smoked salmon and cucumber chirashizushi
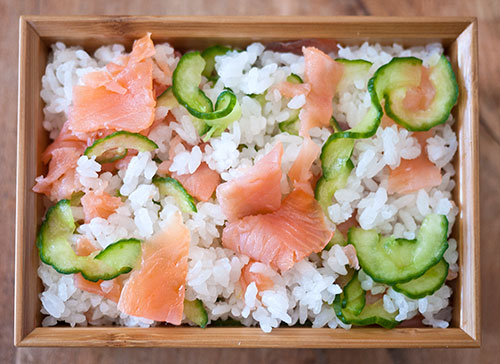
Chirashizushi (ちらし寿司) means 'scattered sushi', and is the easiest kind of sushi to make. This version uses two ingredients that anyone should be able to get - smoked salmon, and cucumber. Since the smoked salmon is 'cooked' so to speak, this sushi is great for bentos.
Ingredients:
- Cooked rice as per Lesson 2 (about 660g of rice - enough for 3-4 servings)
- 3 tablespoons (45cc) rice vinegar
- 1 tablespoon superfine or granulated sugar, or sucanat
- 1/2 teaspoon salt (less than the usual amount since the salmon and cucumber are salty)
- 1/2 English cucumber
- 150g / 5 1/4 oz smoked salmon
Cook the rice as per the instructions. While it's cooking, prepare the vinegar mix by combinting the vinegar, sugar and 1/2 teaspoon of salt. Set aside.
Slice the cucumber lengthwise and scoop out the seeds. Slice very thinly, and sprinkle with a little more salt (not listed). Massage the salt and the cucumber with your hands, and squeeze the cucumber tightly to remove excess water. Set aside.
Slice the smoked salmon into thin slivers. Set aside.
When the rice has finished cooking, while it's very hot empty it out into a bowl. Working rapidly, mix in the vinegar mix as per the detailed instructions above.
Once the rice is mixed, fold the cucumber and salmon in gently, leaving a few pieces to decorate the top.
Serve on a plate, in a bowl or in a bento box.
Filed under: japanese rice sushi japan washoku japanesecooking101Japanese Cooking 101: List of fresh ingredients for Lessons 3 and 4
I hope that you have enjoyed the first two lessons plus bonus lessons of Lessons 1 and 2 of Japanese Cooking 101. I'm going to have to take a few days break because I'm feeling a bit under the weather, but Lesson 3 will come next week and possibly Lesson 4 also. So this is the shopping list for both lessons. As usual, this is in addition to the basic pantry ingredients required for the course.
Lesson 3 list
For lesson 3 we will be tackling nimono (煮物) or stewed dishes.
- Carrots
- Boiling type potatoes (new potatoes are great)
- Medium onions
- Dried shiitake mushrooms. If you can't get dried, fresh will be ok. If you can't get shiitake mushrooms button mushrooms are ok (but will taste very different).
- Snap peas, mange-tout or other bright green vegetable (for garnish)
Lesson 4 list
We will be doing _sunomono__ (酢の物)or a mixed vinegar flavored side dish.
- Broccoli (Tip: we'll be using the stalks, so you can use the florets as the green garnish for the nimono)
- Wakame seaweed (optional), dried or fresh (in salt)
And that's it! I'll see you back here next week for the next lesson.
(If you are just joining us, please start at the Japanese Cooking 101 course announcement and work your way through the linked pages at the bottom.)
Filed under: ingredients japanesecooking101Japanese Cooking 101, Lesson 3: Nimono (simmered dish) basics
This is Lesson 3 of Japanese Cooking 101: The Fundamentals of Washoku.
If you have been following along on Japanese Cooking 101, so far you have learned out to make proper dashi, the base stock used in many savory dishes in Japanese cooking (as well as miso soup and clear soup using that dashi), and also learned how to make proper Japanese style rice.
In Lesson 3 we'll be making vegetable nimono, one of the most common types of dishes found in washoku.
What is nimono?
The ni part of nimono (煮) means to stew or simmer. A nimono dish in Japanese cooking means that it's been simmered in dashi flavored with sugar, sake, mirin and soy sauce, plus some salt on occasion. The ratio of the flavoring ingredients differs according to personal taste, regional preference and so on but the basic combination is the same.
Making "2nd dashi" (niban dashi)
The dashi you use for making nimono can be regular "1st dashi", as we made in Lesson 1. But if you look back at that recipe, you'll see that we kept that used kombu seaweed and katsuobushi and stuck the little packet in the freezer:
That once-used dashi ingredient mixture will yield even more goodness, called "2nd dashi" or niban dashi (二番だし). 2nd dashi is not as flavorful or refined as 1st dashi (ichiban dashi), but it's flavorful enough for simmering vegetables and so on where we'll be getting plenty of flavor from the ingredients anyway. Since I tend to make miso soup more frequently than nimono, I just keep the used kombu seaweed/katsuobushi in the freezer and pull out 2 of the little packs at a time to make niban dashi.
Making niban dashi is very simple. Just put it in as enough water as you need (for today's recipe we will be needing around 400 ml or about 1 3/4 U.S. cups, so add that plus a bit more to allow for evaporation) in the pan with 1-2 used-dashi-ingredient bundles. Bring to a boil, lower to a simmer, and simmer for 5-6 minutes. At this point you can put in a small handful of fresh (unused dry) katsuobushi (bonito flakes) to boost the flavor a bit, or even 1/4 teaspoon of dashi stock granules. Let the dashi ingredients settle down in the pan, then strain through a fine mesh sieve.
If you forgot to keep the used dashi-making ingredients, just make a batch of "1st dashi" following the Lesson 1 instructions. Water plus dashi stock granules is fine too, if not as flavorful.
So let's try making a potful of delicious simmered vegetables, Japanese-style!
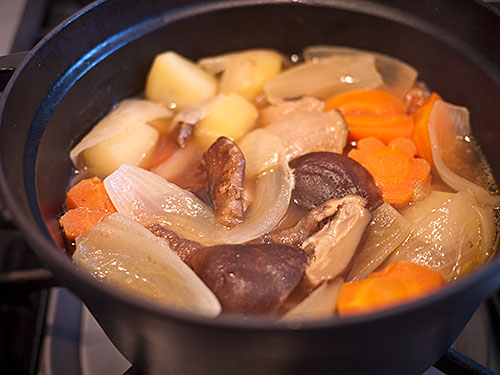
Winter vegetable nimono
I stuck to using ingredients that 1. most people should be able to get a hold of, 2. that are inexpensive, and 3. don't need any pre-processing for this dish.
Yields: About 5 cups of cooked vegetables, enough for 2-3 Japanese meals as a side dish
Time required: 10-15 minutes prep time, 20-25 minutes cooking time (does not include time for making the dashi or soaking the mushrooms, which can be done in advance)
Ingredients
The cooking liquid:
- 400ml (about 1 3/4 U.S. cups) 2nd or 1st dashi stock (see previous section), or 400ml of combined shiitake mushroom soaking liquid and dashi, or 400ml water with 1/2 teaspoon dashi stock granules. (In other words, 400ml of liquid with flavor.)
The vegetables:
- 1 large or 2 medium carrots, peeled
- 1 large or 2 medium-small boiling type potatoes, peeled
- 1 medium onion, peeled and root end and top removed
- 4 small or 3 medium dried shiitake mushrooms, soaked in water until rehydrated, OR 4 small or 3 medium fresh shiitake mushrooms, OR 5-6 button mushrooms
- 3-4 snow peas or mange-tout, for garnish (Other garnishes you could use: small broccoli florets; green beans. Or for uncooked garnishes, chopped up green onion or mitsuba would work.)
The flavorings:
- 1 teaspoon sesame oil, olive oil or vegetable oil
- 1/2 tablespoon white or raw sugar
- 1 tablespoon sake
- 1 tablespoon mirin
- 2 tablespoons soy sauce
- salt (optional)
Equipment needed: Cutting board, sharp kitchen knife, a small saucepan, and an otoshibuta - which I'll explain below.
Proper traditional Japanese cooking (washoku) is all about getting little details right. They really don't have to take a lot of time once you've learned them, but they make all the difference both in taste and texture, as well as final presentation. If you want this dish to turn out as nicely as it can, please read through and follow the cutting instructions. Of course it will all turn out pretty good even if you cut up the vegetables the way you want to...but humor me and follow along at least once. ^_^
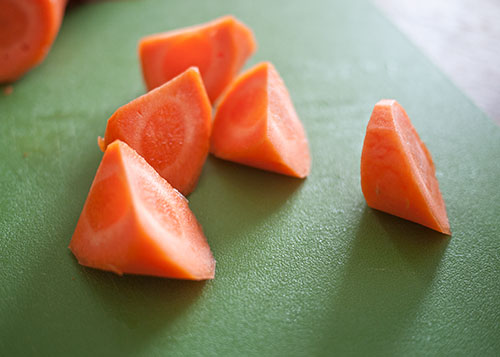
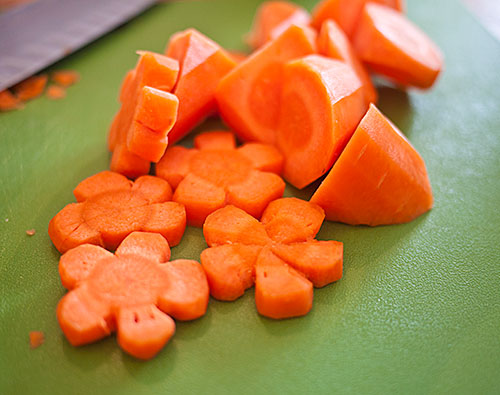
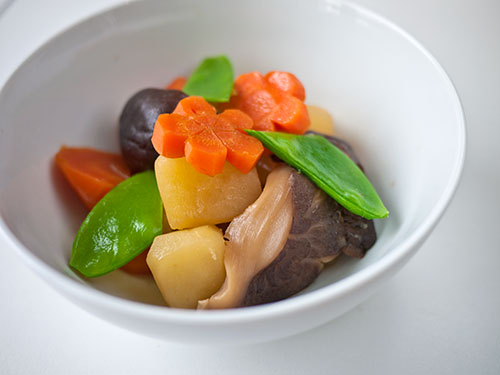
1. Cut the carrots.
The most common cut used for carrots in stewed dishes is called ran-giri (乱切り) which means 'random cut' or 'rough cut'. You want each piece to be fairly even in size, but with multiple surfaces so that they cook evenly. It's quite simple to do: Put your peeled carrot on the board, and cut at even intervals while giving a quarter-turn to the carrot each time.
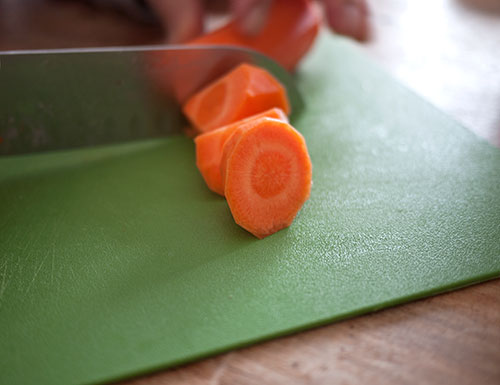
You'll end up with pieces like this...
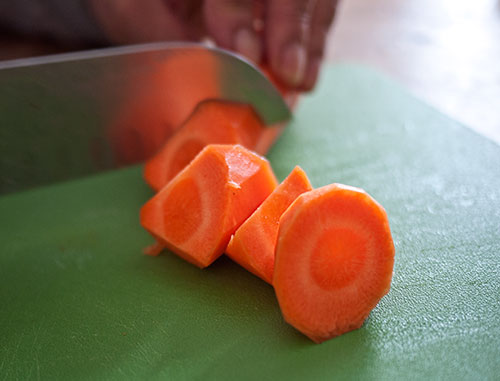
...sort of trapezoidal in shape. These pieces cook very nicely and evenly. (I cut my carrots like this for curry too.)
Now this is very much optional, but if you want to give your final dish an extra flair cut some regular round slices from the carrot and make some flowers out of them. I didn't include the cutting how-to here since it was already way too long, but if you have some small bento cutters you can just cut out some flowers or other shapes (see this post for example.)
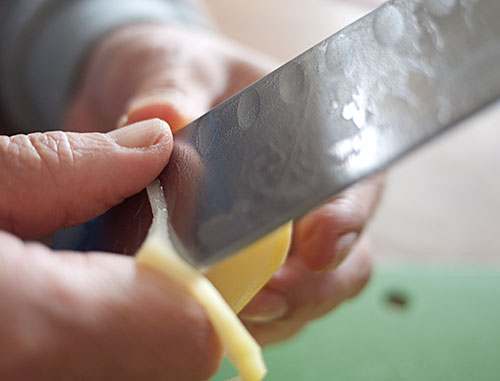
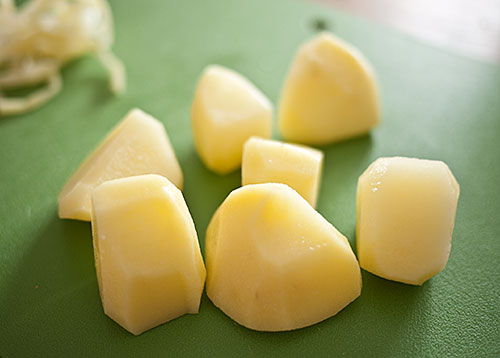
2. Cut and prep the potatoes
Next up are the potatoes. After peeling them, cut them into fairly even pieces like so:
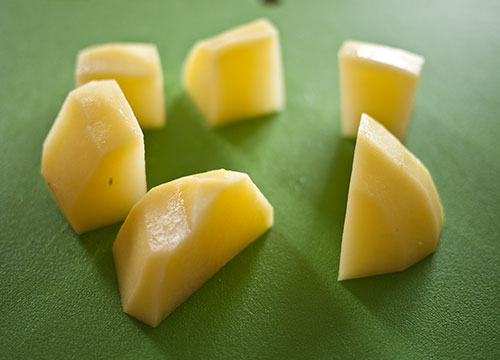
The next step is optional but will really make the final dish that much better. Since potatoes are starchy, the sharp cut edges tend to melt and disintegrate into the cooking liquid. This makes them look a bit messy, as well as clouding the liquid. To prevent that, just shave the edges of each piece to round them off. This cutting method is called mentori (面取り) - 'taking off the edges'.
The potato pieces will look like this. The reasoning behind this is related to the reason why vegetables are 'turned' in classic French cuisine but it's a lot more simple to do. It's not necessary to "mentori" all vegetables - carrots for instance stay firm and intact after cooking unless you overcook them. The most commonly "mentori"-ed vegetables are the starchy ones like potatoes and kabocha squash, plus daikon radish - the ones that literally tend to lose their 'edge' during cooking.
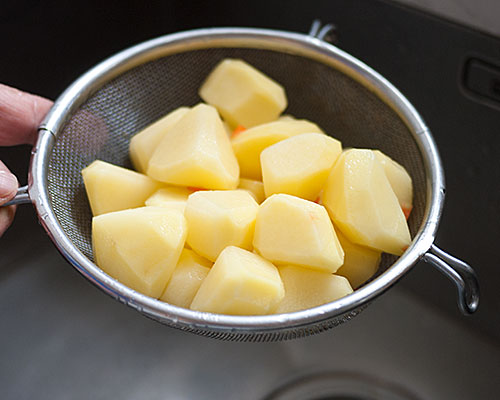
But a frugal Japanese home cook doesn't throw away the trimmed edges. Save them for a soup or a stir-fry by rinsing off the starch in water (to prevent them from browning) and wrapping tightly.
Put the cut up potato in a bowl of water, and then drain to rinse off the surface starch. This step will make the final dish that much more clear shiny. Don't let the potato bits soak too long in the water though - we don't want them to get waterlogged.
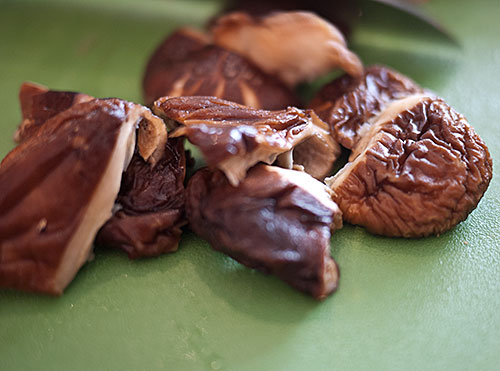
3. Cut the shiitake mushrooms
Tightly squeeze out the rehydrated dried shiitake mushrooms, saving the soaking liquid. Cut off the stem, which is usually too chewy even after rehydrating. Cut each cap in half - but instead of just going straight up and down, make a slanted 45 degree cut.
The reason for doing this is purely for aesthetics. The diagonal cut shows off the pale beige inside part of the shiitake, which offsets the dark brown cap nicely. A small, simple yet nice decorative touch. Do this cut for fresh shiitake also. Regular white button mushrooms can just be sliced in half (you can leave the stems on); if you have brown cap mushrooms the diagonal cut may work well too.
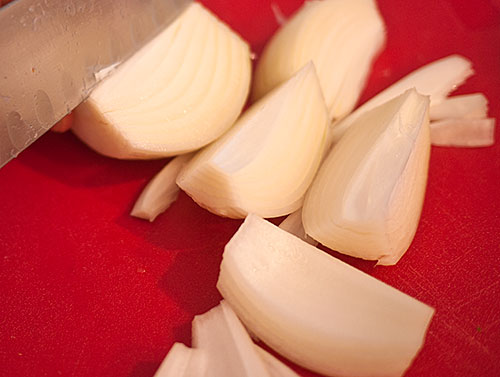
4. Cut the onion.
Just cut the onion into 1/8th wedges.
5. Let's cook some nimono!
Once you've prepped the vegetables, the cooking is pretty easy.
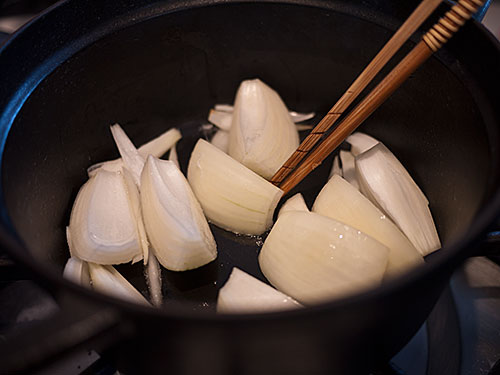
Heat up your pan with the teaspoon of oil. Sesame oil will add a bit more flavor, but any vegetable oil is fine here. (Olive oil is great too.) Put the onions in first and stir around for 2-3 minutes until the edges start turning a bit translucent.
Add the potatoes and carrots and continue stirring for a minute. This short sautéing step helps to bring out the sweetness of the vegetables.
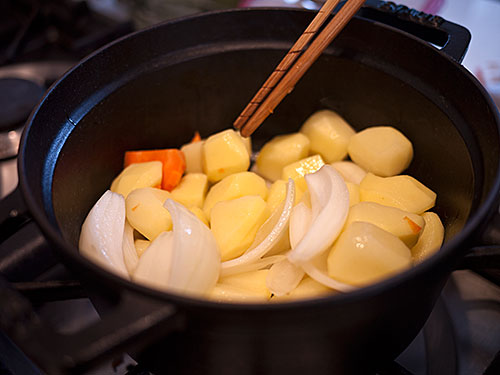
Add the mushrooms and stir a bit more.
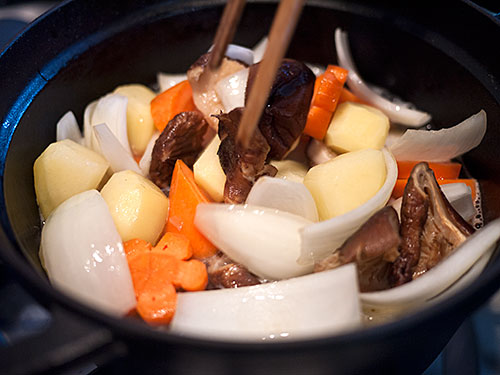
Add the dashi stock (or combined dashi + mushroom soaking liquid). There should be enough to just about come to the top level of all the vegetables in the pot - if there's not enough, add the a bit more dashi or even plain water, but do not overfill with liquid or the end results will be rather blah.
Bring it up to a boil and lower the heat to a simmer. Some scum will rise to the top, which should be removed so that the final dish will have a clean taste and appearance. I use this specialized scum-scooper ladle but any ladle will do fine - even a large spoon will work. Try to take off just the scum and leave the liquid.
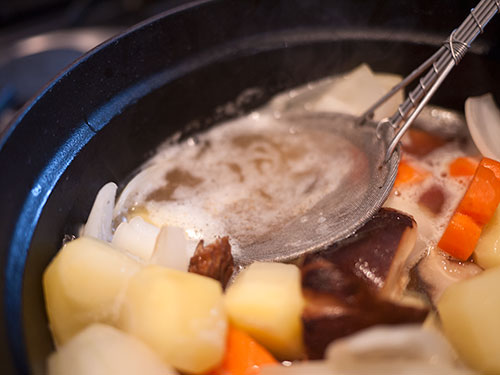
Add the flavoring ingredients in this order: sugar, mirin, sake, and then finally the soy sauce. You can even reserve the soy sauce until the very end to retain its maximum fragrance if you prefer. I just dump it in at this stage though.
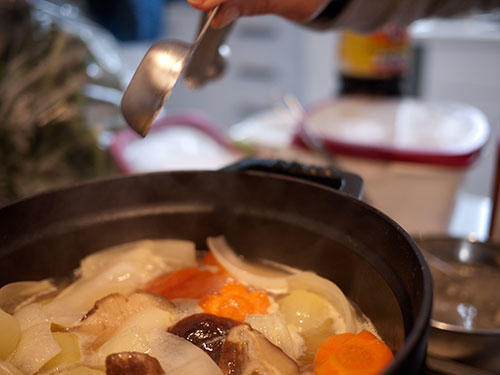
Finally we want to let it simmer on its own. But before we leave the pot, let's put on an otoshibuta (落としぶた) or "dropped lid". This is one of the things that may be unique to Japanese cooking, although other cuisines use similar techniques sometimes. It's essentally a lid that is smaller than the diameter of the pot, that is placed directly on the surface of the food that's being cooked. it prevents the surface from drying out, allows moisture ton condensate on the backside and then drop back into the cooking liquid, and keeps the ingredients in the simmer from shifting around and falling apart. I've explained the otoshibuta several times already on this site, and used it whenever I've made a simmered dish. The most traditional type of otoshibuta is made of wood - but it's still hard to get one of these outside of Japan. But a makeshift one works just as well really. The simplest form of makeshift otoshibuta is simply a pot lid that belongs to a pot that's smaller than the one you're using, preferably one. You can also use a piece of crumpled up aluminum foil or kitchen parchment paper with a couple of holes punched into it for ventilation.
I do happen to have an otoshibuta, which I bought in Japan...it's made of silicone. The 'handle' part is a pig face, with the snout acting as ventilation holes. It's also a pun, since the word for pig in Japanese is "buta". So...otoshibuta... ^_^; (OK so I do like my silly puns.)
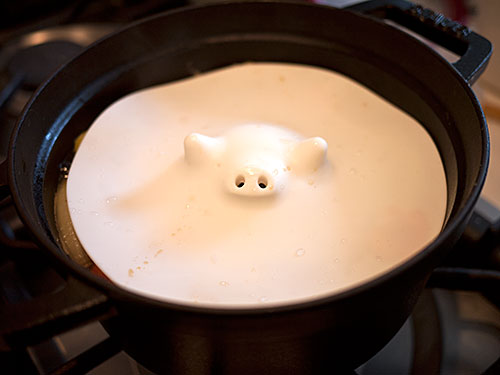
So, leave the pot to simmer with the dropped pig...I mean, dropped lid on top, for around 20 minutes. If the heat is too high, lower it or take the pot off the heat for a couple of minutes before putting it back on. You may want to give it a stir up from the bottom halfway through. (Experienced cooks can take the pan and give it a good toss to mix the contents up, but don't do this unless you are confident you can.)
In the meantime, blanch 3-4 snap peas (or other greenery you are using as garnish) in boiling water for a minute or two, and set aside.
Come back to check on how tender the vegetables are, and if they are done turn the heat off and let it rest for a few minutes. Taste a potato and see if it needs a touch more soy sauce, or even a pinch of salt, and adjust according to your taste.
6. Finishing up
Arrange the vegetables attractively in a bowl, pouring a little of the cooking liquid over it to add shine and flavor. Garnish with the snow peas or other green garnish of your choice to make it "pop".
Store any leftover nimono in the cooking liquid. It will improve in flavor that way. Nimono like this will last in the refrigerator for at least 3-4 days, so make enough to use in a couple of meals and bentos. After a couple of days you may want to heat it through before using.
Nimono summary
- Use 2nd dashi or niban-dashi to be frugal
- Cut the vegetables according to their nature; shave the edges off the starchy ones
- Sauté the vegetables in a little oil to bring out their flavor and to add more flavor from the oil
- Add the soy sauce last, to retain its flavor. Add the sugar, sake and mirin first. (See also: SaShiSuSeSo.)
- Use an otoshibuta (dropped lid) while simmering
- Use some green garnish to make the final dish pop.
- It's worthwhile making nimono in some quantity, since it tastes better the next day and keeps for several days in the refrigerator. Reheat before eating at home, or reheat then let cool down again if using for bento.
This basic procedure is the same for most kinds of nimono, whether they are all-vegetable or have some meat or other protein such as tofu in them.
As usual, please leave any questions, etc. in the comments below or on the Facebook page!
Filed under: basics japanese vegetables washoku japanesecooking101Japanese Cooking 101, Lesson 3 extra: Nimono without dashi

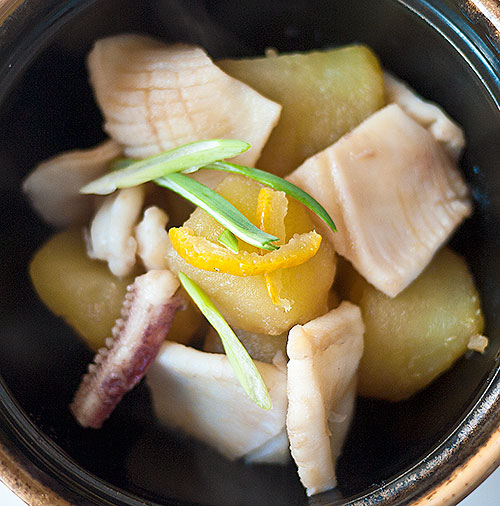
Not all nimono dishes need to be made with dashi. If one of the ingredients has plenty of umami on its own, you can make a dashi or broth from it without having to add any more. One such ingredient is squid (ika) or calamari. If you live in an area with a sizeable Italian, Greek or other Mediterranean immigrant population, as well as us Asians, chances are you can get a hold of good quality squid. If you can, get a nice one and try this quick and simple nimono.
Recipe: Squid and potato nimono
Yield: About 4 1/2 to 5 cups, enough for 2-3 Japanese style meals as a side dish
- 1 large fresh squid
- 3 medium potatoes
- 1 tablespoon sake
- 1 tablespoon mirin
- 1 teaspoon sugar (optional)
- 2 tablespoons soy sauce
- approximately 500ml (2 U.S. cups) cold water Gut and peel the squid. You may want to ask the fishmonger if he can do this for you. Otherwise, here is a good video that tells you how to do it. The advantage of doing it on your own is that you get to use the guts and skin for a bit more flavor in your broth.
Cut off some of the legs and cut into pieces. Slice open the body so that it lies flat. Score the surface of the body and the back fins lightly in a crosswise pattern. Cut the body into squares about 1-1.5 inches (2.5 - 3cm) in size. Reserve the skin and guts.
Peel and cut the potatoes following the instructions in the basic nimono lesson.
Put the water, squid bits, and squid guts and skin into a pan and bring it to a boil. Put the squid pieces and legs in the water and boil for one minute, no more. Immediately drain the squid, making sure to reserve the boiling liquid. The boiling liquid will be your dashi or cooking broth. Take the guts and skin out of the blanched squid and discard.
Return the liquid to the pot and put the potatoes in. Simmer the potatoes until tender. Put in the sake, mirin and optional sugar, then add the soy sauce. Return the squid to the pot and simmer for an addtional 2-3 minutes. Don't over cook after you re-add the squid or it will turn tough. Taste, and adjust the seasonings if needed.
Serve warm or at room temperature, garnished with slivers of onion and lemon or yuzu peel.
Variations
Any kind of protein with lots of umami will work with this method. You may want to try chicken for instance - the dark meat works best. Chicken wings will work well too. Thinly sliced beef or pork work well too.
Filed under: japanese fish washoku japanesecooking101 squid nimonoJapanese Cooking 101: List of fresh ingredients for Lessons 4 (addendum) and 5
I'm falling a little bit behind with Japanese Cooking 101 but not to worry, the rest of the lessons are lined up. Lesson 4 will be posted tomorrow, and Lesson 5 on Friday.
I've already given you some fresh ingredients to get for Lesson 4, but in addition or instead of the broccoli you can also use cucumber. If you can get a hold of some small white turnips with their tops on, you may find it interesting too. Of course you can always get the things later after reading through the lesson.
For Lesson 5, we'll finally be tackling the main protein dish. I pondered this for a long time since I know it's hard for many of you to get fresh fish. I've settled on using some fresh salmon for the main part of the lesson, with a variation using chicken. If you want to try the salmon, you'll need about 120-150g / 4-5 oz. or so per serving, skin preferable. If you'll be trying the chicken, you will need 120-150g/ 4-5 oz. per person of boneless dark thigh meat, skin on or off (I'll be showing it with the skin on). I've revised the plans for Lesson 5: please read this.
And as usual you will need the basic pantry ingredients for both lessons.
I'll see you back her tomorrow for Lesson 4!
Filed under: ingredients washoku japanesecooking101Japanese Cooking 101, Lesson 4, Part 1 : Awase-zu (Vinegar Sauces) For Sunomono
This is Lesson 4 of Japanese Cooking 101: The Fundamentals of Washoku.
So far in Japanese Cooking 101, we've covered how to: * Make proper dashi, the base stock used in many savory dishes in Japanese cooking (as well as miso soup and clear soup using that dashi) in Lesson 1; * How to make proper Japanese style rice, the base starch of most meals in Japan in Lesson 2; and * How to make nimono or stewed dishes in Lesson 3.
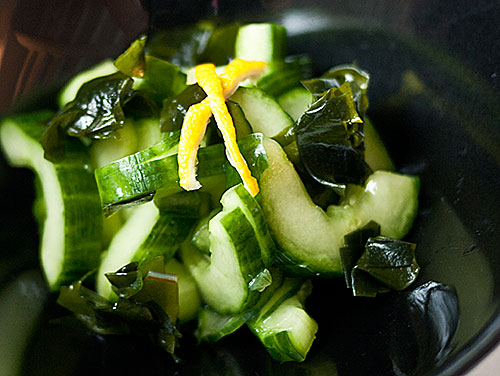
A typical Japanese meal consists of many small dishes to accompany the rice. At least one or two of those dishes is a relatively simple dish called aemono (和え物) a dish of vegetables and sometimes a small amount of protein such as seafood or tofu mixed with a sauce and served cold. One type of aemono is sunomono (酢の物), a sour-flavored dish. Think of it as a Japanese style side salad, using oil-free dressings. Sunomo are quite easy to prepare, can be made on the spot or a bit in advance, and are very refreshing as accompaniments to richer dishes.
There are two stages to preparing a sunomono dish:
- Making the sauce. This can be done as you need it, or in advance. You can also buy bottled versions of many of these sauces in Japan or in well stocked Japanese grocery stores elsewhere, but they aren't that hard to make from scratch. They're a lot less expensive if you make them yourself, plus you know exactly what's going in them. (Many commercial sauces have MSG and preservatives and so forth.)
- Prepping the vegetables and other ingredients. This means cutting and peeling, salting on occasion, and/or blanching. In washoku (traditional Japanese cooking) it's very rare to just eat vegetables raw without any kind of pre-processing such as blanching or salting. (The habit of eating raw vegetable salads became widespread in Japan only after World War II.)
In Part 1 we will be looking at the various sunomono sauces.
Awaze-zu or vinegar sauces: Sour + flavor
The su part of sunomono means vinegar, so sunomono sauces all consist of vinegar or a sour citrus juice plus flavorings. Collectively these sauces are called awase-zu (合わせ酢) or "combined vinegar". Here are some of the most commonly used awaze-zu, which can all be made in advance or just made on the spot as needed.
- Nihai-zu (二杯酢): 3 parts rice vinegar and 2 parts soy sauce, e.g. 3 tablespoons rice vinegar to 2 tablespoons soy sauce. Just combine and it's done.
- Sainbai-zu (三杯酢): 3 parts rice vinegar, 1 part soy sauce, 2 parts mirin (you can substitute sugar for the mirin); e.g. 3 tablespoons rice vinegar, 1 tablespoon soy sauce, 2 tablespoons mirin or sugar. Combine and stir over low heat until the mirin has 'cooked' a bit (about 5 minutes) or the sugar has melted, and cool.
- Ama-zu (甘酢) or "sweet vinegar": 3 parts rice vinegar, 2 parts sugar, a little salt; e.g. 3 tablespoons vinegar, 2 tablespoons sugar, 1/4 teaspoon salt. Combine and stir over low heat until the sugar and salt have melted.
- Tosa-zu (土佐酢): The ratio of ingredients for sanbai-zu (above) with a handful of katsuobushi (bonito flakes) added. Combine as for sanbai-zu and stir over low heat, and simmer for a few minutes and strain before using. You can also just add a small pinch of dashi stock granules to sanbai-zu instead. (Tosa-zu gets its name from Tosakuni, the old name for current day Kochi prefecture, which is still famous for its bonito and katsuobushi production.)
- Goma-su (ごま酢), sesame vinegar: 2 parts vinegar, 2 parts sugar, 3 parts soy sauce and 4 parts toasted and ground sesame seeds, e.g. 2 tablespoons rice vinegar, 2 tabelspoons sugar, 3 tablespoons dark soy sauce, and 4 tablespoons toasted and ground sesame seeds. (You can use tahini instead although it's a lot better with the ground sesame seeds.)
- See also: Nanban-su (南蛮酢) or Nanban sauce.
- Ponzu or Pon-zu (ポン酢): This citrusy sauce is very versatile, and is used as a dipping sauce as well as for making sunomono. The citrus juice can be from any sour citrus; in Japan the most commonly used fruits are yuzu, daidai or kabosu, but lemon, lime, and sour orange can be used too. There are various recipes for ponzu - here are a couple of variations:
- Classic ponzu: 3 parts rice vinegar, 3 parts soy sauce, 1 part dashi stock, 1/2 part citrus juice; e.g. 3 tablespoons rice vinegar, 3 tablespoons soy sauce, 1 tablespoon dashi stock and 1/2 tablespoon lemon juice, all combined.
- Sweet ponzu: 3 parts rice vinegar, 4 parts soy sauce, 2 parts mirin or sugar, 1 part citrus juice, 1 part dashi stock; e.g. 3 tablespoons rice vinegar, 4 tablespoons soy sauce, 2 tablespoons sugar, 1 tablespoon lemon juice. Combine and heat until the sugar has melted.
- Ultra simple ponzu: 3 parts citrus juice, 1 part soy sauce, a pinch of sugar; e.g. 3 tablespoons lemon juice, 1 teaspoon soy sauce, a tiny pinch of sugar. This is my favorite formulation and I often omit the sugar. It's a great all-purpose citrusy sauce. (For a small amount just combine 1 tablespoon juice and 1 teaspoon soy sauce.)
Which sauce you use depends on the ingredients you are using in the sunomono, as well as personal preference.
Which type of vinegar and soy sauce?
The most used vinegar for awase-zu is rice vinegar (米酢), read as kome-zu or (less frequently) yone-zu. This is a very mild vinegar with a slight sweet flavor. You can experiment with other vinegars; for instance, white balsamico is quite interesting, with a pronounced sweetness that may allow you to omit or reduce the amount of sugar in a given recipe. Apple cider vinegar, kuro-zu or black vinegar and so forth are alternatives with distinct characteristics. If you can't get a hole of rice vinegar, try white wine vinegar or apple cider vinegar.
The type of soy sauce that is preferred in most awase-zu recipes is usukuchi (薄口) or light colored soy sauce. Light does not mean it has less salt - it actually has more salt than dark colored soy sauce, but it's preferred since it is light in color and won't add any brown tint to the vegetables and so forth. But the "regular" type of soy sauce you can get usually is dark soy sauce, so if that's all you have that's fine too. Some types of awase-zu specifically call for dark soy sauce, such as Nanban sauce (nanban-su).
Tamari and other very dark soy sauce types are rarely used in awase-zu recipes, will give a definite brownish color to your dish. But again, flavor-wise they are fine to use, although since they are usually a bit lower in salt you may need to add a tiny pinch of salt depending on your taste.
Make ahead?
The awase-zu types that don't use perishable ingredients like dashi and citrus juice will keep for a few weeks in the refrigerator, in a sealed container. The awase-zu types with dashi or citrus juice will keep for a couple of weeks, but don't try to keep them for too long.
I've given you a lot of information here, but it's really not difficult: just pick one awase-zu that looks good to you (or that's called for in a recipe) and you're ready to go.
Go to Part 2: How to prep various vegetables for sunomono.
Filed under: preserves and pickles vegetables washoku japanesecooking101Japanese Cooking 101, Lesson 4, Part 2: Prepping Vegetables For Sunomono
Now that we know how to make the vinegar sauces for sunomono, let's turn our attention to the prepping of the vegetables. The key to good sunomono, and all aemono (mixed-vegetable dishes), is to use vegetables that have had the excess moisture removed. The way to do this is to either drain them well, salt them lightly to draw out the moisture, or to blanch them briefly.
Here are some ways to prep vegetables for sunomono. The recipes for the the vinegar sauces (--su or --zu) mentioned are in Part 1.
Wakame seaweed
Wakame is one of the easiest sea vegetables or seaweed to work with. I've been trying to eat more wakame recently since it is packed with minerals, so I'm just going to include it in all the sunomono variations below. It can also be used in miso soup, as I showed in Lesson 1a.
Wakame comes either in dehydrated form or 'raw' and preserved in salt. If you have the latter kind, simply rinse it well in running water, then soak for a few minutes in a bowl of fresh water. If you have the dehydrated kind, soak in plenty of water to cover until it's rehydrated. Either way, it should look like this after a while.
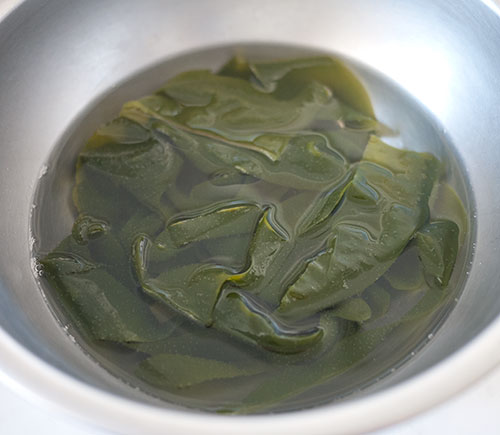
The dehydrated kind usually comes pre-cut into pieces but the salted kind comes in long pieces like so.
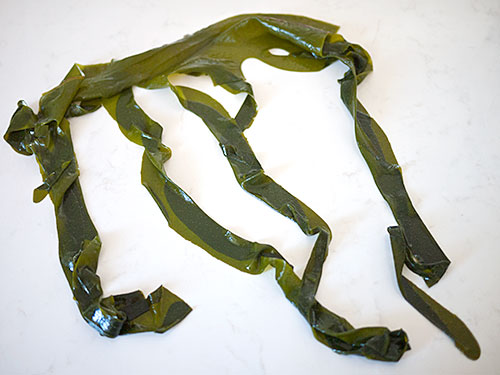
Just cut it up into small, bitesize pieces.
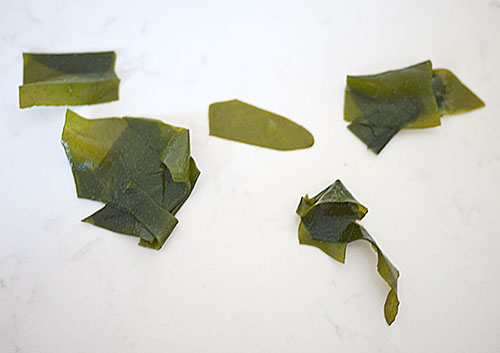
Here's about 1/2 cup of ready to go wakame, which can be used in sunomono, soups, salads and so forth.
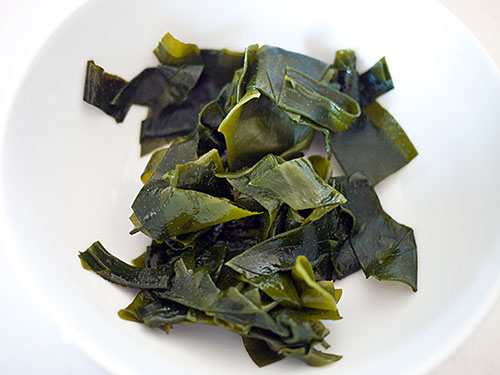
Cucumber
Cucumber is one of the most versatile vegetables for sunomono. It's available year-round (although its real season is summer), and its crunchy-crisp texture lends itself well to vinegar sauce. Japanese cucumbers are quite small and narrow, but just about impossible to get outside of Japan, so I usually use the type of cucumber that's called an English cucumber - long, and sometimes sold individually shrinkwrapped. Since cucumbers have a high water content we need to remove some of that.
Cut the cucumber in half lengthwise, and rub the surface with a little salt. This adds salt flavor, draws out excess moisture, and also makes the dark green skin really pop in color. Plus, if you have very fresh cucumbers with sharp little thorns, the salt will rub those off.
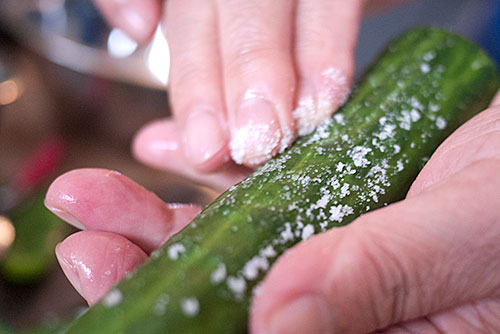
Scoop out the seeds with a spoon.
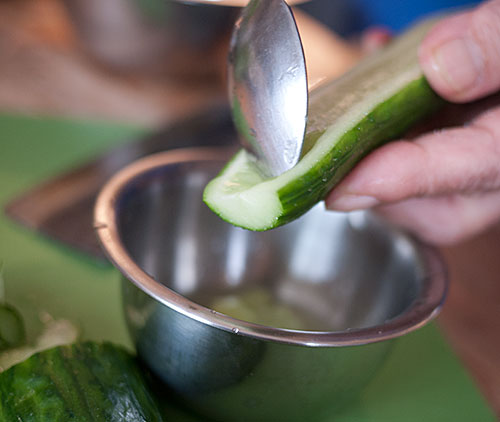
Be sure to be thorough and remove all the seeds, like so. (Tip: Don't throw away the seeds and pulp! Chill it in the refrigerator, then use it to give yourself a cool cucumber-skin treatment; apply it over your face, lie down for about 30 minutes, and wash off. Your skin will feel super-smooth and refreshed.)
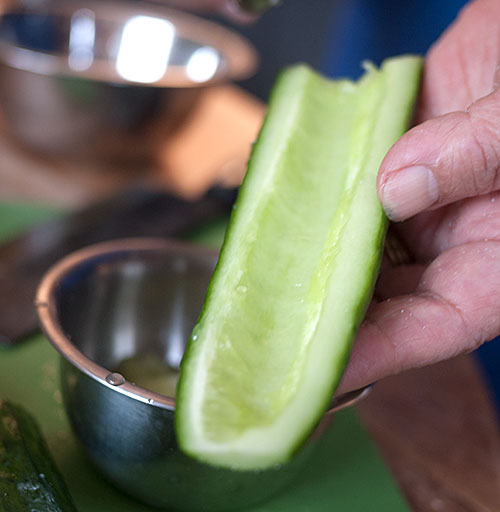
Cut up the cucumber into fairly thin slices. Sometimes I like to slice it paper-thin, and sometimes I slice it a bit thicker as I have here. Massage the cucumber to distribute the salt, then squeeze out as much excess moisture as you can.
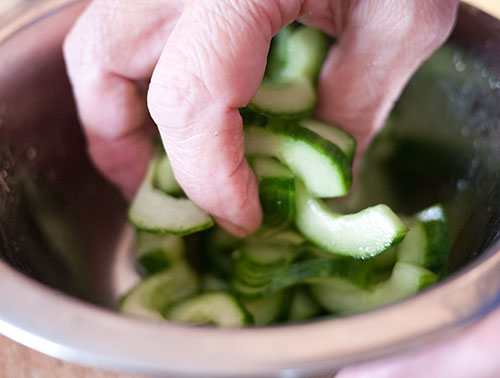
Cucumber and wakame sunomono with ponzu
Cucumber sunomono lends itself to any kind of awase-zu, but I especially like it with the citrusy flavor of ponzu. I used the Ultra Simple version of ponzu here and it was great. Use 1 to 1 1/2 tablespoons of sauce per cup of vegetables, or to taste.
Small turnips
Not all turnips are suitable for using uncooked like this, but small turnips work very well. These little white turnips are perfect.
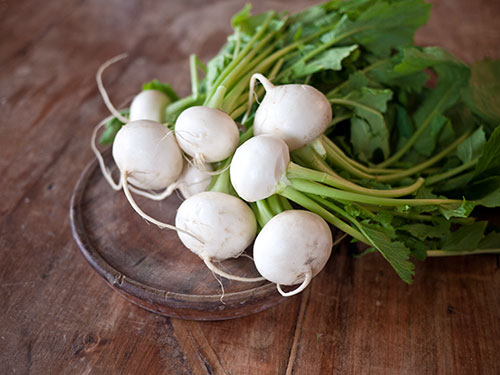
If you can get turnips with their green tops still on, cut the greens off to leave a little bit on the root. (Use the greens for making homemade furikake.) Carefully peel the turnips so you leave that little green topknot intact.
Tip: The outer part of some kinds of turnips (like these white ones) is rather tough and fibrous, so you should peel them rather thickly. I know it seems wasteful, but the turnips will be a lot more edible.
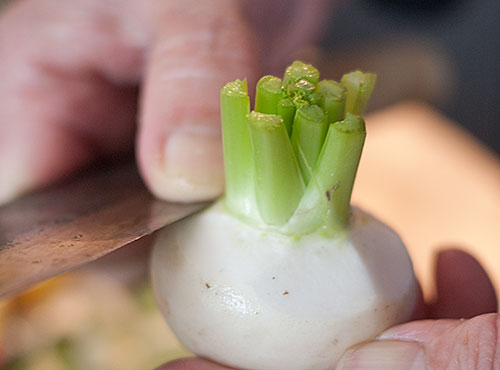
Then slice the turnips lengthwise, so you have a bit of that green with each slice (except for the sides). Sprinkle the slices with a tiny bit of salt, massage as with the cucumber, and squeeze out tightly to express any extra moisture.
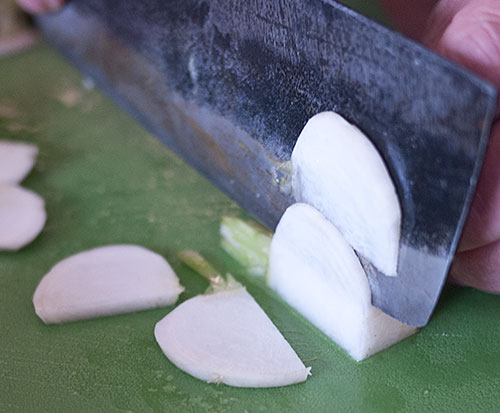
Turnip and wakame sunomono with sanbai-zu
The sweetness of sanbai-zu brings out the sweetness in the turnips. This is just as good without the wakame. Use 1 to 1 1/2 tablespoons of sauce per cup of vegetables, or to taste.

Tip: cutting the turnips with the green tops on makes the slices very attractive in miso soup too.
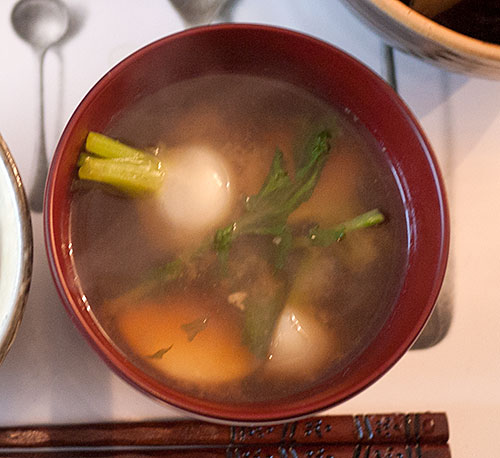
Broccoli stems and wakame with tosa-zu
This is a very frugal dish, making use of a part of broccoli that most people just throw away. To prep the broccoli stems, cut off the florets (to use for another dish). Peel the tough green outer parts of the stems, and cut them into bitesize pieces. Blanch the pieces in boiling water for about 2-3 minutes until crisp-tender, drain and cool. The umami-rich flavor of tosa-zu goes very well with broccoli and wakame. You can add one broccoli floret as a green accent, or use another green accent like the snap pea piece I've used here. Use 1 to 1 1/2 tablespoons of sauce per cup of vegetables, or to taste.
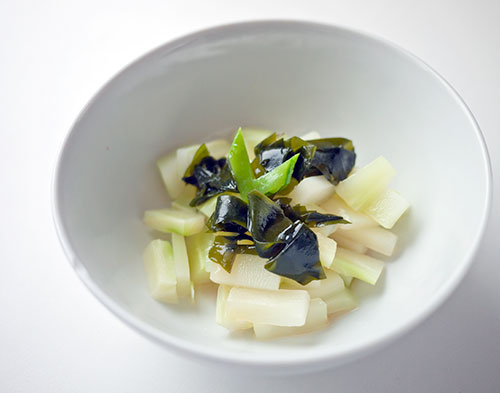
What other vegetables can you use?
Many vegetables work as sunomono. As I wrote above, you just need to make sure that you get rid of any excess moisture. For instance:
- Daikon radish: Slice thinly, salt and squeeze out.
- Radishes: Slice thinly or into halves or quarters, salt and squeeze out.
- Cabbage: Cut up roughly, salt and squeeze out.
- Tomatoes: De-seed and get rid of the pulp. Drain in a sieve to let any excess moisture run off.
- Lettuce: Make sure to pat away any water on the leaves. Rip up the leaves with your hands to avoid the browninng you get when you cut lettuce with a steel knife, or use a stainless steel or ceramic knife to chop up the leaves. Serve immediately after mixing with the vinegar sauce. (Lettuce and wakame with nihai-zu works very well, as does ponzu.)
- Celery: Peel off the tough outer fibers of the stalks. Slice very thinly, and sprinkle with a tiny of salt and squeeze out. Celery works well with sanbai-zu or ama-zu.
- Mizuna: Blanch in plenty of boiling water, cool in cold water and squeeze out tightly. Cut into short lengths. Mizuna goes well with any of the sauces, but I like it best with simple nihai-zu or ponzu.
- Edible chrysanthemum flowers: Blanch briefly in boiling water and drain. This is used most often together with other vegetables, such as daikon radish, and is really pretty.
A few vegetables may not be so suited to vinegar flavor (brussel sprouts come to mind for one) but that's really a matter of taste. I hope you'll try out your favorite vegetables as sunomono and see how they turn out.
Other ingredients uses in sunomono
Boiled seafood such as boiled shrimp, octopus and squid are often used in sunomono. Boiled shrimp is easy to do at home. If you want to try octopus, buy a piece of sashimi-ready octopus at a Japanese grocery store. (Raw octopus needs to be massaged and beaten up to make it tender enough before boiling.) Poached chicken also works well, especially with nanban-su.
You can find dehydrated seaweed salad mixes at Japanese or Korean grocery stores. To use these just soak in water as for the wakame until they are rehydrated and pliable. Use any of the vinegar sauces - for a Korean twist, add a bit of sesame oil and grated garlic.
Harusame is a noodle made from potato starch that is used in sunomono. It requires special treatment so I'll post a separate recipe with it at a later date.
If you think about it, sunomono sauces are rather like oil-free dressings, so they can be used with any number of salad-like combinations. The oil-free dressings sold in Japan are actually just variations on sunomono sauces.
I hope you've enjoyed this trip through sourness. In the next lesson we'll finally get to the main protein dish of a Japanese meal.
Filed under: japanese vegetables vegetarian vegan washoku japanesecooking101Japanese Cooking 101: Lesson 5 theme and ingredients revised to - Fish!
I have been re-thinking the last cooking lesson for Japanese Cooking 101. Originally I was going to do a mixed fish and meat lesson, but I think I will concentrate on fish since I really haven't covered fish cooking much over the years on Just Hungry. The problem I've always run into is that the availability of fish is very spotty around the world, so I'm never sure if the readers of the site can get their hands on the fish I'm talking about.
But the truth is, fish is central to washoku or traditional Japanese cooking. It's a bit hard to be a vegetarian in Japan, but being a pescatarian is very easy. While modern Japanese people do eat a lot of meat dishes, up until about 150 years ago eating meat was actively discouraged by the government, so meals were centered on vegetable proteins like tofu, and fish. And in Japan the array of fish available is rather bewildering.
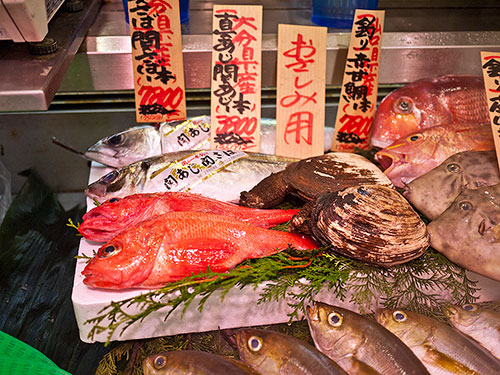
So in the spirit of showing you the real fundamentals of traditional Japanese cooking, for Lesson 5 we'll be tackling fish! If you can get a hold of the fish in question please do try following along. If not, I hope the information will be interesting at least.
Note that I'm able to get all of these fish in my small village in southern France because we have an excellent fishmonger (poissonnerie) even though we're about a 2 hour drive away from the nearest fishing port. So please take a look around to see if you have a good fish seller in your town. A good fish shop should not smell 'fishy' at all; it should smell like the fresh sea air, and be impeccably clean, with lots of shiny, bright and clear-eyed fish.
The fish to get if you can
I've arranged these in order from "probably easy to get for most people" to "maybe be very hard to get".
- A precut piece (filet) of salmon - preferably with the skin on. (this is what I listed originally previously. I'll show you a chicken variation for what I'm going to do with the salmon too.)
- Fresh,whole sardines (have the fishmonger remove the heads if you're squeamish about fish eyes)
- A flat white fish like haddock or plaice or sole (again, have the head removed if you want, but don't have the fishmonger filet the fish)
And, this last one might be very hard to get:
- a whole piece of tuna or bonito - a section of the body part, not the whole fish obviously (that would be rather unwieldly). I will show you how to break down a piece of fish to turn into pieces cut for sashimi or sushi. That's right, you don't have to restrict yourself to pre-trimmed, expensive pieces of sashimi-fish from Japanese grocery stores or expensive fishmongers to make sashimi and sushi, as long as you have good fresh fish.
I do not expect you to get all the fish by any means, but perhaps you can file the lessons away for later.
Since I've revised the lesson plans, I'll be posting the first part early next week. (I'll be posting some non-lesson stuff in the meantime though.) I hope you'll enjoy the fish lessons!
Filed under: ingredients fish japanesecooking101Japanese Cooking 101, Lesson 5 - Fish, Part 1: Salmon Teriyaki
Welcome back to Japanese Cooking 101: The Fundamentals of Washoku. We are entering the most involved lesson in the whole series: how to deal with fish. As I explained previously, learning how to deal with fish is pretty fundamental to conquering traditional Japanese cooking. So, Lesson 5 is divided up into several parts.
Before we dive into the deep end, let's start with something easy: cooking a piece of salmon. Salmon is one of the most easily obtainable fresh fish, since it's so popular, still available in abundance since part of the supply comed from fish farms (although the farmed variety has some catching up to do in terms of taste to the wild kind), and overall a pretty easy fish to deal with. It usually comes to us in cut form so we don't have to deal with de-boning or fileting it and things.
Incidentally, I prefer to buy all my fish, salmon included, with the skin on. The skin of a salmon is delcious anyway, but the main reason for buying a fish with the skin on is that it holds the flesh of the fish together better. And with very low-fat fish the skin helps to prevents the flesh from drying out too much.
While I've given you several formulas for teriyaki over the years on both JustHungry and JustBento, this is the one I use the most now because it's easy to memorise. The teriyaki sauce formula is a 2:2:2:1 ratio of soy sauce, sake, mirin and sugar. You can halve or omit the sugar if you like it less sweet. The sake and mirin are what give this that delicious 'teriyaki' flavor, so do try to use them if possible.
Salmon Teriyaki
Prep time: 5 min :: Cook time: 10 min :: Total time: 60 min
Yield: 2 servings
Serving size: 100-150g (approx. 3 to 5 oz)
Ingredients:
- 200-300g (approx. 7 to 10.5 oz) fresh salmon, skin on
- salt
- flour, cornstarch or potato starch, optional
- 2 to 3 tablespoons soy sauce
- 2 to 3 tablespoons sake
- 2 to 3 tablespoons mirin
- 1 to 1.5 tablespoons sugar
- oil , for frying
Directions:
- So, let's say you have a nice, glistening, fresh piece of salmon. Salmon is a rather fatty fish, and it benefits from an initial salt treatment. The salt helps to draw out excess moisture from the fish, firms up the meat and also eliminates any hint of 'fishiness', leaving it tasting delicious. You only need to sprinkle a little bit on, like so:
- Leave the fish like that for at least 30 minutes if you can, or in the refrigerator for up to a day.
- Cut your slab of salmon into individual serving size pieces about 2-3 cm (1 to 1 1/2 cm) wide. Optionally coat each piece in flour, cornstarch or potato flour - this will make the sauce a bit thicker.
- The rest goes very quickly. Teriyaki is cooked about 80% of the way before you add the sauce ingredients. Heat up a frying pan with a little cooking oil, and put in the salmon in one layer.
- Cook each side over medium-high heat until browned.
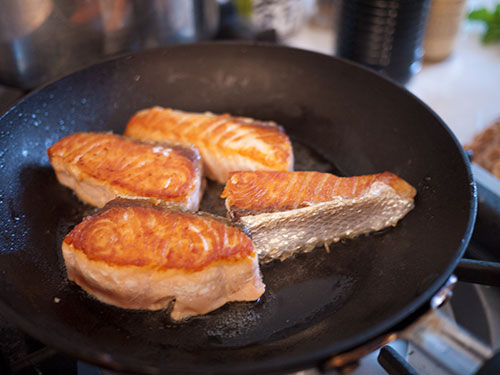
- Make sure to brown and crisp up the skin side well.
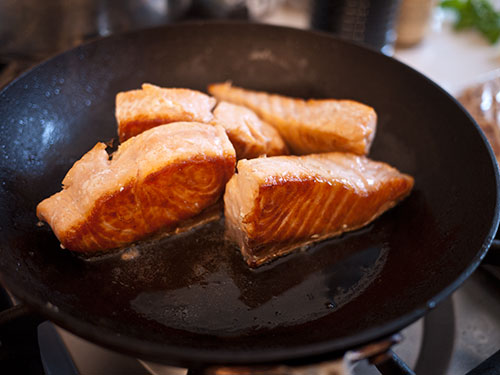
- While you are cooking the salmon, combine the soy sauce, sake, mirin and sugar in a bowl. When the salmon is just about cooked, add all the sauce ingredients in one go into the pan. Careful - it will sizzle and spit a bit.
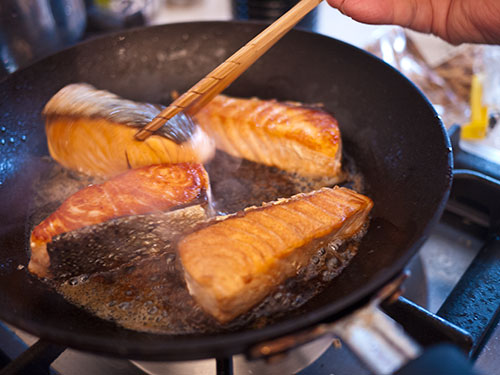
- Rapidly turn the fish pieces so that they are coated in the sauce. In the meantime the sauce will thicken up a bit as the moisture evaporates. When the salmon is a deep golden brown, it's done.
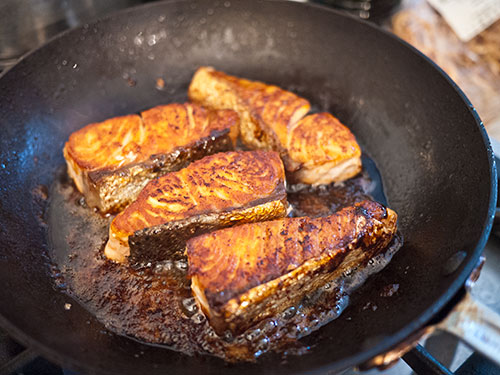
- The basic rule for how to present a piece of fish is, to put the skin side away from the diner. There should always be a bit of garnish too, to provide a contrast in color as well as a contrast in taste. This can be anything that's nice and green - here I've just used a bit of lamb's lettuce (mache), but traditionally you might use a couple of shiso leaves, or panfried shishito peppers, or even a couple of green beans or snap peas.
(this part is for search engines)
By Makiko Itoh
Published: April 16, 2013
Type: fish, japanese, washoku
Variations
You can use this exact same formula for any kind of oily, firm fish such as swordfish or mahi-mahi. It is perfect for buri or amberjack/yellowtail. It doesn't work as well with white fish, but you can give it a try providing the fish is firm.
If you are making a larger quantity, use a ratio of 2 tablespoons each of soy sauce, sake, and mirin plus 1 tablespoon of sugar per 100-120g (3 to 4 oz) of fish.
You can also use a similar formula for chicken, including the pre-salting. Use the thigh meat, skin on or off; if skin on, pierce the skin a few times with a fork before cooking, and start cooking with the skin side down. Turn over when the skin is nice and crisp.
Note that I do not marinate the fish in the sauce beforehand. This is because I think the fish tastes better if it has been pre-salted instead, which enhances the umami that is already in the fish. Not pre-marinading also means you can get a nice crispy skin.
So, that was easy wasn't it? Next time as we continue the Fish Lesson, we'll dive into something a bit more challenging.
Filed under: japanese fish washoku japanesecooking101Japanese Cooking 101, Lesson 5 - Fish, Part 2: Fish buying tips, plus how to "open" a fish
Welcome back to Japanese Cooking 101: The Fundamentals of Washoku Lesson 5 - Fish! This is Part 2 of the Fish lesson; in Part 1 we started with an easy salmon teriyaki.
While many Japanese meat dishes are known around the world these days, such as tonkatsu and the gyuudon (beef on rice), many such meat dishes are in fact part of a different branch of cooking called yoshoku (yohshoku), or western-influenced Japanese cuisine. For a very long time eating meat was either actively discouraged or outright banned in Japan, so that most people who either lived near water or could afford it ate a lot of fish as their main source of protein.
So, learning how to deal with fish is quite important if you want to become a Japanese cooking whiz. Let's start at the fishmonger....
Where and how to buy fish
You will need to start by looking for a good fishmonger. If you're very lucky your local supermarket has a decent fish department (in the U.S. Whole Foods usually has a pretty good one), but otherwise you may have to ask around or do some research to find one that consistently stocks fresh fish.
A good fish seller should not smell 'fishy'. There will be some smell, but it should be like the ocean. If the place stinks, do not trust them.
A good fish seller should have a rapid turnover, and only stock what they normally sell. Just because there are tons of fish on display doesn't necessarily mean it's all good! Smaller fish shops may only sell locally caught fish. That's great, because it means that fish is fresh, in season, and all that you desire. If you live near the sea, you'll also want to see some locally caught fish, not just shipped in stuff. In addition, a good fishmonger will do things for you such as taking off the heads and removing the guts.
Look into his eyes...
Let's talk about fish heads for a moment. I know some people are squeamish about seeing eyes on the food they eat, but in the case of fish the eyes really say a lot. Fish generally start to go bad from the head down, and if the eyes look sunken or dull, that's bad news.
This is a nice, bright-eyed fish.
And how about this guy?
Anyway: when you are looking at fish, if they have their heads on, make sure they are as clear as glass. If the fish you want has already had its head removed, look at the fish that's on the shelf or in the case that do have heads - do they look nice and clear? If yes, your headless fish is probably good too.
Another way to gauge the freshness of fish, besides it smell (it should not smell 'fishy') and the eyes is if it's nice and firm and has a moist looking skin. You have to gauge this with your eyes only most of the time since fishmongers will not let you touch the merchandise. So, use what you can readily see and smell first.
How to 'open' a fish
There are several ways to cut a fish - fileting it for instance, or cutting it across the body into 'steaks', and so on. One way that's pretty common in Japan is to simply open it up, leaving the head on and the backbone in the fish. This method of cutting a fish is called 開き - hiraki (noun) or 開く - hiraku (verb, to open). It's like butterflying but a bit easier. It's also a good way to become familiar with handling a whole fish. If you fish, this is a great way to cook your catch on a campfire grill on the spot, since the opened up fish cooks quickly and evenly.
The easiest kind of fish to use for this - indeed the easiest kind of fish to cut up on your own, is a medium sized round-bodied fish like mackerel, herring, trout and so on. Flat fish like plaice or sole are not suited for this treatment. Here I have used a fish that looked nice at our local fish shop - I think it's called a smelt whiting or whiting in English; it looks a lot like a fish called kisu in Japanese.
If you can, get your fishmonger to take the guts out for you. It's less messy that way.
You will need a sharpt kitchen knife and a cutting board. If you chose a fish with proment plasticky scales, you'll also need a de-scaler. Tip: if you don't have a de-scaling tool, try a used by clean credit card-type card. Run it up the fish skin from the tail repeatedly until all the scales are loosened, and rinse off. In any case, always de-scale befor cutting up the fish.
Put your knife in right behind the gills...
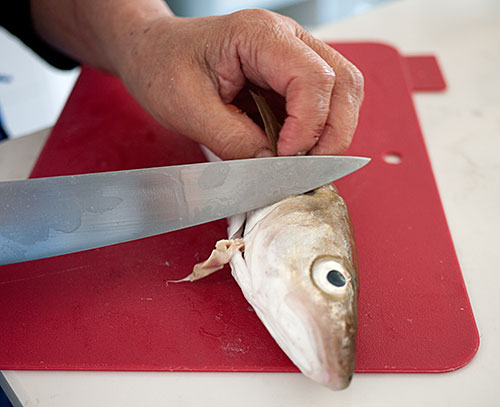
...and firmly cut through until you feel the bone. Don't go all the way through. (Tip: If you're removing the head, just keep going.)
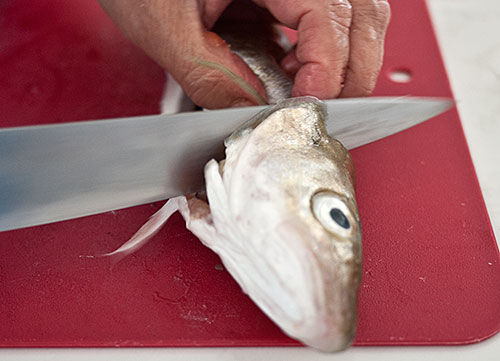
Start cutting the belly side of the fish, starting with where you made your head cut. If you didn't get the guts removed at the fish shop, this is the time to remove them. Pause to rinse out the guts and pat dry before proceeding.
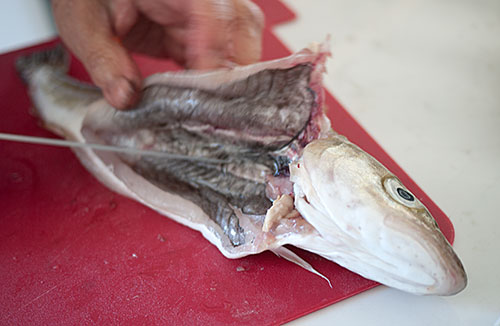
Cut through the belly side all the way to the tail....
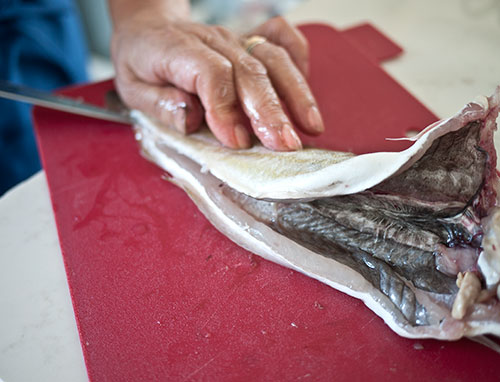
...then pull gently on the top half of the fish while slicing through right on top of where the bone is.
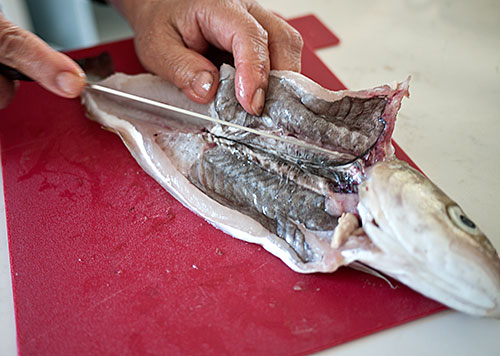
Once the top half of the fish is separated from the bottom half and only connected at the back side, wash the fish out thoroughly inside and out. Make sure that all the scales are rinsed away, as well as any residual bits of the innards. (Tip: If you are fileting the fish you'd keep going and cut all the way through the back part.)
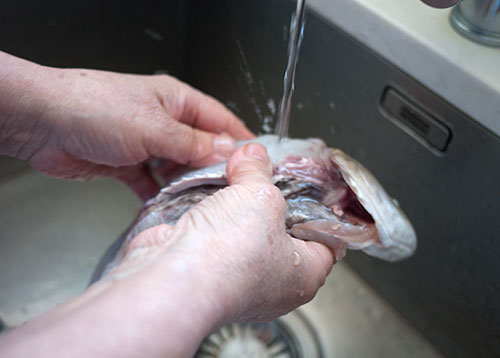
Pat the fish dry with paper towels. Isn't he a fine looking thing?

Put some salt in and round both of the eyes. This helps to keep them fresh a bit longer.
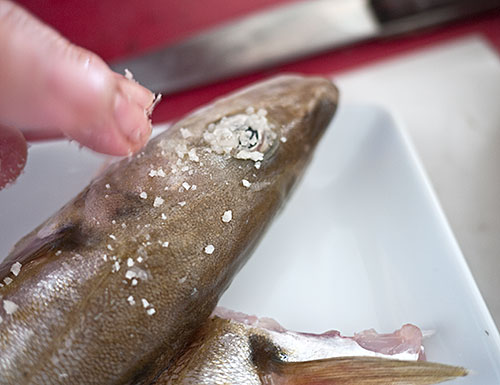
Lightly salt both sides of the fish. A good way to lightly salt something is to sprinkle on the salt from a high above; you get more even coverage that way.
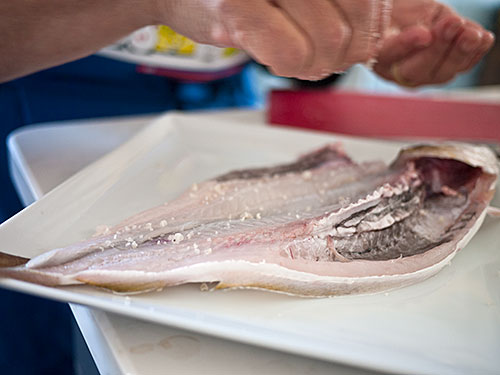
At this point you can just grill the fish or pan-fry it, with no added seasoning if you want the flavor of the fish to shine through, or with a teriyaki sauce brushed on it (see Part 1 for the basic teriyaki formula.)
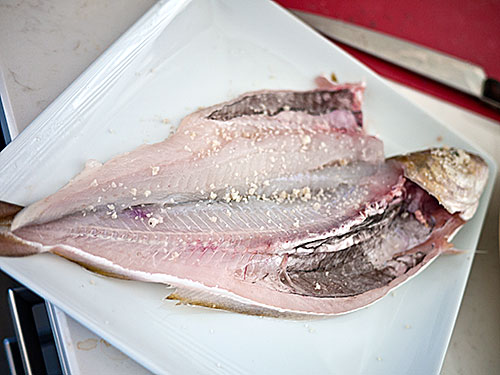
Or, you can make a sort of homemade himono or semi-dried fish, but leaving it on a rack for a day or two. (If you are not sure about leaving out fish in the open, and/or have some furry feline creatures around, do this drying bit in the refrigerator.)
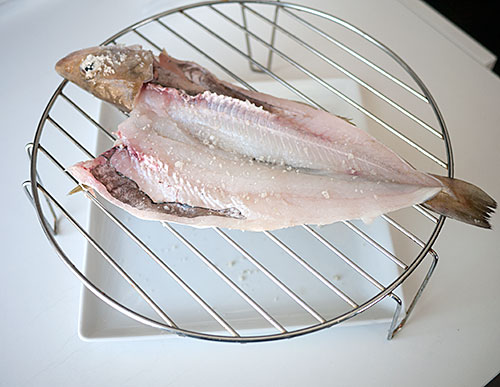
Here is the fish after it's been air-drying for 2 days, simply grilled. It was delicious, in the way only really fresh fish can be. We had it with grated daikon radish and some soy sauce drizzled on top.
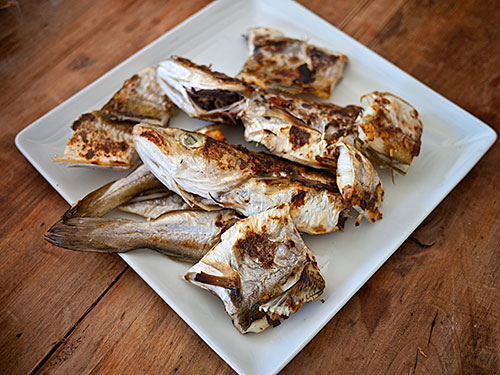
You can also pan-fry it in olive oil or butter, maybe with some herbs piled on for a great light meal.
Summary
- A good fish shop should smell fresh, and have a carefully selected array of fish, at least a good percentage of it of it locally caught if you live near the sea.
- A good fishmonger will know how to recommend fish to you and to do some basic processing such as gutting it.
- Look at the eyes of a fish! If they are nice and clear, the fish is fresh. Also trust your nose.
- Try cutting open a fish!
Not too complicated or scary, right? Next time we'll look at how to deal with tiny fish like sprats and sardines.
Filed under: fish how-to washoku knife skillsJapanese Cooking 101, Lesson 5 - Fish, Part 3: How to break down small fish
We are entering the home stretch here for both Lesson 5, Fish and the whole Japanese Cooking 101: The Fundamentals of Washoku course. I hope you've been enjoying it so far!
In this lesson we are going to get very intimate with fish. Basically all fish needed to be prepped the same way: the head taken off (sometimes the head is cooked with the fish or separately); de-scaled if it has prominent scales; gutted, and then usually fileted and/or boned. And usually you need a sharp knife for these operations.
However, with small fish like sprats, sardines and anchovies, you don't even need a knife at all, except to take the heads off. They are tender enough that you can just prep them with your hands. This is a great way to really get to know a fish, and it's kind of fun too.
This is a plate of fresh sardines, popular around the world, especially in the two places I spend the most time - Japan and southern France. Beautiful, aren't they? They have nice clear eyes.
The one thing you do need a knife for is taking the heads off. You could pull them off, but that's a bit messy. So, here are the beheaded sardines, with some of the ingredients we'll be using with them later to make the plate look prettier.
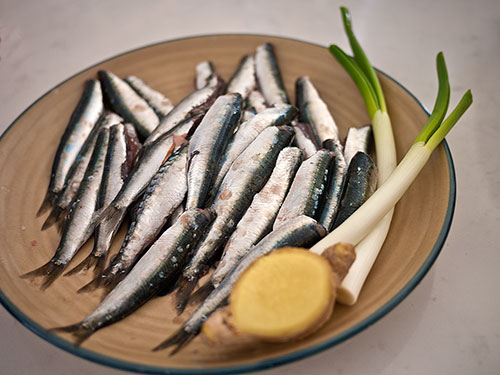
To deal with the sardines, position yourself at your sink and have a thin stream of water running out of the tap.
Take one of the sardines, and just run your thumb down the belly and pull it open. You'll see a bit of guts there; just pull it out and wash it off with the running water. (If you don't have access to running water, just use a bowl filled with clean water and swish the fish in it.)

The next thing is to take out the bone. This comes off easily in one go. Pry it off at the head end, and just pull. Don't be hesitant. Give it a tug and it's gone, tail and all.
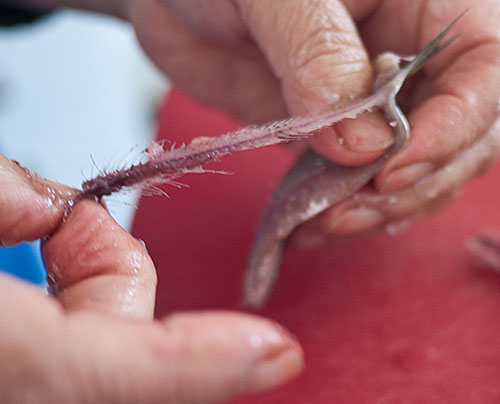
Don't throw away the bones by the way! Put them on a plate to deal with later.
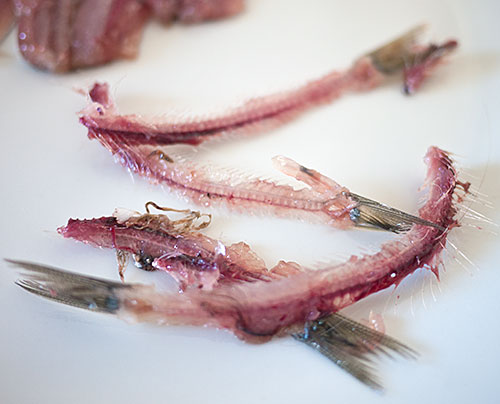
Here's the gutted and boned sardine - so easy! At this point, run your finger carefully down the surface of the fish. If you feel any little bones left in there (which you shouldn't if you ripped out the backbone properly) take them out with your fingernails or a pair of fish bone tweezers.
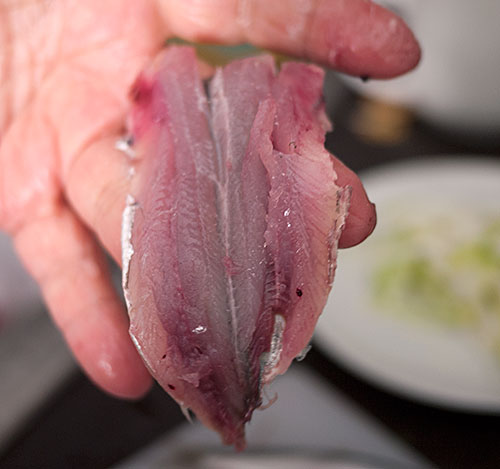
Here it is on the other side.
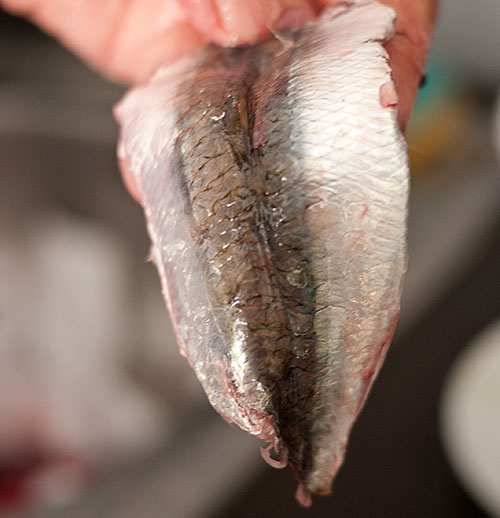
Wash each filet again to get rid of any stray bits of guts and stuff.
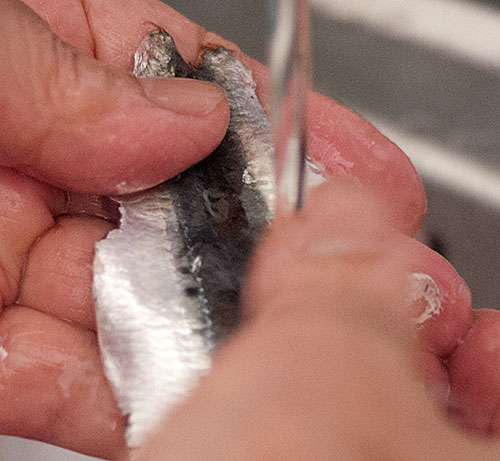
This next step is somewhat optional, but does improve the texture of your fish. The skin of the sardine peels off quite easily. Just pry up a corner with your thumbnail, and pull it off in one go. As with the bone, don't hesitate here or the skin will rip and it becomes harder to take it off.
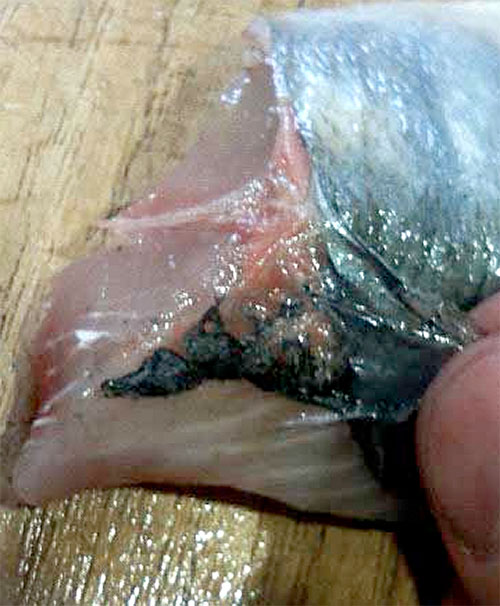
Here are the skinned filets. Put them on absorbent paper towels to drain off the excess water.
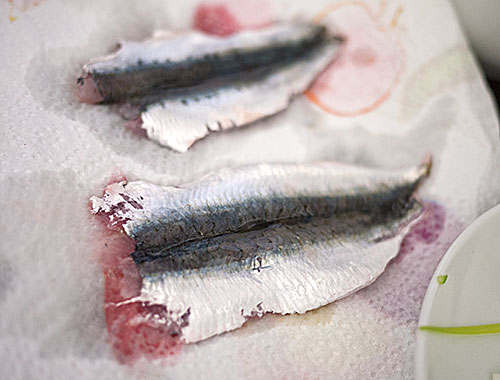
At this point you can pan-fry them in a bit of olive oil or butter (maybe coat them with flour or cornstarch first), or marinate them, or whatever you like to do with such fish. You can even turn it into sushi!
Recipes using fresh sardines
- Here is a classic way to use sardines, Iwashi no tsuire-jiru - Sardine balls in clear soup..
- A frugal way to use up the bones: Fishbone crackers
Japanese Cooking 101, Lesson 5 extra: Iwashi no Tsumire-jiru (イワシのつみれ汁) - Sardine balls in clear soup
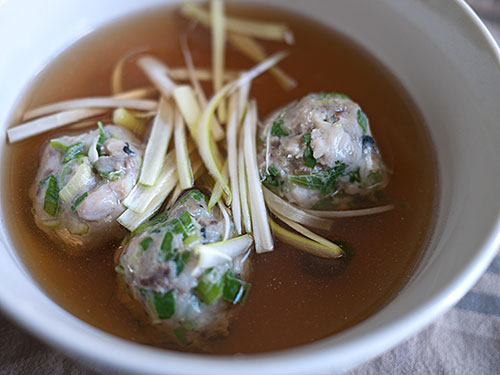
Now that you know how to gut, bone and clean sardines, one of the nicest ways to eat the sardines is to turn them into little fish balls which can be floated in a hot pot, pan-fried, and so on - or most classically, served in a clear soup. The ginger and onion takes away any kind of 'fishy' taste. You can even serve this in cold soup for a refreshing change. They are very healthy too, since sardines are one of the best sources of the heart-healthy omega-3 fatty acids EPA and DHA.
Recipe: Iwashi no Tsumire-jiru (鰯のつみれ汁): Sardine balls in clear soup
Prep time: 20 min :: Cook time: 10 min :: Total time: 30 min
Yield: 4 servings
Serving size: 3-5 balls
Ingredients:
For the sardine balls (tsumire)
- 600g (1 lb. 6 oz) fresh sardines, weighed before gutting/deboning
- 1/4 to 1/3 teaspoon salt, to taste
- 1/2 tablespoon sake , omit if you don't have any
- 1 egg white
- 1 piece fresh ginger - about a 1cm + / 1/2 inch long piece (should make about 2 teaspoons of grated ginger)
- 2-3 stalks green onion, about 1 cup chopped
- cornstarch or katakuriko potato starch
For the soup:
- 750ml / 3 U.S. cups dashi stock
- 1/2 teaspoon salt, to taste
- 1 teaspoon soy sauce, light soy sauce (usukuchi) is preferred but dark is ok
- green onion, ginger, mitsuba etc., for garnish
- sansho pepper, to taste
Directions:
- Gut, bone and de-skin the sardines as per the detailed instructions here (link).
- Finely chop the green onions - you shoul have about 1 cup's worth. Peel and grate the ginger. (No photo for this step...I figure everyone knows how to do this!)
- Start chopping up the sardines. First just slice them up.
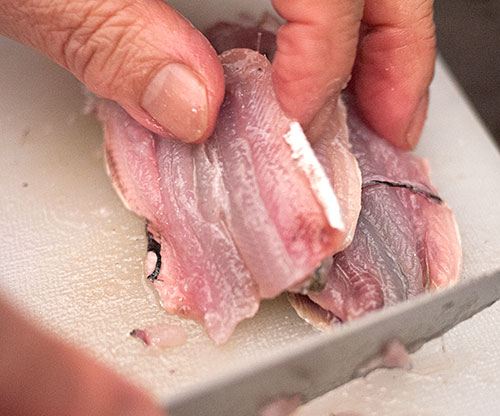
- Keep chopping the fish until the pieces get smaller and smaller.You can also bash the mixture with the side of your knife occasionally.
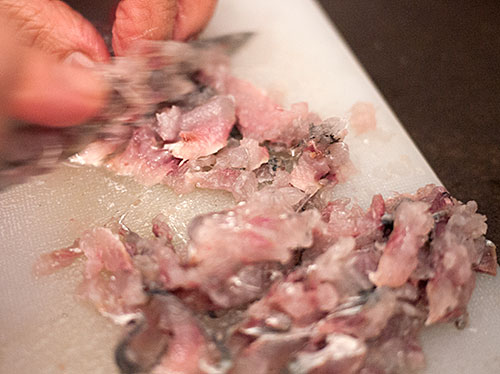
- They should get to about this consistency - rather like rough ground meat. (You can chop up the fish in a food processor if you prefer: use the pulse function so you don't grind them into a paste.)
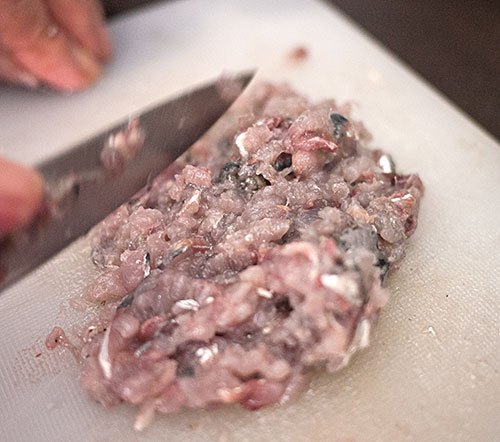
- Put the chopped up fish, ginger, green onion, sake, salt and egg white in a bowl. Mix together thoroughly with your hands until it forms a slightly sticky paste.
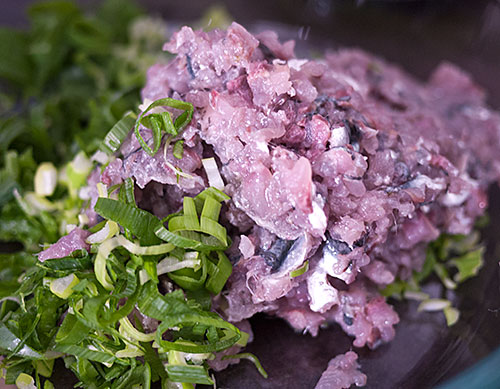
- Form into balls with moistened hands. (Some people prefer to use two spoons that have been dipped in oil to form the balls, but I just use my hands.) You should have an equal number of balls per serving, around 3-5.
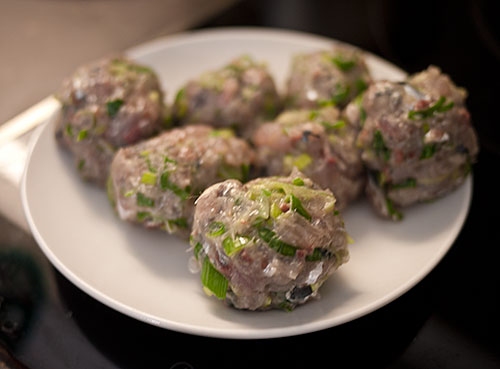
- Lightly roll the balls in cornstarch (cornflour) or potato starch. Drop them in a pot of simmering water, and poach for 4-6 minutes until they are firm, and white on the outside. Take them out and drain well. At this point you can use the precooked balls in hot pots, oden stew, or pan-fried gently and served on its own or with a little ginger-wasabi sauce.
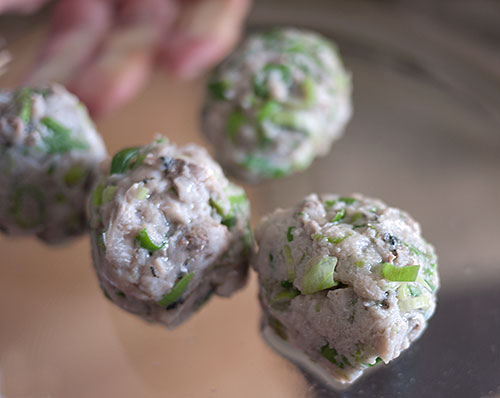
- Heat up the dashi stock. Add the tsumire (sardine balls) and gently heat through.
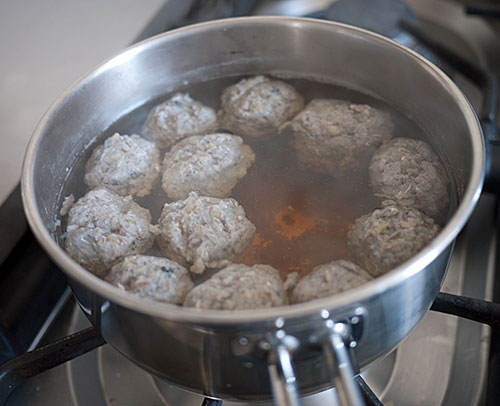
- Serve piping hot or chilled until it's ice-cold, with julienned green onion or the white part of leek, and/or julienned ginger. You can also add mitsuba, komatsuna, or even watercress to the soup. Some crunchy greens are especially nice in this if you serve it chilled. A sprinkle of sansho pepper on top is great too.
(Below for search engine purposes only)
By Makiko Itoh
Published: April 25, 2013
Type: Japanese, washoku, fish, soup
Japanese Cooking 101, Lesson 5 extra: Fish bone crackers (hone-senbei) with shoestring potatoes
There's no need to throw away the bits of fish that you cut off when you filet them and so forth. Fish bones and heads can be kept for making soup. Or, if the bones are tender enough they can be made into delicious fish-bone crackers.
At the sushi restaurant in New York I worked at many years ago, the chefs used to serve these as extra treats to customers who sat at the counter. One of those was a lovely little girl, who used to come regularly with her father. She just loved those fish bone crackers. One year the chefs made a big batch of them and gave her a takeout box full for her birthday. She was so happy I thought her eyes were going to pop out of her head.
I've paired these with shoestring potatoes, which taste surprisingly sweet next to the umami-rich fish bones. The type of potato is important - choose a nice firm waxy type, not a floury type like Idaho baking potatoes. Alternatively you can use sweet potatoes.
Recipe: Fish bone crackers (hone-senbei 骨煎餅) with shoestring potatoes
A frugal way to deal with the bones taken out of small fish like sardines. Tip: Always fry the potatoes before you fry the bones, or the potatoes will take on the flavor of the fish.
Prep time: 15 min :: Cook time: 10 min :: Total time: 25 min
Yield: 2 servings
Ingredients:
- 16 to 20 fish bones from fresh sardines
- 2 Yukon Gold or Bintje potatoes, or similar firm potatoes, medium sized
- salt, to taste
- flour or cornstarch, to dust the fish bones
- oil, for frying
Directions:
- These are the fish bones taken out of the fish. Wash them off, and pat them dry with paper towel. Leave to dry out a bit on a plate for an hour. (Do this in the refrigerator if the weather is hot, or if you have some feline overlords about.)
- Peel the potatoes and cut them into small matchsticks. Rinse them and then pat them dry, and leave on a sieve to dry out some more until you're ready to fry everything.
- When you are ready to cook and while the oil is heating up, coat the fish lightly with flour or cornstarch.
- Heat up some oil for frying. Heat the oil to a low cooking heat, about 170°C / 340°F (see this for how to gauge frying oil temperature with wooden chopsticks). Fry the potatoes until cooked but not browning yet. Take them out and drain.
- Heat up the oil until it reaches the high range, about 180°C / 355°F. Put in the pre-cooked potatoes and fry until a golden brown. Take out and drain.
- Put the fish bones in and fry until golden brown and crispy. Take out and drain.
- Lightly salt the fish and the potatoes. Serve as a snack or appetizer. It goes very well with beer.
(Below is for search engine purposes)
By Makiko Itoh
Published: April 26, 2013
Type: Japanese, fish, washoku, appetizer
Japanese Cooking 101, Lesson 6: Putting It All Together
Welcome to the last lesson in Japanese 101: The Fundamentals of Washoku. I hope you've enjoyed the course and learned a few things along the way. In this last lesson we'll take a look back at what we've learned, and also see how to put it all together to great an authentic traditional Japanese meal at home.
What we've covered in this course
First we looked at the basic pantry ingredients for the course, which are also the basic pantry ingredients for a traditional Japanese kitchen.
Then learned how to make proper dashi stock, which is the foundation of many savory dishes in Japanese cooking. We also learned how to make miso soup and clear soup using that good dashi stock.
Next, we took a good hard look at how to prep and cook Japanese style rice. Rice is central to Japanese life, not to mention most Japanese meals. We also learned how to make sushi rice.
Then we got to the dishes that go with the rice and soup, starting with nimono or simmered dishes (even without dashi). We went on to sunomono and aemono - basically prepped or precooked vegetables with some kind of sauce.
We then ended by looking in-depth at arguably the most important protein used in Japanese cooking, fish, from a simple teriyaki to whole fish opened up to breaking down whole small fish and using every part of it.
If you missed the course by the way, just follow the links in the paragraph above in sequence! Or, just start at the very beginning intro, then go to the first article linked below that, required ingredients. After that just keep clicking on the 'next' article link below each article.
There was actually a logic to this...
There's a reason why I presented the parts of the course in the order I did:
- Dashi is so fundamental to traditional Japanese cuisine that it's important to know how to make it and how to use it. This way of thinking - flavoring something with a little umami - permeates other types of cooking in Japan too.
- Soup also is a part of most meals, even breakfast.
- Rice forms the center of most Japanese meals. Sure, sometimes we deviate and have some noodles or something else, But we keep going back to rice. The word for cooked rice, gohan (ご飯)is also used to indicate the whole meal. When mom called out "gohan dayo-" when we were out playing, we knew she meant "it's dinner time", not just "it's rice". Even if that bowl of rice was not always 100% - poor people often had to mix in other grains like barley or millet - the ideal was always that plain bowl of white rice. (Ironicly of course these days people mix in these zakkoku (雑穀), the 'other grains' formerly looked down upon, into rice for their nutritious benefits. See more about zakkoku-mai or mixed grains with rice.)
- The other dishes are basically side dishes to the rice. In Western style cooking, the main protein is the 'star' of the meal, but in Japan the rice is the unquestioned king of the table. Everything else on the table is judged by how well it goes with that plain bowl of rice. The word for all of these side dishes is okazu (おかず)__, or more formally, fukusai (副菜).
The one-soup, three-side dish rule
A balanced Japanese meal is supposed to have__ 一汁三菜 - ichijuu sannsai - 1 soup, 3 side dishes, to go with the rice. It may sound like a lot, but it's not that much more than many western style meals if you think about it. A typical western meal might have a soup as a starter, then a main dish with steak, potatoes, and some side vegetable like steamed broccoli, followed by a sweet dessert. A traditional Japanese meal doesn't have separate courses - everything is served at once. (This differs at top end Japanese ryoutei or kaiseki restaurants, who often serve single dishes one at a time in multiple course.) Having more than 3 sides is extravagant, although in the olden days people avoided having 4 sides since the number 4 is unlucky in Japanese culture. (4 can be read as "yon" or "shi", and "shi is synonymous with 死, or death. Most Japanese buildings don't have a 4th floor, just like most Western buildings don't have a 13th floor.)
The bare basic Japanese meal is 一汁一菜 - ichijuu issai - 1 soup, 1 side dish, plus the bowl of rice.
(Incidentally, there's also no tradition of having dessert with a meal, which may be why many Japanese main dishes have a bit of sugar in them. Sweets are eaten separately during the day, not with a meal. This is changing, and many people have some fruit or a light dessert after a meal, but that is a recent thing influenced by western style eating.)
How to line up all those dishes
Traditional Japanese meals are served in multiple serving containers, one for each item. And there are some basic rules to follow as to how to line them up.
Here's how to line up a basic 一汁一菜 - ichijuu issai - 1 soup, 1 side dish, bowl of rice meal.
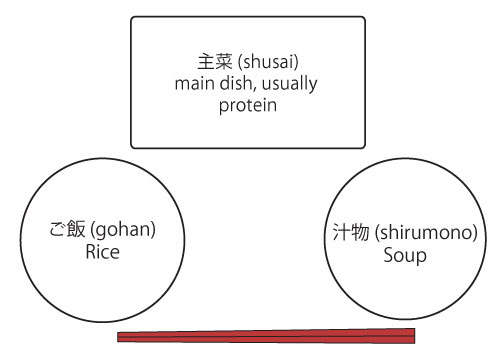
As you can see, the rice goes on the left, the soup on the right, and the side dish is behind that. The rice always goes on the left, even for lefties. That left corner closest to the diner is considered to be the most 'honorable' position (don't ask me why it's honorable...) so that's where it goes. If you think about it it it's not the most convenient way to arrange things for a right handes person, who'd have to reach over the soup to get to the rice. Maybe this is why you usually lift up your rice bowl and your soup bowl to eat from them. (You don't life up the other serving dishes though.)
This is how the full 一汁三菜 - ichijuu sannsai - 1 soup, 3 side dishes and rice meal is arranged.
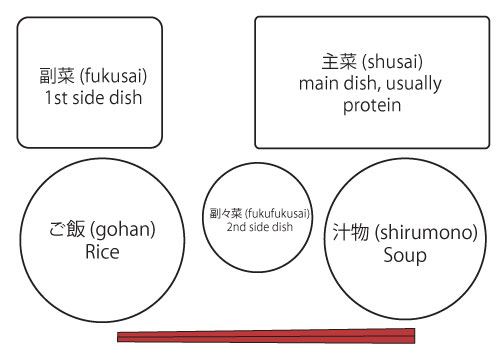
There are no rules really to dictate where the side dishes go in relation to each other. But again, the rice and soup are closest to the diner, with the rice on the left. Plus, the main fukusai or side dish is in the most prominent position.
I arranged the dishes we made during the course for dinner one day following these rules. (Click on the photo to see a larger version.)
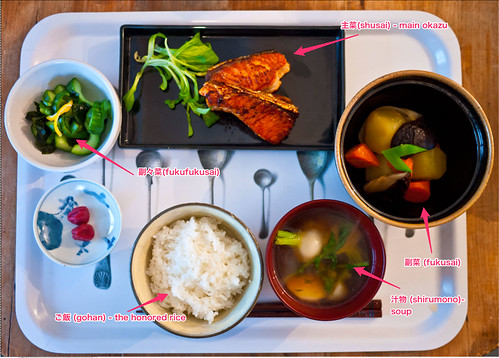
The little dish of umeboshi is not really considered to be a proper side dish so you can ignore that, but as you can see the rice is on the left, soup on the right, and the side dishes beyond that. As I mentioned in the salmon teriyaki chapter for fish, the skin side goes on the top or the far side; the same goes for a piece of skin-on chicken for example. If you are serving a whole fish the head goes to the left.
Flavor balance is important too
When you put a Japanese meal together, pay attention to the balance of flavors and cooking methods. Ideally you should aim for 1 yakimono (焼き物), something cooked with dry heat - grilled, pan-fried, or deep fried; 1 nimono (煮物), something simmered, and 1 aemono (和え物) or sunomono (酢の物) - a cold dish with a sauce, dashi based or vinegar based. This gives a good balance of flavors and textures. While the yakimono is usually a protein, the two other sides can be all-vegetable, or contain a little protein (e.g. a little seafood), and so forth.
In practice, on an everyday basis most families would have maybe 2 side dishes plus some pickles or something. But this is the ideal anyway. And it's not impossible to achieve since many dishes can be prepared in some bulk in advance, especially the nimono. What makes things a little easier for the cook when preparing Japanese food is that not everything has to be piping hot. The soup certainly should be, and the rice should be freshly cooked and hot too. And some yakimono or protein dishes should be too. But the side dishes to round out the meal don't need to be.
There are a lot of recipes on the site that you can use for any of these categories. Take a look!
Wrapping things up
So how was that walk through the basics of washoku, traditional Japanese cuisine? I hope it was interesting.
For people who were looking forward to more fish lessons, I've decided to hold off on them for a bit and possibly put them in a more advanced course down the line. Stay tuned!
I'm also planning at least one more 'course' series like this this year, but I'm still open to ideas about what it should be about. If you have some ideas please tell me in the comments.
Filed under: japanese washoku japanese culture japanesecooking101Japanese Cooking 101: Final thoughts, or what was the point?
I'm still getting reactions to the recently completed Japanese Cooking 101 course (if you missed it, here's the complete list of lessons.) While the reactions have been overwhelming positive, I've gotten a couple of negative comments too.
One I wanted to address in particular is the accusation, if you will, is that the lessons do not represent that way most people cook in Japan anymore. One person even opined that I was not a 'real Japanese' because I didn't cook like 'the Japanese people I know in Tokyo' or something like that.
Well you know what, that person is right about one thing: Many (not all!) people in Japan don't take the time to make their own dashi from scratch, or grow their own shiso or other herbs. Some rely on prewashed rice called musenmai (無洗米) so they don't have to bother with rinsing rice either. A lot of recipes on various Japanese cooking sites call for the use of mentsuyu (めんつゆ), bottled noodle sauce concentrate, a ready-made combination of soy sauce, mirin, sugar, and dashi. It saves time having to pull out each individual ingredient and adding it one by one, for sure. There are just as many convenience foods and ready-made foods in Japan as there are anywhere else - not to mention tons of restaurants, fast food places, and the like. You can easily avoid having to cook, ever. And sadly, a lot of people are like that. Japan is after all one of those so-called developed countries, where conveniences abound.
I have plenty of quick and easy recipes on JustHungry, and many more on JustBento - although I do try to stick as much as possible to real ingredients. (Some of my Japanese recipes call for the use of dashi stock granules, especially when they're used as an underlying flavor rather than the main flavor. They're so convenient, plus I've heard from many readers that they're easier to get a hold of than bonito flakes and konbu seaweed.)
HOWEVER!

The whole point of the Japanese Cooking 101 course was to show how things are done for the best possible results, using traditional methods.
Most of the readers of my sites do not live in Japan. I'm not writing for a Japanese audience obviously, since I'm writing in English. I'm not even writing for an audience of English speaking residents of Japan - although I know there are some who've been following along for years (hi guys!). (My column in The Japan Times on the other hand is aimed at English speakers in Japan, so has a rather different focus.) Unless you live in a city with proper Japanese groceries, it can be very hard to get a hold of the right ingredients. Things like mentsuyu are often too expensive to rely on all the time.
Let's face it, most Japanese ingredients are expensive outside of Japan, if you can even get a hold of them. If you're going to try to make proper tasting Japanese food under those circumstances, I would much rather you spend your precious money on basic, fundamental, real ingredients rather than manufactured convenience products. If you have access to a Japanese grocery store you can get things like mentsuyu, or the Japanese equivalents of Hamburger Helper and the like. But they're expensive - too expensive for everday use. On the other hand, although soy sauce, mirin, sake, konbu seaweed and bonito flakes to make dashi, plain old miso and so on are not cheap either, they're a much better investment of your money if you want to create many authentic tasting dishes.
The point is, I want to be able to teach a little bit about how to cook Japanese food the proper way, through my sites, my book and my other writings. Cooking from scratch is, in my opinion, a fundamental skill, and I'm fighting the battle to keep that skill alive. Even if that notion is laughably old fashioned for some people.
Filed under: philosophy washoku japanesecooking101