Onigiri (Omusubi) revisited: An easier way to make Japanese rice balls, step by step
[Update:] See all kinds of onigiri on my new bento-only site, Just Bento.
[Another Update:] Check out the Onigiri FAQ for answers to most, if not all, your onigiri related questions!
[One more Update:] A few people are obviously not taking the time to read or follow the links suggested properly. Otherwise they would not keep asking the same question, or worse answering it wrong, over and over. So please let me repeat again:
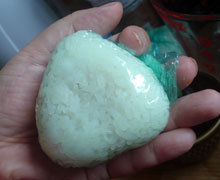
The best rice to use for standard onigiri is the kind usually sold as Japanese rice or 'sushi rice'. It is NOT THE SAME as 'sticky rice' or 'sweet rice' or 'glutinous rice'. And no you cannot use jasmine rice for successful onigiri, the way onigiri are supposed to be! The right kind of rice, properly cooked, is not the same as the wrong kind of rice, cooked until mushy and pressed together in a gluey fashion. If you can't get a hold of Japanese rice for some reason, there are a few other rices that can be substituted. See Looking At Rice for a complete explanation. That should make things clear! (end Update)
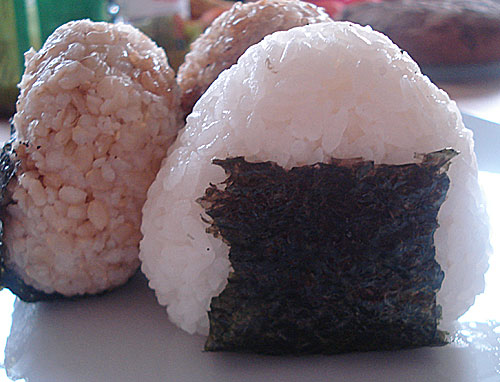
One of the most popular entries on this site is the one about onigiri, or Japanese rice balls, which I wrote back in 2003. (A lot of people landed there searching for onigiri as portrayed in anime or manga, especially Fruits Basket...which is interesting.) It was one of the very early entries on the blog, and I gave the traditional way of making the onigiri: hot rice put on moistened and salted palms, which quickly turn red and sore because of the heat from the rice.
I've made hundreds of onigiri in the 3 years since I wrote that, because onigiri are such great portable meals for picnics, not to mention party food and late-night snacks. But let's face it, those red sore palms aren't too pleasant, and the rice grains do tend to stick all over the place. Also, portioning with the rice scooper can be a bit erratic unless you are an onigiri-making expert.
With ideas from several places including cookbooks, Japanese TV shows and my mother, this much neater method of making onigiri evolved. It requires no special molds or equipment. It ensures that all your onigiri are uniform in size. Your hands never get too hot and red. And, if you're going to bring them on a picnic or store them for eating a bit later, they're already conveniently pre-wrapped in plastic.
A word here from my mom about the most frequently asked question regarding onigiri: alternative fillings if you can't get a hold of, or don't like, the traditional fillings like umeboshi (pickled plums), tarako (salted cod roe), or katsuobushi (bonito flakes) with soy sauce. She says, "Onigiri isn't about the filling really. It's about enjoying the flavor of good rice." She has a point there. Use good rice, prepared properly, and the filling becomes secondary.
So, I present you... Onigiri 2.0 :).
Onigiri 2.0 (Easier, neater onigiri)
There are a lot of steps here, but once you have done a couple this way you will be turning out tons of rice balls in no time.
Equipment and ingredients needed:
- Sturdy plastic wrap that is not so thin that it will get weak when exposed to a little heat, or too thin that you spend more time un-sticking it form itself than using it. Saran Wrap is great, or Glad. (I used a green colored wrap for the sake of photographic clarity, but you can use clear wrap of course.)
- A small bowl or teacup that is the size you want your rice balls to be. I like to use small teacups so that the onigiri don't turn huge. For party-sized mini-onigiri you can use a sake cup or egg cup. The teacup used here holds about 2/3rd cup of liquid.
- A rice scoop or a spoon
- Properly cooked white or brown Japanese rice or "sushi" rice or uruchi-mai, NOT 'STICKY' RICE and definitely NOT JASMINE, LONG GRAIN OR OTHER RICE Please read the Looking At Rice post if you are confused about what kind of rice is best to use for onigiri.
- Salt, preferably in a salt shaker (or you can just sprinkle with your fingers)
- Water
- Fillings of your choice
Covers of your choice such as nori seaweed
Mise en place: Make ready your teacup, a cup or bowl holding some water, salt shaker, rice, rice scoooper, fillings, plate to put the finished onigiri, and plastic wrap roll. It's easiest to do this near the sink, if you have the space.
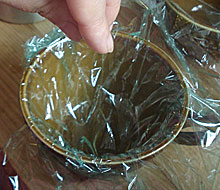
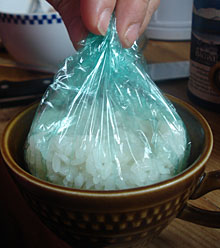
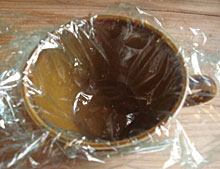 Line the small bowl or teacup with a piece of plastic wrap that's big enough to hang well over the sides. Press the plastic down into the cup with your fingers.
 Sprinkle the inside of the cup with a little water. Shake out the excess into the sink.
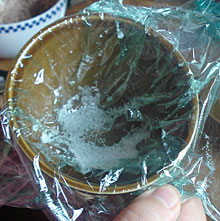 Sprinkle the inside of your wetted, plastic-lined cup with salt, turning the cup so the sides get sprinkled too. Shake out any excess salt.
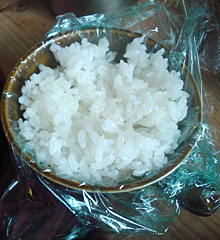 Fill the cup with rice up to the brim. No need to press down; just fill it loosely.
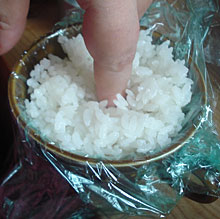 Poke a hole in the middle of the rice, about halfway down in depth, with your finger.
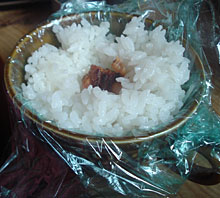 Poke your filling of choice in the hole - about 1/2 a tablespoon or so. Here I have used traditional umeboshi.
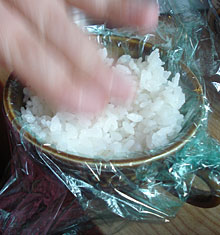 Lightly press the rice over the filling.
 Gather up the ends of the plastic wrap.
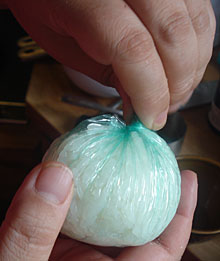 Twist and squeeze, pushing out any excess air. Twist tightly to form a ball. The squeezing is critical for ensuring that the salt sinks into the surface, and for making sure that the rice grains stick together enough so that the ball will not disintegrate when you bite into it.
At this point, if you just want round onigiri you can squeeze and press a bit and you're done! If you want triangular rice balls, you just need to squeeze a little differently.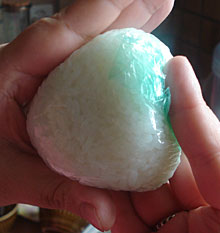 Form an L shape with one hand and make three corners on the ball...
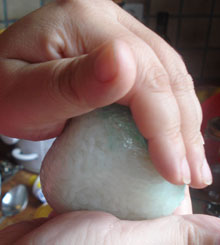 Use the other hand to turn the ball and squeeze back to front. Squeeze, turn, squeeze. Practice makes perfect!
 And, here you have a perfectly shaped triangular onigiri.
If you're going to bring the onigiri on a picnic, just leave it in the plastic wrap, and bring along the nori separately; wrap the onigiri with the crisp nori just as you're going to eat it. If you're going to eat the onigiri right away, you can re-use the piece of plastic wrap for all the onigiri balls you make.
This method works marvelously for brown rice balls as well as white rice balls. Brown rice balls can be a bit tricky, since brown rice is not as sticky as white.
Non-traditional fillings redux
A lot of people ask about alternative fillings for onigiri. Basically anything that goes well with rice, is not too wet or oily, and is highly seasoned (read: quite salty) will work. There are several listed in the original onigiri article as well as in the comments. Remember that any filling you use must be well cooked. Here are some that have been successful for me to varying degrees:
- Anything flavored teriyaki-style: chicken, pork, beef, etc., chopped fine and cooked down a bit if too sauce-y.
- Chopped plain black or green olives. Salt cured ones work better than oil cured.
- Char siu pork, (there is a recipe for a simplified version at the bottom of this page) chopped up small. Don't use a fatty piece of pork though, or the fat will leak out to the surface of the rice ball, which is not only rather gross but will make the grains fall apart.
- Tiny little meat balls, well flavored with flavorings of your choice. Just salt and pepper do fine.
- Well drained pickles. Japanese style pickles may suite best but regular Western style pickles work quite well too.
Remember also that you can have plain onigiri, flavored only with salt, to bring along as the carb component of a portable obento lunch or picnic, to eat with other things like chicken wings, boiled eggs, little meatballs on a stick, or whatever strikes your fancy.
Yaki Onigiri (Grilled onigiri)
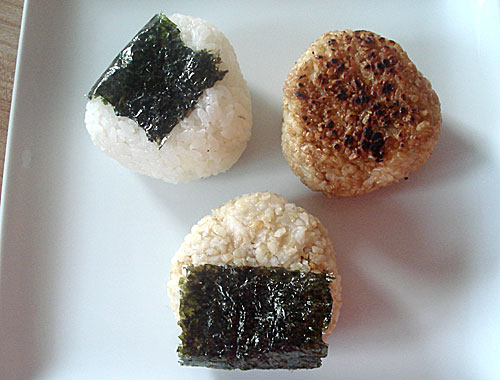
The rather burned looking onigiri on the top right in the photo above is a yaki onigiri, or toasted onigiri, made of brown rice (genmai). It's actually 'toasted' in a hot dry non-stick frying pan until the surface rice grains get brown and toasty, then brushed on both sides with soy sauce. This is a great way to revive onigiri that's gone a bit dry on the outside. You can put a little bit of sesame oil in the pan to add even more flavor. Brown rice onigiri is especially good as yaki onigiri, since the toasting really brings out the nutty flavor. You can also toast the onigiri in a toaster oven; toast first, then brush with soy sauce, and toast a bit more until your house smells like a giant rice cracker.
(A word of clarification here: What makes this method a little different is the use of both the cup and the plastic wrap: the cup helps you produce uniformly sized onigiri, which can be an issue for onigiri neophytes, and the plastic helps to avoid the red, sore hands. It's meant to be very beginner friendly. If you or your mother/aunt/wife/friend already uses a similar method, terrific! That's just confirmation that it works, isn't it? And, if you/your mother/etc. can whip out tons of onigiri without resorting to 'gimmicks', all the more power to you. )
Before asking a general question about onigiri, please check out the Onigiri FAQ page. Chances are your answer is already there!
Update, September 2009: I am closing comments here, since the same questions keep getting asked over and over. Maybe there are too many comments for people to read through. Most if not all your onigiri questions are answered in the Onigiri FAQ. If they are still not answered, then ask your question over there. Thanks!
Submitted by maki on 2007-01-12 10:54.
If you enjoyed this article, please consider becoming my patron via Patreon. ^_^
 Welcome to Just Hungry, where we serve authentic Japanese recipes and more! I'm


Comments
Sovelia
12 January, 2007 - 15:50
Permalink
Onigiri (Omusubi) revisited: An easier way to make Japanese rice
Doh, I don't have time to read the entry right now because I have to hurry to my exams but I can't wait to read it once I get home. Your initial Onigiri post was indeed what brought me here the first time and what made me discover your blog. Since then I make Onigiri almost every week and I've truly learned to enjoy a rather simple meal of nice cooked rice on the go instead of always eating boring sandwiches.
I tried to fill mine with Umeboshi but unfortunately I didn't like it much because it was too salty for my taste. So I've experimented a bit since then and found that I like Tuna and mayo mixed with a little bit of salt as filling. It's really not that bad even if it sounds weird ^^
P Hutchison
2 September, 2008 - 16:15
Permalink
I agree with you
I read your comment; I love the tuna w/mayo as a filling. And these are a great alternative to sandwhichs, espeically for students on the run. I use these constantly; as I im in class 7-days a week. (I will never schedule it like that again.)
I make them in monster batches on Sunday when my son is with his grandmother. That way I can focus on getting them done and then freeze a few. I keep them mostly in the fridge; because I eat them throughout the day, so there is never enough left to go bad.
Sarah
12 January, 2007 - 17:20
Permalink
Onigiri (Omusubi) revisited: An easier way to make Japanese rice
Your onigiri looks fantastic. I am Japanese American (Yonsei) and, since starting my blog, have been thinking more about the foods I grew up on, especially the few Japanese dishes that have trickled down to me through my family's four generations in America-- onigiri being one of them. Of course, when I make it, I usually take the lazy way out and use the little plastic onigiri mold my mom gave me . . .Thanks for sharing your great method!
sylvia
12 January, 2007 - 19:39
Permalink
Onigiri (Omusubi) revisited: An easier way to make Japanese rice
One filling that gets me rave reviews is sushi ginger (patted dry) and a small chunk of avocado. The strong flavour of the ginger and the texture of the avocado seems to really work. :)
Rez
12 January, 2007 - 19:39
Permalink
Onigiri (Omusubi) revisited: An easier way to make Japanese rice
Great entry again. I really enjoy your articles due to the amusing anecdotes that you provide in tandem to your main commentary. However, I must say I prefer your original method for making onigiri. I have made many rice balls using those instructions and I find it gives me better control in shaping them. The plastic wrap method seems to get in the way. To be fair, this 2.0 method may be more helpful to someone just trying things out for the first time.
When it comes to fillings I tend to prefer none mostly due to a lack of traditional Japanese ingredients where I reside. Though I have found salted smoked salmon and tuna with soy sauce to be edible. In general I mostly like the onigiri decently salted wrapped in a generous amount of nori, with a side of wasabi and soy sauce.
Thanks and keep up the great work.
myriadin
19 July, 2007 - 12:53
Permalink
Try this filling
Try this filling variation,
spicy onigiri filling
Ingredients:
cooked chicken or fish, chopped fine (I often use fresh roast chicken or canned albacore...freshly grilled salmon is especially good)
green onions or negi (Japanese green onion) sliced fine
shoyu (soy sauce) or tamari (less-wheat or wheat-free variation on soy sauce)
spicy mayo (recipe below)
All proportions are to taste. I use 1 6oz can of tuna (or one chicken breast), 1-2 green onions, 1-2 tsp shoyu, and 2-3 Tbsp spicy mayo. This makes enough filling for about 6 onigiri. Remember, fish doesn't keep well. Try to make only enough for one meal and perhaps a snack the day after. If using chicken or beef it'll keep a day or two longer.
After washing the onions, dry them with a paper towel before cutting.
Mix ingredients well, making sure that there are no chunks of meat larger than 1 cm. Fill your onigiri, wrap with your preferred style of nori, top with toasted kuro goma (black sesame seeds) or toasted goma (regular sesaqme seeds) and enjoy!
You may or may not want to dust your hands with salt before shaping the onigiri. Try with and without to see what you like. I prefer to salt my hands thoroughly and adjust the shoyu to taste, rather than adjust the salt amount. Less shoyu keeps the filling dry.
note: sea salt adds a good flavor vs. regular salt
optional: substitute daikon sprouts, radish sprouts, grated daikon or red onion in place of the green onion
optional: roll the onigiri in tempura crumbs or bonito flakes before wrapping with nori
optional: substitute boiled shrimp or rare-cooked tender beef in place of other meat
optional: add ripe avocado to the mix (delicious)
optional: for a very tasty Western flavor, add toasted garlic crumbs
spicy mayo
ingredients:
1/2 cup mayonnaise (safflower or cold-pressed canola oil mayo is best)
2 tbsp hot chile pepper powder (use your favorite...we like chipotle, cayenne works great also)
1 tbsp hot sesame oil (be sure that it is made with -sesame- oil, not some other oil)
Thoroughly mix all ingredients (I use the back of a spoon to mash it all together. For larger batches, use a whisk).
For best flavor, refrigerate overnight to meld the ingredients.
Keep refrigerated in a tightly-lidded container. A mayonnaise jar is perfect.
Due to the pepper content, this blend keeps fresh longer than regular mayo. Multiply the recipe to save work.
If your desire for spiciness leads you to use too much spicy mayo (making the filling too "wet"), add more chile powder to the mayo and use less of ithe mix.
This spicy mayo was originally created (by others) for use with sushi. It tastes AWEsome with ahi, maguro, salmon or yellowtail sushi (with some added avocado). It also tastes great on a hamburger (also with avocado).
maki
19 July, 2007 - 13:13
Permalink
Wow, thanks for that very
Wow, thanks for that very long comment! I'm sure a lot of people would love to try the spicy mayo.
(and yes comments are held for moderation...thanks to the spammers who manage to get through all the barriers somehow on occasion. Just the other day I had to delete 900+ of them...it ruins it for all legitimate commenters I know :()
pricca
13 January, 2007 - 04:28
Permalink
Onigiri (Omusubi) revisited: An easier way to make Japanese rice
Great Recipe!
Thanks for sharing and the hard work cooking and photgraphing :)
Can't wait to try it! I first tasted onigiri in Tokyo this summer and absolutelly loved it.
Cheers!
PR
silvio
14 January, 2007 - 15:22
Permalink
Onigiri (Omusubi) revisited: An easier way to make Japanese rice
Hello, Maki !
You said in one of your entries (about food destinations in Zurich, from May 2006) that you (quote) "don't pretend that sushi is great here".
Why do you have such notion about japanese cuisine in Switzerland ?
There are a lot of "fake" sushi bars all around switzerland, but there are some that are quite good. Of the really good ones, you should try the one near Neuchatel, called Kazumi.
Their web address is http://www.kazumi.ch/
Would like to hear your opinion ! :)
Isaac
15 January, 2007 - 07:06
Permalink
Onigiri (Omusubi) revisited: An easier way to make Japanese rice
Hello~!
I too found this blog while searching for what fillings are usually in Onigiri, about the time you had posted the Omuraisu story. Those two stories not only got my hooked to your blog, but got me experimenting on my own and with my mother in making some of these dishes. I never knew I'd enjoy ketchup-flavored rice, but it happened!
What I ended up putting in my Onigiri was a cut-up mix of green olives (which were stuffed with garlic), dill pickles, and a bit of soy sauce. I was craving vinegar/pickles that day I suppose. I thought it turned out good, anyway!
Thanks for writing the blog, I enjoy it a lot :)
Lucy
16 January, 2007 - 05:30
Permalink
Onigiri (Omusubi) revisited: An easier way to make Japanese rice
I first tried it with fried Spam as a filling in Hawaii and loved it even though I am not a big Spam fan. But the saltiness of the Spam and the juices from frying it seeps through the rice and makes it very tasty. My husband is Irish and he likes it too so it's not just some crazy Asian Spam thing. I haven't actually made any myself but your easy directions might inspire me to attempt it.
Lisa Y
16 January, 2007 - 11:06
Permalink
Onigiri (Omusubi) revisited: An easier way to make Japanese rice
*chuckle* I have to admit that I came to know about onigiri after watching Fruit Basket. Being absolutely crazy about rice, I'm going to give this recipe and method a try. :-)
maki
16 January, 2007 - 11:12
Permalink
Onigiri (Omusubi) revisited: An easier way to make Japanese rice
Rez, I agree that bare hands does give you a bit more control. But for me anyway the itchy, hot palms are too irritating to stand after say, doing 10 onigiri in a row, and the plastic seems to insulate from the heat just enough. Also the tight twisting/squeezing action seems to give a bit more control than just wrapping it in plastic.
maki
16 January, 2007 - 11:16
Permalink
Onigiri (Omusubi) revisited: An easier way to make Japanese rice
Sovelia tuna-mayo is not weird at all..it's almost a standard filling nowadays, and you're right it does taste good!
sylvia, the ginger and avocado sounds great! Another thing that works well is to finely cut up sushi ginger, or just use a bit of pre-shredded 'beni sho-ga' (pickled ginger that's a bright red), well drained, and mix it in the rice all through before making it into onigiri. Delicious!
Lucy, I forgot about the Hawaiian Classic, Spam musubi! Thanks for reminding me!
maki
16 January, 2007 - 11:19
Permalink
Onigiri (Omusubi) revisited: An easier way to make Japanese rice
Silvio, I'm very very picky about sushi ...maybe pickier than most, so I even have a hard time finding a 'good' sushi place in other places that presumably should have a multitude of them...for instance I have yet to really encounter a sushi place I love in London, or San Francisco. Next time I'm in Neuchatel I'll be sure to give Kazumi a try though. Thanks for letting me know about it!
Lizz
16 January, 2007 - 21:01
Permalink
Onigiri (Omusubi) revisited: An easier way to make Japanese rice
I'm having trouble finding short grain rice. I've checked 2 stores in the area but all they have is long or medium grain. Do you think a Natural food store would have it? Or how would I find a Japanese type store around my are?
Britany
29 June, 2009 - 03:43
Permalink
Re: Onigiri (Omusubi) revisited: An easier way to make ...
I found mine at a health food store and I also found one in a market. You won't find it in your common supermarket back at home.
maki
17 January, 2007 - 10:20
Permalink
Onigiri (Omusubi) revisited: An easier way to make Japanese rice
Lizz, you didn't say where you are, but any Japanese or Korean grocery should have it. Try asking for "mochi rice" if "short grain" isn't understood. You can try online too if you can stand paying for shipping costs - they even sell it on Amazon now. (If you're in the US that is of course...)
Isaac
18 January, 2007 - 05:49
Permalink
Onigiri (Omusubi) revisited: An easier way to make Japanese rice
To Lizz:
I'm not exactly sure if this will help, but in my local Walmarts, they have a tiny section of an aisle marked "International" or "Asian," that has a small selection of instant Thai and Chinese food, canned stir-fry vegetables, and the like. In that section, they stock bags of rice called "Botan" Rice.
I'm not sure if it's the same as Mocchi rice (?), but it is short grain, and sticky, and quite tasty and nice, I've found.
...Is that an acceptable kind of rice for this sort of thing?
PS: I tried Onigiri with Tuna Salad (Tuna+Mayo+Onion+Dill Pickles+Sweet Pickles) the other day, very tasty!
Jennifer
4 February, 2007 - 19:21
Permalink
I’ve tried searching a
I've tried searching a number of sites, but no avail. I've made fresh onigiri a number of times and would love to be able to make it the night before and take into work with me the next day. How do I do that? (or am I out of luck?) The rice gets all hard and I've tried sprinkling water on it in the microwave, but then it falls apart. Suggestions? Do I need a special type of rice? How do I store it after it is made? Help!!
maki
5 February, 2007 - 05:36
Permalink
Keeping onigiri
Hi Jennifer,
I started to write the reply but realized it was getting pretty long, so I'll write it up in a separate post.
Lisa
5 February, 2007 - 04:30
Permalink
Brown Rice Balls
Hello! I like your article. Just wanted to say that with brown rice, you can use a bit of water to help it stick. I just run my hand under water, and start forming and pressing the ball. As long as you cooked the rice properly (i.e. not dry) the rice will stick together.
Also to Jennifer (above) just wrap your rice ball entirely with nori when you make it. The nori keeps the rice from drying. Rice balls will keep unrefrigerated overnight (as long as it's not too hot in the house) and should make it to your lunch fine! Try putting a bit of umeboshi plum/paste in the middle - yummeeeeeeey
nekomata
6 February, 2007 - 21:52
Permalink
Short grain rice
Lizz,
I'm not sure if this is applicable where you are, but where I live (UK), I've found that the supermarkets tend to stock short grained rice in the puddings section rather than in the rice section. On the off-chance that you're a fellow brit, the best deal I've found so far is the 1kg bags at Morrisons.
anon.
27 February, 2007 - 22:28
Permalink
Waitrose sell sushi rice in
Waitrose sell sushi rice in the ethnic food ilse. It is in a pink plastic bag. Or you can have it delivered from www.japancentre.com
anon.Therese
17 February, 2007 - 16:25
Permalink
Hi about the rice type
I just wonderd I live in Norway and I can only find jasmin rice is that good or is there another type that is better?
I can also bye a rice tybe that is cald oncle ben
s boil in bag but I realy dont now witch type that is best.maki
17 February, 2007 - 18:05
Permalink
rices
Therese, see here - Looking At Rice about different kinds of rice. Neither jasmine rice (which is another word for Thai rice) nor Uncle Ben's (a brand name for 'regular long grain', often parboiled, from the US) is sticky enough to make onigiri I'm afraid. You ideally need to find 'sushi rice' or 'japanese rice' etc (whatever they label it). Italian risotto rice (arborio, vialone, etc) also work pretty well.
anon.Therese
18 February, 2007 - 21:18
Permalink
Ok
Than you
I think I can get the risoto rice becouse my best friends mom always make risoto when I`m there so I can ask her what kind of rice she use
Therese
19 February, 2007 - 22:25
Permalink
HI I just Wanted to say
HI I just Wanted to say that I made 3 this morning with jasmin rice and I took a little bit of a rice type that is kalde Grot ris and it was realy jumy and it worked ;):)
RettaBear
20 February, 2007 - 08:59
Permalink
An easier way...
I've been doing a variation of the saran method. I lay each piece of saran on the counter. The bowl method looks even easier. I also need to squeeze more because occasionally I would get one that fell apart. I usually pack the nori in a separate baggie so it's still crispy at lunch. Yum.
I like some of the onigiri seasonings I can get at my local Japanese market. My favorite has red shiso, seaweed, and white sesame (among other things). I like using spam as a filling, but I've also bought canned mackerel and other fish. One of my favorite fillings is canned quail eggs. They taste quite like hardboiled chicken eggs, but in a handy onigiri size.
mel
23 February, 2007 - 19:43
Permalink
Really looking forward to
Really looking forward to trying my hand at these! My kids love the story "Roly-Poly Rice Ball," told by Elizabeth Falconer. After listening to the story over and over, I decided I'd check the internet for how to make our own omusubi. Our Asian market is out of umeboshi, but we'll try the sushi ginger/avocado filling.
Thank you!
Possum
25 February, 2007 - 05:14
Permalink
Excellent!
I just used this method to make my first Onigiri (well first successful ones) and it works great! I didn't have a teacup so I used a 1/2 cup measuring cup and they turned out perfectly.
I like my nori a little soggy though so I stuck it in the bottom of the cup before I put the rice in. Worked like a charm. So quick, so simple.
Thanks! I'll be making lots more with this technique.
Claudia
27 February, 2007 - 02:29
Permalink
This works!
No more burning my hands! No more different-sized onigiri!
I tried this method and the riceballs turned out great! What a simple and wonderful idea.
Thank you!
Sunnikka
10 March, 2007 - 15:25
Permalink
So easy that I can't believe I didn't figure it out myself..!
Thanks for this great tip! Every time I got my hands burned and messy while making onigiris. Today I tried this and it totally works! Very big thank you from Finland! :) devours an onigiri with one bite
Idoru
12 March, 2007 - 21:44
Permalink
Omigosh!
I've made onigiri PLENTY of times, and I can't believe I never thought of this! I always wrapped mine after, and half the time they'd fall apart! (So I'd feed them to friends who were hanging around the kitchen!) This sounds so much easier, thank you!
And tuna soaked in soy sauce with kosher salt sprinkled on it is an excellent, cheap filling--especially if you have no access to the "traditional" ones. It's what I always make, and I find it absolutely delicious!
Pi
18 March, 2007 - 18:37
Permalink
^_^
Yum, I <3 onigiri; it was the first japanese food that I tried to make (which could explain why it's now my favorite) for my new bento boxes. The first ones came out reeeeally funny looking and not so tasty, but I got some books, checked a lot of websites, and messed around with fillings/mix-ins. As of right now, the type that gets me the most compliments has sweet scrambled egg bits mixed in to the egg, stuffed with chopped bacon (=breakfast onigiri?). It's great to pack in your (or someone else's) bento, though it can get sticky if you don't wrap them in plastic wrap. ^^; just thought I'd share...
anon.
24 March, 2007 - 23:32
Permalink
hi
well... my mom keeps on asking me how to make a rice ball and i don't even know how so i serached it up and i found your site.now my mom stop bugging me thx anyway how do u make okaka flavour rice balls is it spicey?
maki
25 March, 2007 - 00:42
Permalink
okaka
Okaka is dried bonito flakes, or katsuobushi, that has just enough soy sauce added to it so that it's barely moist but not dripping. Nothing else other than the soy sauce is added so it's not spicy.
Ellen
16 April, 2007 - 20:44
Permalink
Thanks for the help
maki
Thanks for the excellent instructions. I used your method to make onigiri for the first time with my rice-crazy children (aged 4 and 7) and they loved helping to make it and devouring the results. We used little nuggets of some leftover pork/bison pate from the fridge as a savoury filling which worked very well indeed. To make it even more fun, we decorated the balls with little nori stars and sharks cut out using a shaped paper punch, an idea I'd seen in the cookbook that came with my laptop lunch box. We will definitely be making these again!
Ellen
samira
26 April, 2007 - 15:01
Permalink
japanese rice balls ^^
hi
i havent tried japanese rice balls yet but they look really nice. to tell you the truth i dont know what it is about japan but i love everything about it.
iam even learning japanese at this moment (just a bigginer) but i think it awesome.
i even have my half yearly on next week. i am so scared :(
anyway i was wondering if u could help me by telling me what i can use in the rice balls that would make it tast nice (anything that you have tried that ended up really nice). Also if you could tell me another japanese food that is really nice and easy to make. sorry for making you go through all these trubles.
thank you verry much ^^
maki
26 April, 2007 - 20:50
Permalink
Lots of Japanese recipes
samira, there are lots of other Japanese recipes on this site - take a look here:
http://www.justhungry.com/recipes/japanese
You may want to start with the ones that are marked "Basics" - or anywhere you want really.
Good luck with your Japanese studies!
Kotatsu
8 May, 2007 - 04:18
Permalink
Keeping Rice
I need to take some type of food in for school, so i decided i wanted to do something Japanese. This is because i love all things Japanese with a passion. So, anyway, i have to make most of it at school, and i was thinking i could pre make the rice the night before because we have a limited time to cook the food. So i was wondering if there was some way that i could make the rice before hand and bring it in the next day to make onigiris. Can someone please help me? =(
P.S. I also need some good and simple filling suggestions if any body has any.-Please.
maki
8 May, 2007 - 17:18
Permalink
onigiri rice
If you cook the rice the night before, take it out of the pan or cooker while still a bit warm and wrap well in plastic wrap, then in a ziplock bag. Then either refrigerate or freeze the rice. (If your school has a microwave on hand freezing may be better.) Before using the rice warm it up in the microwave if possible. If not, try to arm it up in a double boiler (a bowl suspended over a pot of very hot water).
The reason you need to have warm rice is that cold rice will be very hard to stick together.
For fillings there are tons of suggestions in the body and comments of this article, as well as the other onigiri article (listed in the right sidebar)
laraq
17 May, 2007 - 04:31
Permalink
Made 2 yaki onigiri tonight
Made 2 yaki onigiri tonight with chopped up fake crab legs inside using leftover rice from making 3 maki rolls. One of them fell apart during the last stage (with soy) of toasting. But, the triangular one, which was handled more to get the shape, held up and will be lunch tomorrow. Smeared a bit of wasabi on one side cause I like it spicy. :)
anon.
8 June, 2007 - 00:38
Permalink
What is the purpose of the
What is the purpose of the seaweed around the rice balls and is it okay to eat? I've never had onigiri before and so I was just curious about it.
maki
8 June, 2007 - 02:30
Permalink
the purpose of nori (seaweed)
The nori is used as a sort of protective wrapper, it helps to hold the rice together, and also adds flavor. Yes it's meant to be eaten! It's the same seaweed that is used for sushi rolls.
kasugi baby
23 June, 2007 - 06:47
Permalink
muffin tray
Oooh. I've been doing this 4eva but use muffin n cupcake trays so I can place 6 clingwrap on all the holes and fill them up with rice. Its my little onigiri production line hehe. So I have big onigiri (muffin trays) with filling and small onigiri (cupcake trays) plain to pack into my bento. The little cupcake tray onigiri breaks with filling but it works well as carbs component in my bentos for uni.
PS. love your blog
Mina
15 July, 2007 - 22:13
Permalink
This Made Onigiri-Making Easy!
I have always tried to make onigiri, but somehow my onigiri always fell apart. This was so much easier and they looked absolutely perfect! They tasted good, too! I tried tuna and soy sauce filling, which was good, and umeboshi filling. It was lucky that my friend had gone to Japan. She brought me back a whole jar full of umeboshi and it was DELICIOUS. I also made a pickled cucumber umeboshi...it wasn't a pickle. It was saucy and good! Thanks so much! I will definitely refer this site to other people and I make this everytime I want a nice onigiri! Thanks! ^_^
niceties
20 July, 2007 - 18:26
Permalink
Thanks for tips & some ideas for fillings
Your instructions were so easy to follow and this method worked wonderfully for me! Thanks, Maki!
It occurred to me that some unconventional but suitable, not-easily-perishable fillings could be Chinese salted eggs or Chinese fish/chicken/pork floss. Aside from buying these things commercially, it's easy to make your own - I like the recipes for them here: http://lilyng2000.blogspot.com.
maki
22 July, 2007 - 14:38
Permalink
salted eggs
Thanks for the salted egg recipe! That might be a good filling indeed.
Tracy
25 July, 2007 - 17:21
Permalink
Rice molds
Because I can't even do the plastic wrap method effectively, I cheat completely and use the rice molds that I bought at the local Asian convenience store. My only problem is I can't really figure out how to salt them adequately, but it's okay as my kids prefer them plain anyway. Will keep working on that!
maki
25 July, 2007 - 17:36
Permalink
salting
Tracy, you can try shaking a bit of salt over the rice balls after you've formed them also.
Gail_Blitzy
27 July, 2007 - 04:39
Permalink
Really easy Method
Onigiri is so much easier to make then sushi (and it also allows for more experimentation ^_- made several of my own fillings the most successful being cut up spicy sausage) and with you method mentioned above, I've even got my food illiterate brother to have a go!
Noémi
15 August, 2007 - 21:18
Permalink
Thanks!
Thank you for this! It really did the trick!
Genie
31 August, 2007 - 22:41
Permalink
Hey! I really like your
Hey! I really like your blog, and I appreciate you sharing this awesome method! I tried it, and it works great ^.^ Though, I have yet to make onigiri with any fillings, because I don't like raw fish...I might try teriyaki chicken, but you see I want a filling that's super tasty, but easy to make as well. So making onigiri doesn't take so long, you know?
Lol, yeah, I really wanted to try onigiri after watching Fruits Basket. They looked so tasty and cute!
maki
1 September, 2007 - 15:19
Permalink
You’d never use raw fish
You'd never use raw fish as a filling for onigiri...and I never suggested it. You may be confusing sushi and onigiri (and sushi using raw fish is NOT portable).
lkoziba
8 September, 2007 - 08:13
Permalink
plastic onigiri wrappers
HI! Can someone tell me how to use those plastic onigiri wrappers that separate the nori from the rice? he instructions on the package are in Japanese and I cannot read it!
Thanks!
Never teh Bride
11 September, 2007 - 03:55
Permalink
Thanks you!
Such a great idea...wish I'd thought of it myself. Now I use my mold/press thing, but if I go back to doing it by hand, this is the route I'll take.
manga junkie
14 September, 2007 - 01:08
Permalink
YAY!!!
I've seen lots of references to onigiri in manga, but I haven't been able to find a recipe that didn't assume I knew most of the important stuff! Thanks for the recipe! (And I actually found this page while searching for fruits basket, Ha ha!) ;)
Miminechan
14 September, 2007 - 16:01
Permalink
tuna salad in onigiri
I've quickly scrolled through to find out how to care for a tuna salad rice ball. I lived in Japan for a while and I loved eating the tuna salad onigiri's from 7'11. Since I don't refrigerate my onigiri when I take them to lunch how would that work with something with mayo. I always eat my lunch around 2pm, so they would sit for around 5-6 hours. ???????
maki
14 September, 2007 - 17:29
Permalink
To be on the very safe side
To be on the very safe side I wouldn't really use mayo-tuna salad in an onigiri that might sit at room temperature for too long. Though I have had tuna-mayo filling (made from commercial mayo, not homemade from raw eggs etc) without problems, I don't want anyone to sue me either if I say it's safe :) To be on the safe side you can try packing your onigiri lunch with a cold pack.
There are other onigiri fillings that are quite safe and actually help keep the onigiri longer - umeboshi fits this perfectly. Most other traditional salty fillings are fine too. Keep in mind also that onigiri doesn't require a filling - so you can for instance bring plain unfilled onigiri, and have a salad on the side.
Onigiri Fanatic
2 October, 2007 - 14:32
Permalink
Always wanted
I've never actually gotten the chance to make or try Onigiri, or riceballs, but have always wanted to. With this teqnique, as well as all the great recipes, I believe I'll be making some soon. I've actually had an idea for somewhat of a desert onigiri, just using the shape.
It's really nothing more than fired icecream, rolled in confectionate sugar, and small faces and such added with sculpting chocolate.
Rome
3 October, 2007 - 16:37
Permalink
Such a great tip.
Such a great tip. Preparation made easy for beginners. True, you can practically include anything on onigiry, but the magic is on the taste palate of the individual preparing it (them). Great blogsite....Ampaiiiii!
Hayley
6 October, 2007 - 05:12
Permalink
Alternative Shapes
You can also try:
Put cling wrap down.
Place cookie cutter (after rinsing it with cold water) on the cling wrap.
Press rice into cookie cutter with a spoon and flatten evenly.
Remove cookie cutter.
Voila! Onigiri with any shape of your choice (although rounded points work best). Great for kids' lunches.
SweetKitty
16 October, 2007 - 16:30
Permalink
No More Burnt Hands
Why not buy onigiri molds?
Take the hot rice, scoop it into the mold, take the top of the mold, press and turn out the product.
To add filling, fill the mold halfway, make an indentation in the rice, add filling, add more rice to cover and fill, apply lid, press and turn out.
The molds come in your usual rounded triangle shape and other shapes such as hearts and stars which are really quite jazzy with a bit of food coloring.
Marienee
25 October, 2007 - 16:19
Permalink
Flavored rice
My 8 year old loves onigiri so much he once made a whole tray full and took enough to school to feed his friends -- though they were smaller, the size of a first grader's hands as opposed to those of an adult.
He does not care for fillings or shapes other than round or triangular, but he does like to cook the rice in either weak miso broth or weak chicken broth with soy sauce. With miso broth he then puts his hands in cold saltwater before forming the balls; with chicken broth he uses water with rice vinegar on his hands. Just thought I would pass that tip along.
anon.
1 November, 2007 - 21:40
Permalink
very tasty
As a Chinese American, I've been shoveling down rice all my life. I used to think it was bland, but when I tried making onigiri, I realized how good plain old rice could be. ^_^
Jo
3 November, 2007 - 21:10
Permalink
onigiri
wow - love this site - came here via the bento site ...
i usually have home made sushi in my bento but sometimes make onigiri - i have a little rice mold thing that makes 5 small bite size logs at a time - and rather than a filling i chop up peppers - red, green, yellow - and mix them through the rice (sushi rice sold in my local supermarket - i'm in New Zealand) - i cook the rice fresh each morning in my microwave!
Stephanie
4 November, 2007 - 21:26
Permalink
Great how-to recipe!
I used this method to make my very first onigiri, and it turned out great! I made a regular-sized one and a mini onigiri. Here's a picture of the mini one: http://img225.imageshack.us/img225/2228/1001875si0.jpg (sorry the picture is bad, my sister took the new good camera. It looked much better than in the picture just to let you know). I didn't take a picture of the regular size one though, I was too hungry. But it looked perfect & fabulous -if I do say so myself- and it tasted good too. I used the revised method until it got the part where you mold the ball into a triangle (I used the traditional method for that, because I found it much easier than using the revised method). Anyways, thanks for the recipe!
J-F
21 November, 2007 - 05:37
Permalink
If only... Umeboshi
I've always wanted to try umeboshi, however it's not exactly an easy thing for me to find. I'm in a small town in eastern Ontario, Canada. About an hour away from both Ottawa and Montreal, the latter having the larger population and so a greater asian presence....however I've yet to find umeboshi anywhere. Being incredibly shy, I can't bring myself to ask anyone for help when visiting that area...this may sound ridiculous, but since all food markets in that area have non-japanese asians working I feel worried that I may offend or be ridiculed for asking for a japanese item... That certainly doesn't help.
I've looked online for some, however I've only found one store which shipped only to the United States. I was wondering if there were online stores that you were aware of that would ship to Canada, or maybe better advice as to how I could go about finding some in those stores... Would they maybe have an alternate name?
I'm also embarrassed by the fact that being a french canadian, my love for Japanese culture did start with the discovery of Japanese animation... I'm very glad to have found your post, however.
Jonathan Addleman
21 November, 2007 - 19:35
Permalink
umeboshi in Montreal
There are many stores that sell umeboshi. The only store I know of dedicated to Japanese food is Miyamoto (http://www.sushilinks.com/miyamoto/index.html) in Westmount, but there are many Asian groceries that have a lot of japanese food. Fruits du Parc, in Galeries du Parc at the corner of Parc and Prince Arthur is a good one. There's a decent Japanese/Korean place in NDG on Sherbrooke, I think near Grand Blvd. There are several in Cote des Neiges I think, though I don't know that area so well. and of course, Chinatown will have some stuff, though there isn't a huge Japanese presence there. There's also a Japanese Cultural Center (http://www.geocities.jp/jcccmcanada/ though the web site seems to be down just now).
J-F
24 November, 2007 - 01:27
Permalink
Thank you!
Thank you very much! I'll try to track those places down when I'm in that area next time! I really appreciate this!
maki
21 November, 2007 - 15:44
Permalink
i don't know
The last time I was in Canada was...hmm, more than 10 years ago, so I don't really know I'm afraid. But I've thrown out the question to readers...hopefully someone out there knows! (post here)
Don't be shy at a store though...they want to sell you stuff, who cares if it's Japanese! :)
And nothing wrong with getting to like something through anime...I got to like Switzerland a long time ago via an old anime series of Heidi! :)
anon.
22 December, 2007 - 06:15
Permalink
I know what I'm eating tomorrow!
Thank you so much for this post! I visited Japan a few months ago, and became addicted to those pre-packaged onigiri in convenience stores. When I came home, I had no idea how to make them, but I had the same idea about the cup. Saran wrap would have definitely helped!
Instead of proper onigiri, I ended up with a cup of loosely packed rice with some soy-sauced, drained, canned salmon, and some crumbles of toasted nori--which wasn't bad, but it wasn't onigiri.
I...also didn't know that you had to use hot rice...at least it was Japanese rice!
dls
9 January, 2008 - 11:51
Permalink
onigiri
I love this recipe on the quick and easy Onigiri recipe. Tried it this morning after work and loved it. Also froze it and used your plastic wrap method for storing cooking rice. So far so good. Seeing that this was the 1st time for me to make Onigiri I was impressed with the ease of making it. Had a few tonite at work and they were very good. Tried stuffed with tuna salad, chili and mango today. That was all I had at the house since have not been to the store in a few days.
Did have a question for you. Now, thanks to you, I have learned how to store rice and premade Onigiri. Would like to know if you have a certain way to store Sushi. I have tried the refridge and it gets really hard. Since most of the time I try to make my meals the day before it would be nice to know a way to store it to keep it as fresh as possible as well.
Thanks for everything
maki
9 January, 2008 - 18:12
Permalink
sushi rice
Actually sushi rice is a tricky thing to store. Because vinegar and salt have penetrated the rice grains, they tend to get pretty hard and lose that moistness pretty fast when cooled. A lot of companies in Japan have made attempts at selling good frozen or refrigerated sushi, with no success so far. (A supermarket here tried, and I think still does, sell frozen sushi, but I tried it once and it was horrible.) It's okay at room temperature so if you mix it in the morning and have it for lunch it's fine. I guess you can experiment with wrapping it in saran wrap while still warm and freezing it, though I can't guarantee it will work.
I just did a quick surf around some Japanese food sites, and the consensus seems to be that freezing or refrigerating sushi rice is not a very good idea. I've seen some suggestions to just use leftover sushi rice as fried rice or in a porridge/soup.
dls
10 January, 2008 - 22:28
Permalink
sushi rice
Thank you Maki,
I had figured as much. Have been doing searches as well with not much luck on sushi storage. Every time I have tried it tastes like the supermarket sushi here in Texas, the taste and texture is bad.
Thanks again for all your info, love the website please keep it up
anon.
13 January, 2008 - 05:57
Permalink
Interesting website
Wow, you have an interesting website!
I stumbled upon it for the first time and find it very interesting. I think the kids will like the Onigiri very much. I shall definitely give it a try and it is beef and vegetable stew with dumplings this weekend. It is the most perfect food for these wintry days.
Helen
25 January, 2008 - 09:57
Permalink
Rice
Hi! I live in a small Russian town in Siberia so I was sure that it will be absolutely impossible for me to find exotic japanese rice or something like risotto rice here. But when I looked at the picture of uruchi-mai I immediately recognized that very type of rice that is the most wide-spread in our region :) I'm so glad 'n I i'm going to try and make my first onigiri right away!
Thank you so much for this blog! Japanese culture is one of my greatest interests but I'm just a beginner in the sphere of cooking on the whole, let alone Japanese cuisine :) Your comments are so helpful and information is structured so clearly - that's amazing!
anon.
6 February, 2008 - 04:44
Permalink
how kneeded is the nori?
im wondering because i dont have any at home and i want to make some soon.
Tara
18 February, 2008 - 18:23
Permalink
Thank you! My first onigiri in two years!! and in France!!
Thank you so much for the Onigiri 2.0 version. It worked very well for me. I am so happy to discover your site.
I am English but living in the south of France...there is a small section on Japanese food in the local supermarket, but it is very limited.
I travelled for three months in Japan and loved everything about it there; especially the food. My favourite was natto! I haven't found it here though...or in the UK. Here's hoping.
Thank you again. I look forward to popping into your site now and again for more Japanese food tips.
Best wishes,
Tara
Kotatsu
22 February, 2008 - 04:23
Permalink
Dango
I know this has nothing to do with what any of these other comments are about, but do you think you could tell me how to make bocchan dango? I have to make something for school again, and I cant find the recipe anywhere. Also, thank you for telling me haw to keep my rice good back in May of 07. I had forgotten to write a response. Thanks.
maki
22 February, 2008 - 11:35
Permalink
hmm, I’ve never tasted
hmm, I've never tasted bocchan dango myself so I don't think I can re-create it. (Unless I've eaten something myself I don't even want to attempt to try to re-create it, obviously!)
Kotatsu
23 February, 2008 - 00:08
Permalink
thanks
Oh, thanks anyway. I'll just have to try to find a book or something.Thank you.=)
Kotatsu
23 February, 2008 - 00:17
Permalink
dango 2
Actually, do you think I can just take a plain dango recipe and add the flavor and colorings myself?
http://theanimeblog.com/2007/02/01/japanese-recipe-natsu-furutsu-dango/
This website has a recipe for plain dango in it. Could I just use that?
Oh, and what is mochiko?
Thanks for listening to all my ridiculously annoying questions.
Chad
7 March, 2008 - 23:38
Permalink
Looks great!
I love Japanese sweets. I've got to try this!
maki
24 February, 2008 - 02:54
Permalink
Again, I have never had
Again, I have never had bocchan dango so I don't know how they taste...but I don't think that the color just comes from food coloring. Actually 'dango' is a generic term for a dumpling, so there are many different sweet dangos out there...
Mochiko is sweet rice or glutinous (mochi rice, it's not actually sweet as in sugary sweet). You can find it at Japanese grocery stores sold as mochiko.
Vicki
7 March, 2008 - 09:20
Permalink
Nice! I’ve always wanted
Nice! I've always wanted to try to make my very own Japanese meal! Guess this will be the first step, eh? Onigiris are so cute!
Chad
7 March, 2008 - 22:03
Permalink
Here is something
OK, after reading all the comments about fillings, i have to tell you guys about something quite different but tasty. I like to make something called Military Hoagies at home. The are not sandwiches, but rather a special mixture of ham and stuff toasted on one side of a loaf of French bread. i wanted to try this mixture with the Rice Balls (onigiri).
Items
What i do is get the ham out and mash it around with the sour cream first. make sure that you have no lumps of Ham anywhere. Then mix in the rest of the seasonings. there is no cooking required for this filling for the onigiri. (except for the fact that you need to cook the rice, lol) To make the Military Hoagies, just get a loaf of fresh French bread and cut about 2/3 in slices. then place them on a cookie sheet close to one another. then spoon out the filling on one side, then sprinkle the cheese on top. set the oven to broil at 350 to 400 and let them set for about 5 min, or until the cheese melts and browns just a little.
anon.
9 March, 2008 - 15:30
Permalink
Rice
This is a great way to make it, but my place doesn't sell short grain rice except for medium. Can I use medium grain rice instead of short grain?
maki
9 March, 2008 - 19:50
Permalink
If it’s like the 2nd rice
If it's like the 2nd rice pictures in this article, yes!
Chad
11 March, 2008 - 19:06
Permalink
Med Rice is OK
I've used Medium Rice before and it works just as fine. but i know that one of the most important things is to make sure its clean.
Edd
20 March, 2008 - 20:18
Permalink
AMAZING!
First time ever making onigiri and it came out wonderfully thanks to your very easy to follow steps. I used some slightly cooked salmon in sesame oil and no one in my family could stop eating them! thank you so much
Kawaii Shinigami
18 April, 2008 - 19:45
Permalink
Looking forward to trying this...
I happened across your blog whilst trying to find out how to make Onigiri, and I must say, your Onigiri look amazing! I'm going out today to try this, as I'm going to be letting my girlfriend try some.
I hope it tastes as good as it looks!
Jennifer
20 April, 2008 - 13:45
Permalink
Onigiri
I like onigiri and wanted to make my own so i searched for instructions and this came up!
It's simple and mine were tasty if a bit malformed. I'm a vegetarian so i tried to use a mixture of tofu etc instead of meat and it worked quite well. By the way peppers work well.
Thanks for the post.
Jackie
11 May, 2008 - 02:04
Permalink
You are SO amazing! I made
You are SO amazing! I made this for the first time and it came out great! Thanks for making this website~
The only advice I have for beginners is to keep the metal pot in the rice cooker with the cover on so that the rice stays nice and warm while you wrap each rice ball (I wasn't quick enough so by the time I got to the last one, the rice had already cooled down a bit).
Again, thanks so much for posting this step-by-step guide. :-)
anon.
25 May, 2008 - 22:13
Permalink
How to keep overnight.....
One thing that many people don't know is that you can freeze onigiri. I usually make a big batch of onigiri about once a week and stick all of them, still wrapped in saran wrap, into the freezer. Then I just take out the ones I want for lunch each day and microwave them for 1-2 min each. Just don't stick them in the fridge or try to let them thaw. If you microwave them and put them in your bag for lunch, they taste like you made them fresh that morning without being stale!
Midori Alexandros
28 May, 2008 - 15:29
Permalink
I love this!
I am an American, who wishes they where Japanese. :D lol
But this is awesome! Our family is very in to Japanese traditions, foods, the culture, and everything, my children absolutely love Onigiri, so this is AWESOME for us, I can't wait to get our new rice cooker :D
eriko
15 June, 2008 - 22:52
Permalink
thanks!
I just tried this method this morning, it worked perfectly! I never make onigiri as often as i should because of the rice sticking and burning my hands.
I made some using ume-boshi chazuke mix (i know it's supposed to go in the soup, but i love using it as regular furikake!) and some goya furikake that my dad brought back to the states the last time he was in Okinawa.
I took it to work with me. My coworkers had never had rice balls before, and loved them! Thanks again for your site :)
Amy
29 June, 2008 - 18:28
Permalink
Thanks!
Hi! Just wanted to say that your method of making onigiri with an eggcup was really handy! I have always had an interest in japanese culture and cooking and have wanted to make them properly for ages. Since i'm located in ireland bento supplies (such as rice molds) are few and far between. I filled them with prawn fried in a little soy sauce and they were delicious! :3
anon.
10 July, 2008 - 22:29
Permalink
plastic
Hi, I was curious, could I use wax paper instead of saran-wrap?
Hope
29 July, 2008 - 18:14
Permalink
Must try!
After being fascinated with onigiri from Fruits Basket, I'll have to try this and see if I can make onigiri! 8P
Eleven
15 August, 2008 - 18:04
Permalink
Probably quite late to be
Probably quite late to be posting a comment here, but I only just stumbled upon your pages recently (besides, I don't cook. I'm 16 and I prefer to spend my time drooling over photos of food rather than attempt to make it myself :P ).
Anyway, I had some kids from the neighbourhood come over lately, and since my mother had banned us from watching Friends, the idea of making onigiri cropped up. This method is fantastic, since neither I nor the kids are capable of packing the rice tightly enough using the 'traditional' method. In the end everyone was happy, and my mother left the house so we watched Friends anyway, while snacking on onigiri :)
I've probably not tried this enough times yet, but I can never get the knot in the right spot, so my onigiri comes out with a funny little bread roll squish on one face ;)
I do get one problem though; although you said the plastic wrap can be reused, after about the 2nd or 3rd one I always end up with a hole and all my rice escapes T_T
But thanks for posting this anyway, it beats hands only by far :D
Kamen
31 August, 2008 - 12:06
Permalink
Prepping the rice?
It seems to me washing and rinsing the rice would leave it not sticky enough to form and keep a good riceball? How do you guys prep the rice before cooking?
I have a rice cooker that also has a steamer basket. I'm thinking some baby portabello or veggies like broccoli heads or shredded carrots, or a mix of them in the basket while the rice is cooking could make for a great filling especially with soy sauce. Maybe with some unsteamed radish sprouts for some zing. But I'm thinking packing soy sauce in with the filling would leave it too wet and spoil quicker/fall apart?
maki
2 September, 2008 - 03:24
Permalink
See How to prepare and cook
See How to prepare and cook rice, as well as the Onigiri FAQ mentioned above. Washing rice does not decrease its sticky/glutinous quality - rice is, depending on the type, either glutinous or not, depending on the type. That's why it's very important to use the right type of rice. And as you guessed, filling cannot be too watery or oily or it will seep through the rice and make it fall apart, so if you season it with soy sauce you'd have to cook off the excess moisture somehow.
Kiki
2 September, 2008 - 00:56
Permalink
Room Temperature Rice
Wow! Thank you so much. Me and my friends are anime otakus so when I came to school with onigiri they were asking me where I got it and I was proudly able to say,
"I made them myself!"
I never would have thought of making it that way.
I just have a question:
Is it okay to eat rice that's been in your locker since morning when you pulled it out of the fridge at your house before you came to school and now has gone to room temperature? Or do you need to use ice or cool packs to keep it cold and eat it that way? (I can't freeze it and then use a microwave or any heating device.)
I want to make sure I''m not going to get sick or anything and the rice is always just in a room temperature bento in the animes so. . .
I would really appreciate it if someone answered my question.
Arigatou!
maki
2 September, 2008 - 03:08
Permalink
Check out the Onigiri FAQ
Check out the (new) Onigiri FAQ page for the answer to this and many other onigiri questions!
P Hutchison
2 September, 2008 - 16:11
Permalink
Difficult this way
I may be the odd one out here; but I found this method very difficult to use. I prefer the traditional method; with using your hands.
I found that handling warm plastic or even cool rice in plastic was a hassle. I don't have time for hassles. So I did it by hand and it worked perfectly. They all turned out the same size and I found I could evely add the salt in; where as with the plastic, the salt would concentrate no matter now much I shook the cup or turned it or anything. Also, when I make these, I use about a half a pinch or salt, if that.
But the good news is, my mother loves these and now she eats lunch, which she never did before.
Ann M
8 September, 2008 - 01:03
Permalink
I did it! Thank you!
I'm so excited! I just made my first onigiri, and they looked (and tasted!) fantastic!!!!! I love to cook, and while my dishes (usually) taste great :), presentation has always been a BIG weak spot for me. But this method turned out just beautiful-looking onigiri, I'm just thrilled! My boyfriend said it had turned out "surprisingly successfully" and he yummed them down quick as a wink. Thank you so much for all the great info, I'm really happy to have finally given onigiri a try!
Cynthia
17 September, 2008 - 17:53
Permalink
This was extremely helpful!!
This was extremely helpful!! I had my first onigiri from an Ito Yokado store in Beijing, and I've been hooked ever since. I've recently had a craving for it, but with no place selling onigiri in my area, I had to resort to making it myself. Following your instructions made it so easy! I just used a ramekin, risotto rice, and tuna with mayo. I'll definitely start making this more often and try different fillings.
Juli
21 September, 2008 - 16:04
Permalink
I followed your instructions
I followed your instructions to a T and had an amazing turnout for my first attempt at onigiri! Thanks for posting all the info step by step! I've never been the best of cooks, but if there's an easy to follow guide, I can make some pretty tasty stuff. I can't wait to make these for my bento. I will be the rave of my Intro. to Japanese class.
MitarashiDango
24 September, 2008 - 15:37
Permalink
I cooked some teriyaki beef
I cooked some teriyaki beef and shiitake mushrooms for keepsakes and found out that I cooked too much rice. Rather than dividing them into batches, I made them into teriyaki mushroom beef onigiri. My onigiris turned out rather large because of I used a 250ml cup (the standard Australian size).
Much thanks to your site, Maki-san!! I really enjoyed making these and my housemate wanted me to keep one for her!
machina
17 October, 2008 - 23:43
Permalink
I made these last week and
I made these last week and they came out perfectly! Thanks for this great idea. I made some with umeboshi and some with tuna. Your rice cooking instructions were perfect too! Thanks again.
Savvie
23 November, 2008 - 06:27
Permalink
So tasty!
I just made this after contemplating the recipe a few times, and it turned out awesome!
I made it with the Press N Seal wrap with the sticky side in the cup. That way the cling stuck to the cup enough to not sink underneath the weight of the rice. I'll try some with regular plastic wrap later, since the Press N Seal doesn't mold all that well. I think I'll also try it with tuna+mayo+soy sauce and a teeny avocado slice.
Thank you for the recipe!
SheWolf
9 December, 2008 - 05:47
Permalink
Amazing! Thanks so much!
I made my rice and chicken dinner tonight, and decided to try the cup method. I used cheap store brand extra-long grain rice, and it worked! The rice stuck together! My 3 year old was able to eat one without needing a spoon to do it!
Thank you so much! I don't know if the rinse did it, or just using plastic wrap instead of my hand did it, but somehow, it turned out. And I even got some adorable triangles!
Now I have a lunch that's not microwaved or a sandwich.
Amanda
28 January, 2009 - 18:56
Permalink
Re: Onigiri (Omusubi) revisited: An easier way to make ...
Arigato Gozaimasu!
Konnichiwa. Hanjimemashite!
Genki desu ka?
O namae wa Amanda!
Yoroshikun Onegai Shimasu!
Lol, this is a late reply... but just saying thanks for the recipe! I'm only 11, but I do want to try it myself. And no, I'm not Japanese -- Chinese, that's me! I have people (that know my last name!) ask me if I'm Japanese. I'm like... No. Look at my last name! LOOOK!
Yeah... Kinda off topic, lol. I only know tiny bits of Japanese (from watching a overly obsessive amount of anime)
Well, sayonara! =)
Chibi Chikari
7 February, 2009 - 14:26
Permalink
About toasting...
You said that you could toast the rice in a toaster. Well, I have a toaster oven and I was just wondering if that would work just as well.
maki
7 February, 2009 - 20:25
Permalink
Re: About toasting...
I meant a toaster oven really. It would be a bit hard to fit an onigiri in a slot-type toaster ^__^;
Ashe
18 February, 2009 - 03:18
Permalink
Simple and wonderful! Thank you!
I found this site about a week ago, and it got me back in the idea of trying to make a bento. I bought a bento box three years ago (I was 14), but I couldn't figure out how to make anything. I came across this site looking for bento recipes since I got interested again, and I can't thank you enough!
I tried out what seemed to be the easiest for me, which was the onigiri. I used this plastic method, and it was so easy! I just got done making them, and I'm munching on one now :3
I'll be starting on some other recipes from this site later this week. Thank you for this recipe, and this website!
Usagi21163
23 February, 2009 - 00:55
Permalink
Re: Onigiri (Omusubi) revisited: An easier way to make ...
Hi Maki-san,
Thank you for your site. Everyone here is so creative and I hope to learn and be inspired (well I have already been inspired...). I have always made omusubi by hand so I tried this method and it actually turned out great. I immediately taught my daughter (10) and niece (13) since they love rice. My daughter loves umeboshi so you know what her first filling was??! My husband also commented that he thought this was a very sanitary way to make them. I like that you can eat them right away, or if you choose, you can either freeze them or put them in your lunch for later since they are already wrapped. Take care.
Nick
26 February, 2009 - 02:35
Permalink
Re: Onigiri (Omusubi) revisited: An easier way to make ...
I finally made myself some authentic ramen last week, I guess it is time for onigiri. I'll update if I'm able to make one with out smashing it with my fist first.
anon.
5 March, 2009 - 17:15
Permalink
Re: Onigiri (Omusubi) revisited: An easier way to make ...
wooo~ another great thing to keep in my receipe box!
Satsuki
9 March, 2009 - 19:29
Permalink
Onigiri Rice
I wasnt able to find japanese rice or sushi rice, but i did find pearl rice, now im wondering if maybe it will work or if i need to go and search some more? Thanks alot!
Michael
17 March, 2009 - 20:44
Permalink
Re: Onigiri (Omusubi) revisited: An easier way to make ...
Just made my first batch and that has to be the best time ive had in a kitchen for a long time (Im a chef.) Never could get these right cheers for the tip. I flaked some tuna and mixed it into the rice then made them yaki onigiri, was really good. one of those, one with umeboshii and a bowl of homemade miso and i am one happy chap.
XxbabeygirlangelxX
14 May, 2009 - 04:07
Permalink
Re: Onigiri (Omusubi) revisited: An easier way to make ...
i just tried to make sticky rice well omusubi i made a cat head shape and a heart shape and batman ^^ lol it was so fun and my mom tried it and she said they were to cute to even eat but they were tasty
anon.
14 May, 2009 - 22:44
Permalink
Re: Onigiri (Omusubi) revisited: An easier way to make ...
The picture on the top looks like Rice Krispie Treats :) lol
faechildmom
15 May, 2009 - 04:23
Permalink
Re: Onigiri (Omusubi) revisited: An easier way to make ...
I made some really good onigiri this morning. I took 3/4 cup strawberries chopped up and 3/4 cup sugar and let them soak to make a syrup. Then I drained the syrup out and let the strawberries dry out a little. When I had the rice I put a little surgar in with it then added the strawberries in the middle it was really really good.
Drogum
25 May, 2009 - 05:04
Permalink
Re: Onigiri (Omusubi) revisited: An easier way to make ...
Any tips on grilling these? I remember as a kid some Japanese friends used to grill these on the Hibachi. Do they need to be oiled or anything like that before placing on the grill?
Jesse
26 May, 2009 - 17:39
Permalink
Re: Onigiri (Omusubi) revisited: An easier way to make ...
Thanks for posting this method. I'm terrible at portioning, and this way I get it perfect every time. I recently moved back to Canada from Japan, and I already miss the food :(
confused
24 June, 2009 - 16:22
Permalink
Re: Onigiri (Omusubi) revisited: An easier way to make ...
can I ask something?
it's really hard to find ingredients in my place as I live in the Philippines. I was wondering if I could use our type of rice here? it ranges from long grain to medium grain rice. can I also omit the vinegar thing you add to the rice because it's kind of expensive here if you'll only use it for this sort of thing. also, we have a different kind of rice cooker here, is your way of cooking rice with a rice cooker applicable to our type of rice cooker? sorry for the oh so long inquiries because I really want to surprise my family with this onigiri recipe. Thanks and more power!
p.s. hope you can reply c:
Chelsea
24 June, 2009 - 21:04
Permalink
Oh so good....
I taught English in Korea a few years ago and ate a "tuna triangle" almost everyday from 7-11. When I came back to California I could never find them but I craved them all the time. Skip eight years ahead and this time I am five months pregnant and on vacation in Japan (June 2009) and low and behold gorge on more tuna triangles at Lawson's and 7-11... so exciting! When I got home yesterday I was craving onigini and googled recipes, getting your site. I made the rice exactly as described and used the spicy tuna filling and oh wow, I am in heaven. Wrapped with nori right before eating, dipped in a little shoyu and I am right back in Japan. Thanks for a killer recipe, exact directions, and pictures, I will share it with everyone! I am so happy I live in the San Jose/SF Bay area with a top notch Asian market in almost every city. All the sushi rice, nori, and ingredients a gaijin could ever want! haha
rachel
25 June, 2009 - 08:09
Permalink
Re: Onigiri (Omusubi) revisited: An easier way to make ...
i've made onigiri following the plastic wrap method, and i absolutely love it! i do make mine somewhat bigger, and put more filling in, though. for me, the bowl method doesn't work as well as patting the rice down on a flat counter surface, though. but to each his own! (;
i make mine usually with a mayo-tuna combination(flavored with ground black and red peppers), occasionally grilled salmon if i have the time, and i want to start taking them to school in the fall. however, it takes about four to five hours until i can actually eat them! do you think the tuna would be able to keep until then? i'm too scared to try it and see for myself; i would hate to waste such good onigiri, and i'm too impatient to wait!
do you think i could eat my onigiri cold/room temperature, too? o:
also,
can anyone recommend any fillings that would keep for that long?
8D Garets
28 June, 2009 - 07:01
Permalink
Re: Onigiri (Omusubi) revisited: An easier way to make ...
I Was Just Wondering,How Do You Roast the Nori? Im Gonna Make Onigiri Soooon
Britany
29 June, 2009 - 03:39
Permalink
Re: Onigiri (Omusubi) revisited: An easier way to make ...
About the fillings, I can't eat meat or fish so I usually eat them plain or use umeboishi(pickled plums) but lately I haven't got any pickled plums at a good price. Could I use scallions as a filling?
jessica
14 July, 2009 - 04:03
Permalink
Re: Onigiri (Omusubi) revisited: An easier way to make ...
thats really great and works well but instead of putting water in the bowl i used a little bit of warm sake for flavor and came out very yummy. the flavor of the sake isn't very strong but i guess you would have to like the taste o sake to like it. thanks alot or the tips.
Felicia
29 July, 2009 - 09:14
Permalink
Re: Onigiri (Omusubi) revisited: An easier way to make ...
Making onigiri this way is so much easier one of my favorite fillings to use is Miso paste not too much but a little goes a long way and it add a perfect saltiness to the onigiri! You must try it because it is so.... good!
Rebecca
1 August, 2009 - 13:45
Permalink
Re: Onigiri (Omusubi) revisited: An easier way to make ...
I'm still confused about just one thing. Are onigiri made with sticky rice?
anon.
6 August, 2009 - 09:07
Permalink
Re: Onigiri (Omusubi) revisited: An easier way to make ...
You are a genius. I have very bad luck with bento, onigiri, japanese cooking, cooking in general, but this may inspire me to "try, try again" . Thank you for taking the time to share.
Mk_sakura
24 August, 2009 - 22:31
Permalink
Re: Onigiri (Omusubi) revisited: An easier way to make ...
hi um its going to be my first time making rice balls and im confused on the fillings i want to add a fruity filling but is there a special filling you would use for it? i want it mixed so would i add jelly im confused please help me
i love japanese culture anime and would love to make the foods but it feels like living in the us itd be hard to come across the stuff you would buy at a japanese store
Briar
30 August, 2009 - 03:40
Permalink
Dessert Onigiri
Your easier way to make onigiri was wonderful. I have one suggestion to make for all those out there who grew up on rice pudding - you can make dessert onigiri by replacing the filling with a small spoonful (1/8 - 1/4 t) of sugar and a sprinkle of cinnamon. Totally not authentic, but for enterprising Americans who make every foreign dish their own, it works great.
M_OiKha
27 September, 2009 - 09:36
Permalink
Re: Onigiri (Omusubi) revisited: An easier way to make ...
Erm...can onigiri's stay overnight??
Coz' my school starts at 7:10a.m and recess is at 'bout 10.
maki
28 September, 2009 - 01:48
Permalink
Re: Onigiri (Omusubi) revisited: An easier way to make ...
See the Onigiri Safety and Transport section of the FAQ.
maki
28 September, 2009 - 01:50
Permalink
Closing comments
I am closing comments here, since the same questions keep getting asked over and over. Maybe there are too many comments for people to read through. Most if not all your onigiri questions are answered in the Onigiri FAQ. If they are still not answered, then ask your question over there. Thanks!